Astro
Astro is a modern web framework for building ultra-fast, content-rich websites with zero JavaScript by default and seamless integration of your favorite UI components

What is Strapi?
Strapi is the leading open-source headless CMS offering features, like customizable APIs, role-based permissions, multilingual support, etc. It simplifies content management and integrates effortlessly with modern frontend frameworks.
Explore the Strapi documentation for more details.
What Is Astro?
Astro is a modern, open-source web framework designed for building fast, content-driven, SEO optimized, websites such as blogs, marketing pages, and e-commerce platforms.

Its standout “islands architecture” serves static HTML by default and only loads JavaScript for interactive components, delivering exceptionally fast load times and an improved user experience compared to traditional JavaScript-heavy frameworks.
Visit the Astro.js documentation for more.
Strapi and Astro.js Integration
The out-of-the-box Strapi features allow you to get up and running in no time:
- Single types: Create one-off pages that have a unique content structure
- Customizable API: With Strapi, you can just hop in your code editor and edit the code to fit your API to your needs.
- Integrations: Strapi supports integrations with Cloudinary, SendGrid, Algolia, and others.
- Editor interface: The editor allows you to pull in dynamic blocks of content.
- Authentication: Secure and authorize access to your API with JWT or providers.
- RBAC: Help maximize operational efficiency, reduce dev team support work, and safeguard against unauthorized access or configuration modifications.
- i18n: Manage content in multiple languages. Easily query the different locales through the API.
Learn more about Strapi features.
Setup Strapi 5 Headless CMS
We are going to start by setting up our Strapi 5 project with the following command:
🖐️ Note: make sure that you have created a new directory for your project.
You can find the full documentation for Strapi 5 here.
npx create-strapi-app@latest serverYou will be asked to choose if you would like to use Strapi Cloud we will choose to skip for now.
🚀 Welcome to Strapi! Ready to bring your project to life?

...

? Please log in or sign up.
  Login/Sign up
❯ Skip
After that, you will be asked how you would like to set up your project. We will choose the following options:
? Do you want to use the default database (sqlite) ? Yes
? Start with an example structure & data? Yes <-- make sure you say yes
? Start with Typescript? Yes
? Install dependencies with npm? Yes
? Initialize a git repository? Yes
Once everything is set up and all the dependencies are installed, you can start your Strapi server with the following command:
cd server
npm run develop
You will be greeted with the Admin Create Account screen.
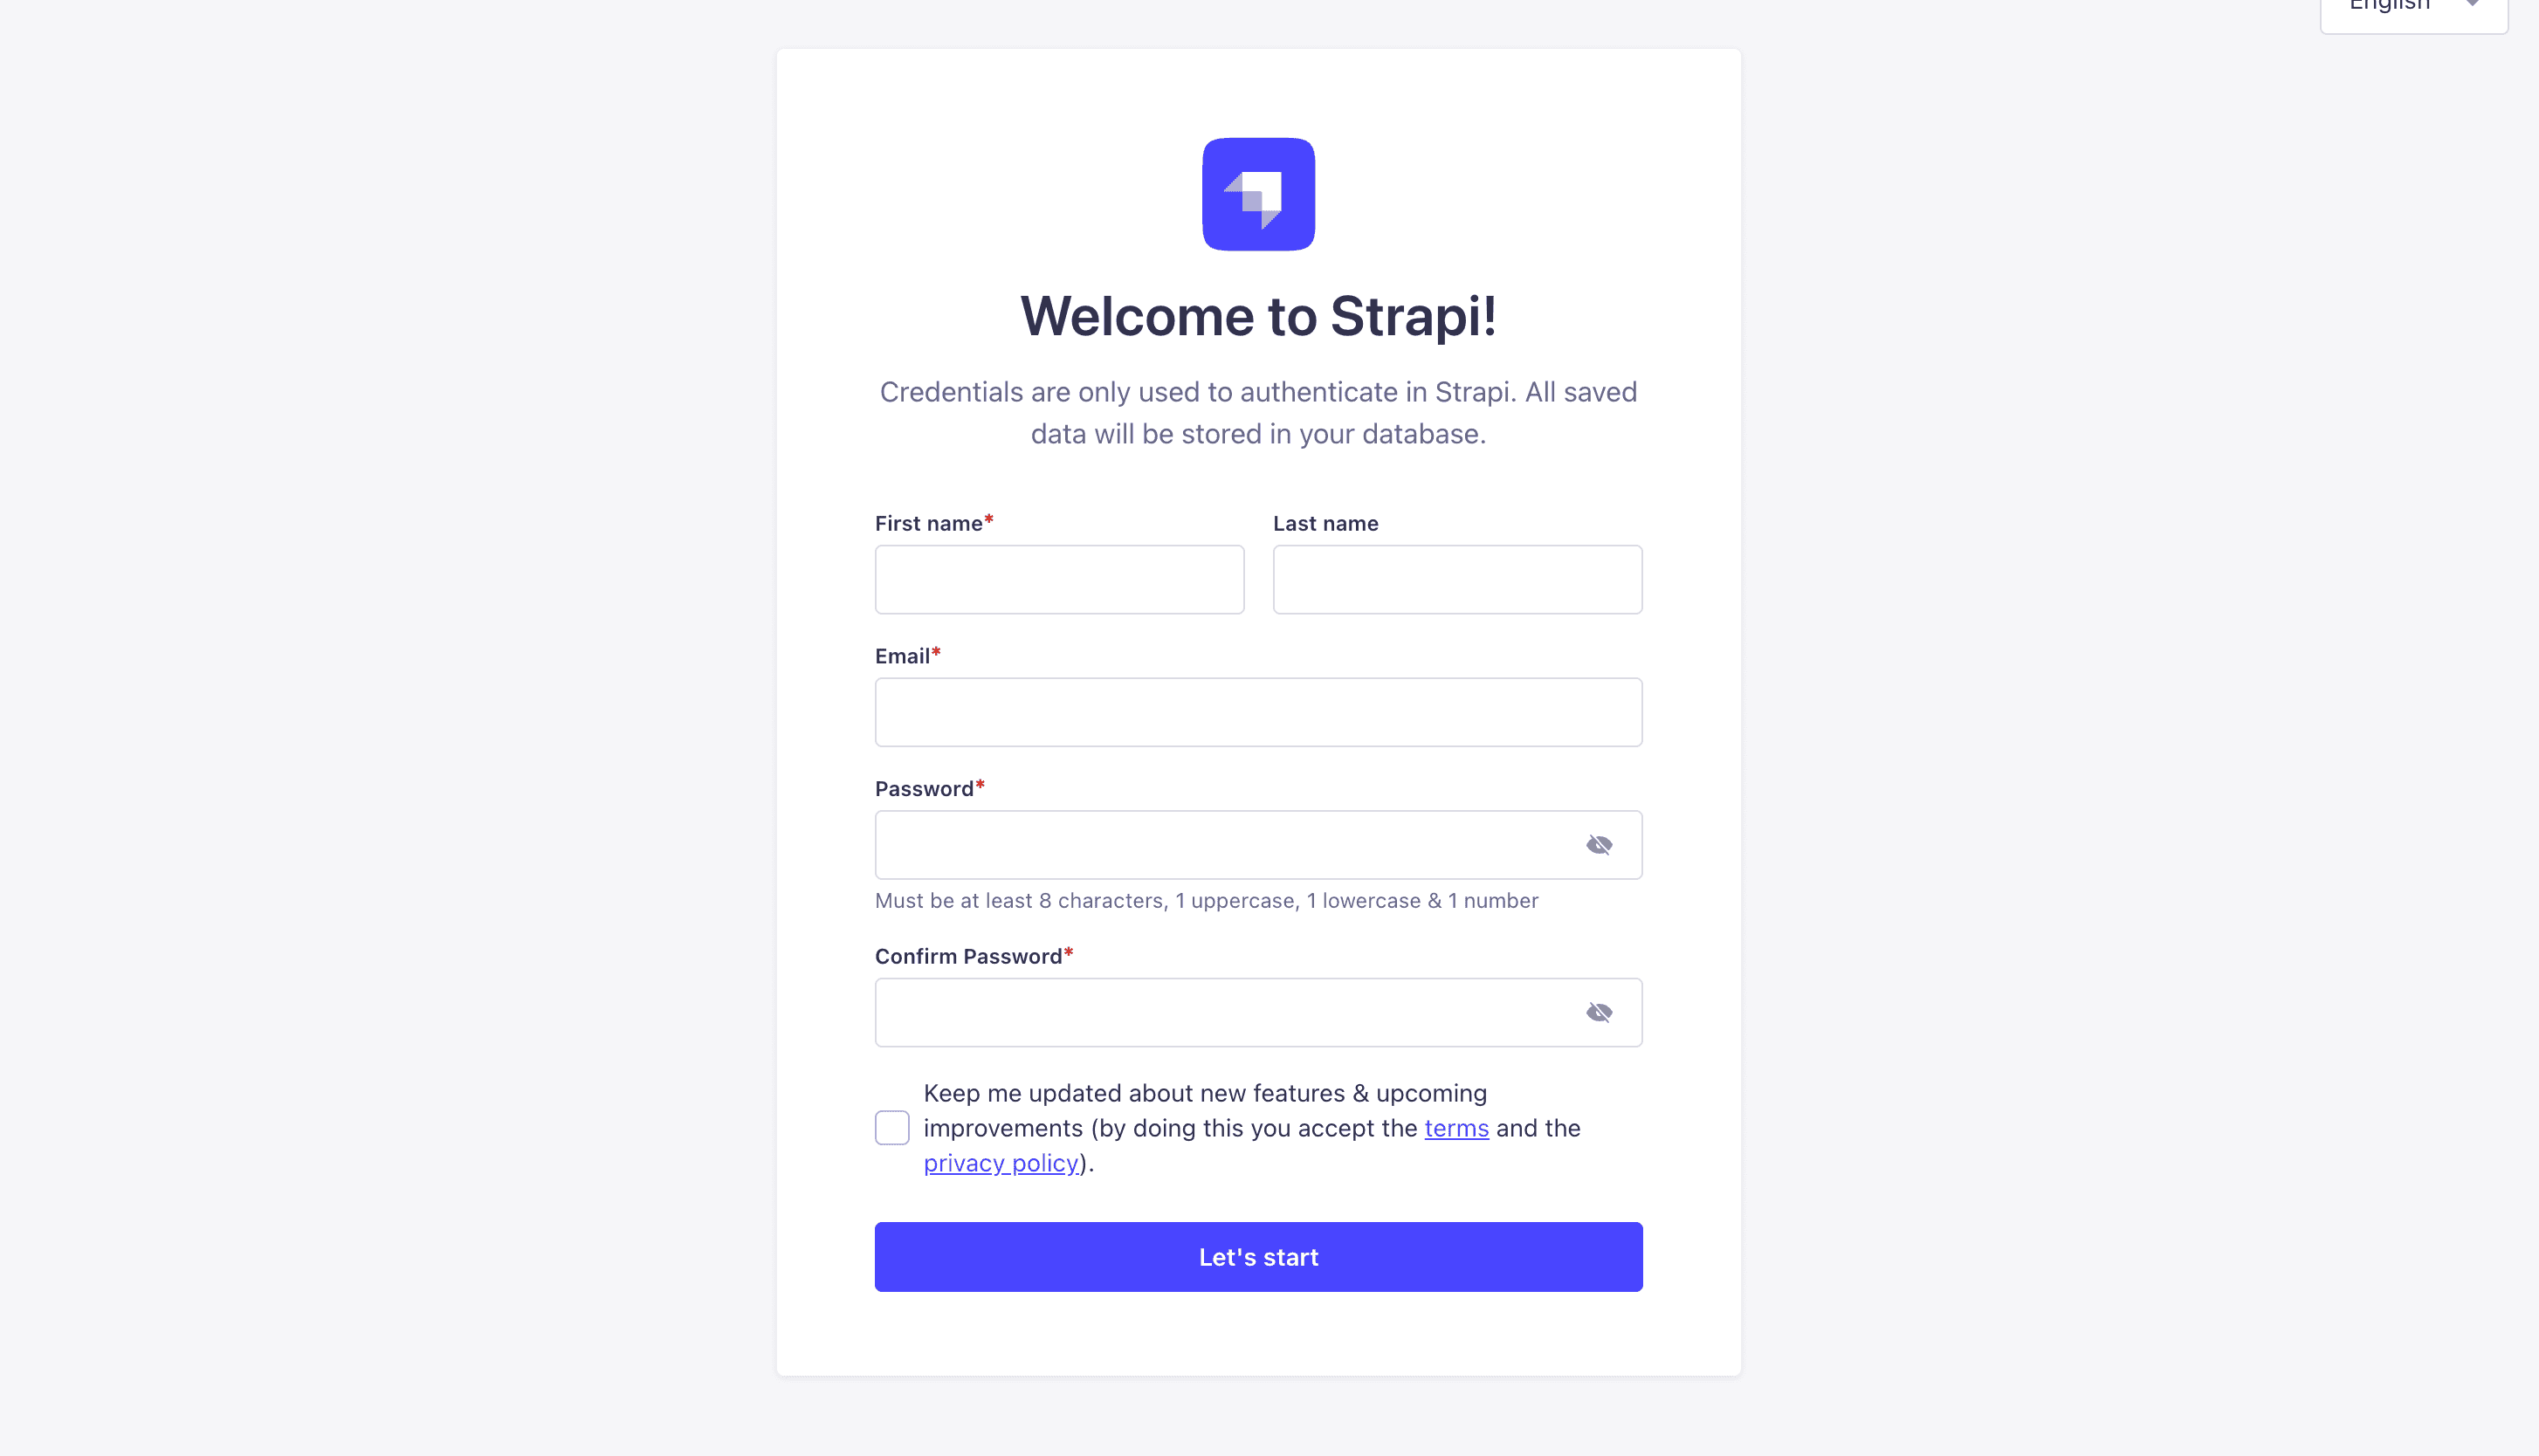
Go ahead and create your first Strapi user. All of this is local so you can use whatever you want.
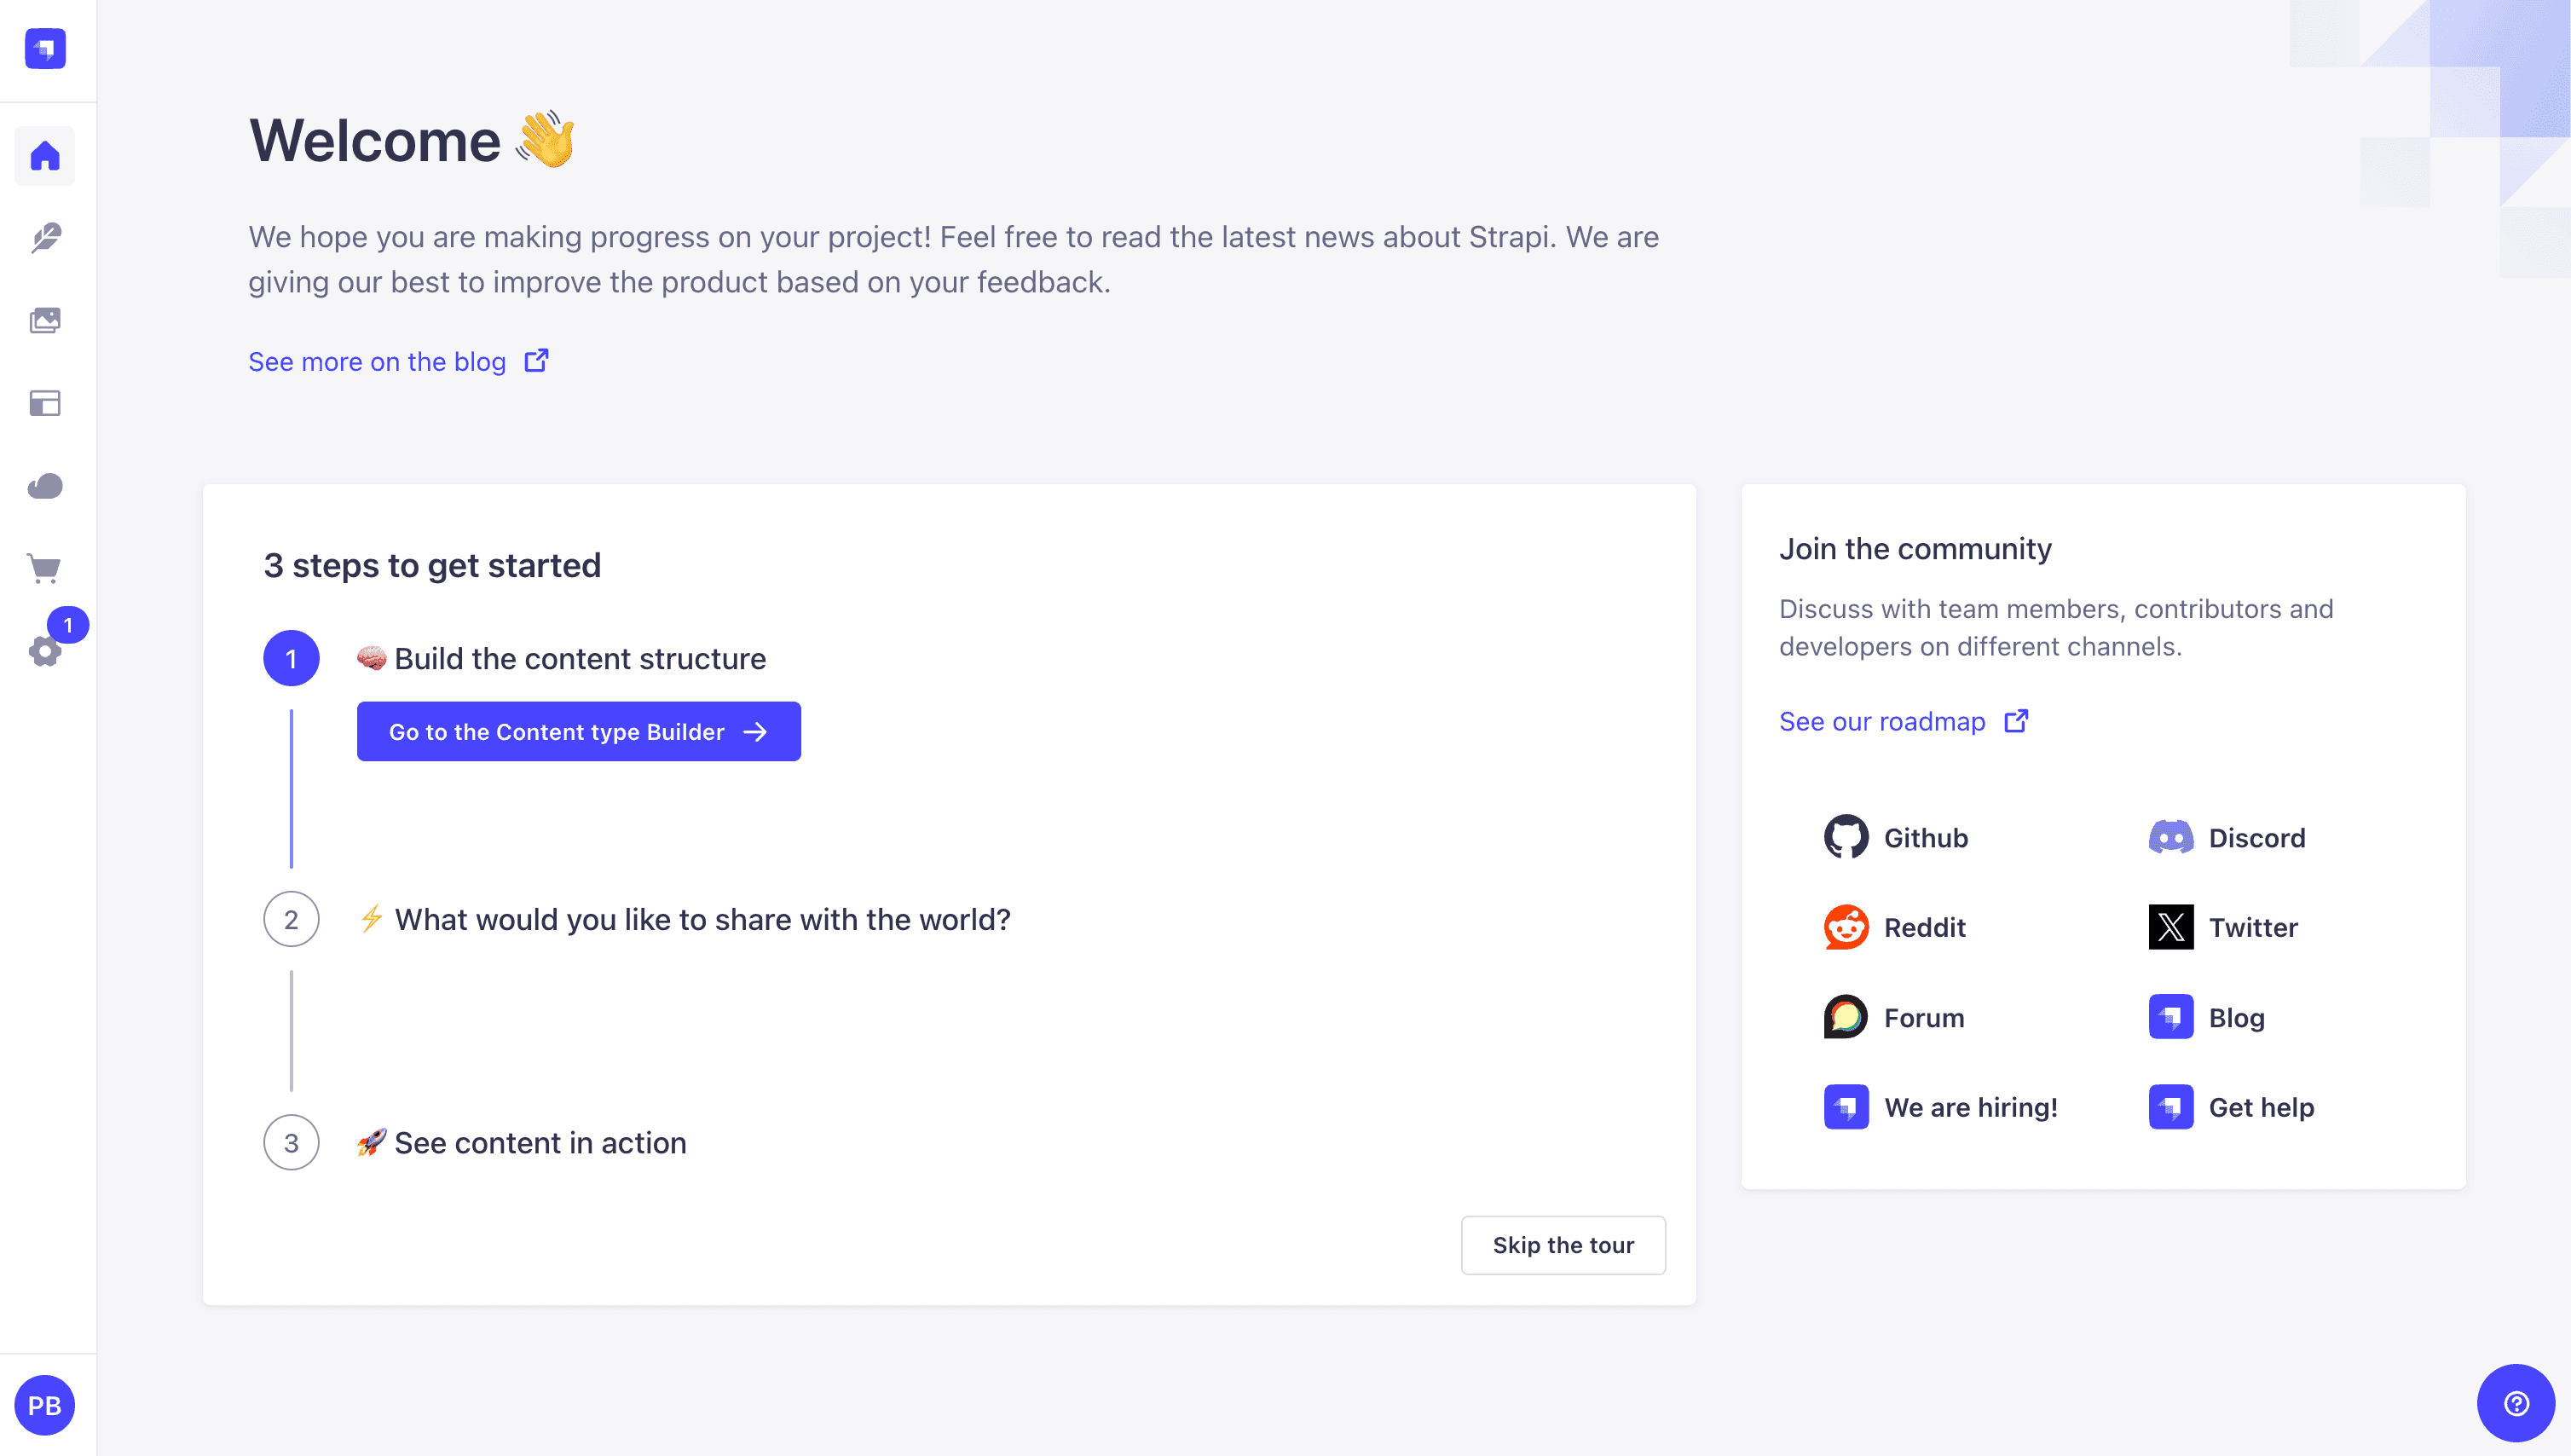
Once you have created your user, you will be redirected to the Strapi Dashboard screen.
Publish Article Entries
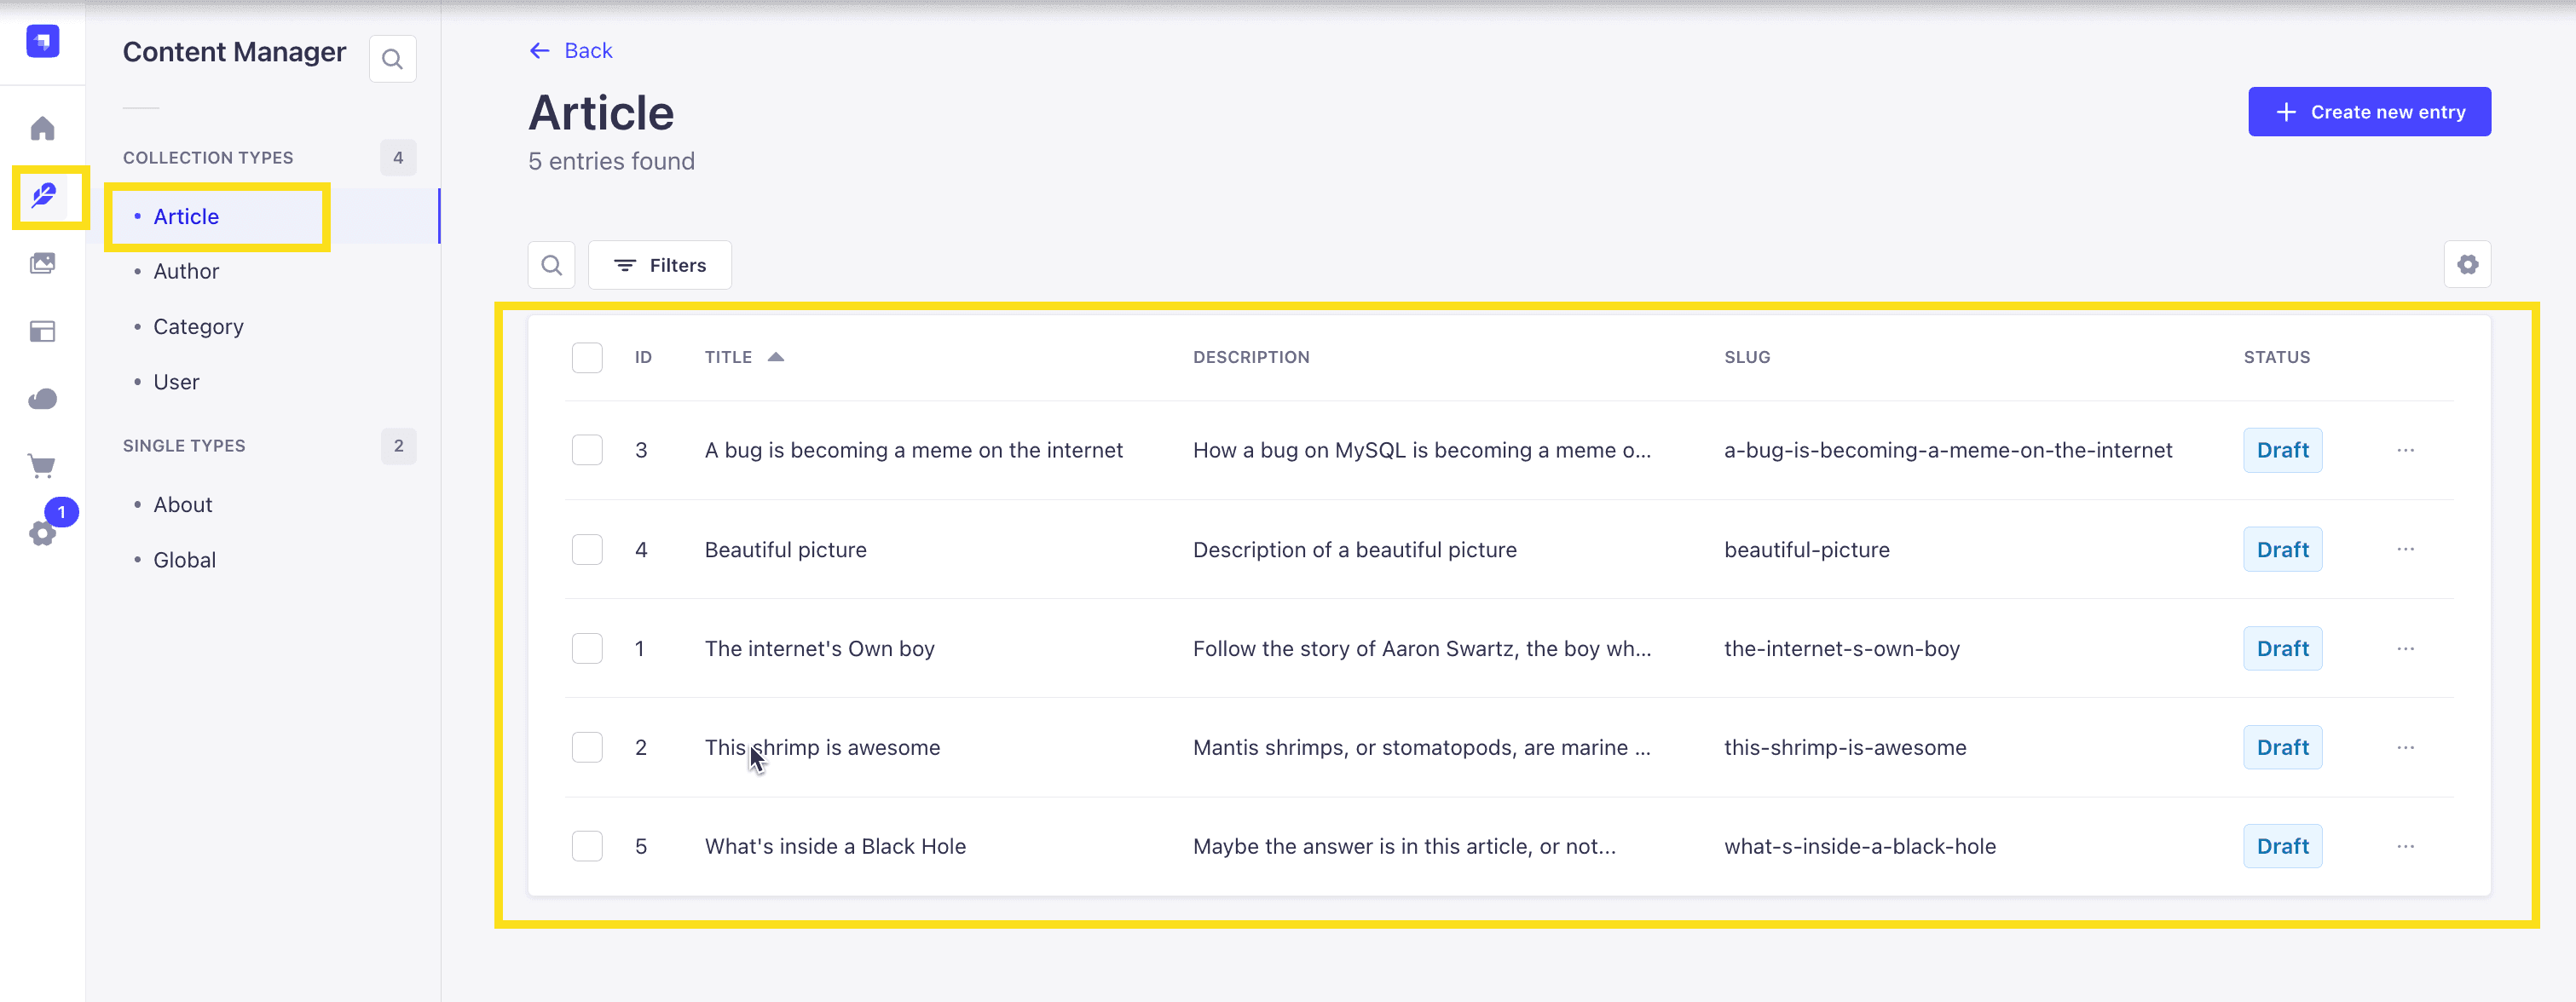
Since we created our app with the example data, you should be able to navigate to your Article collection and see the data that was created for us.
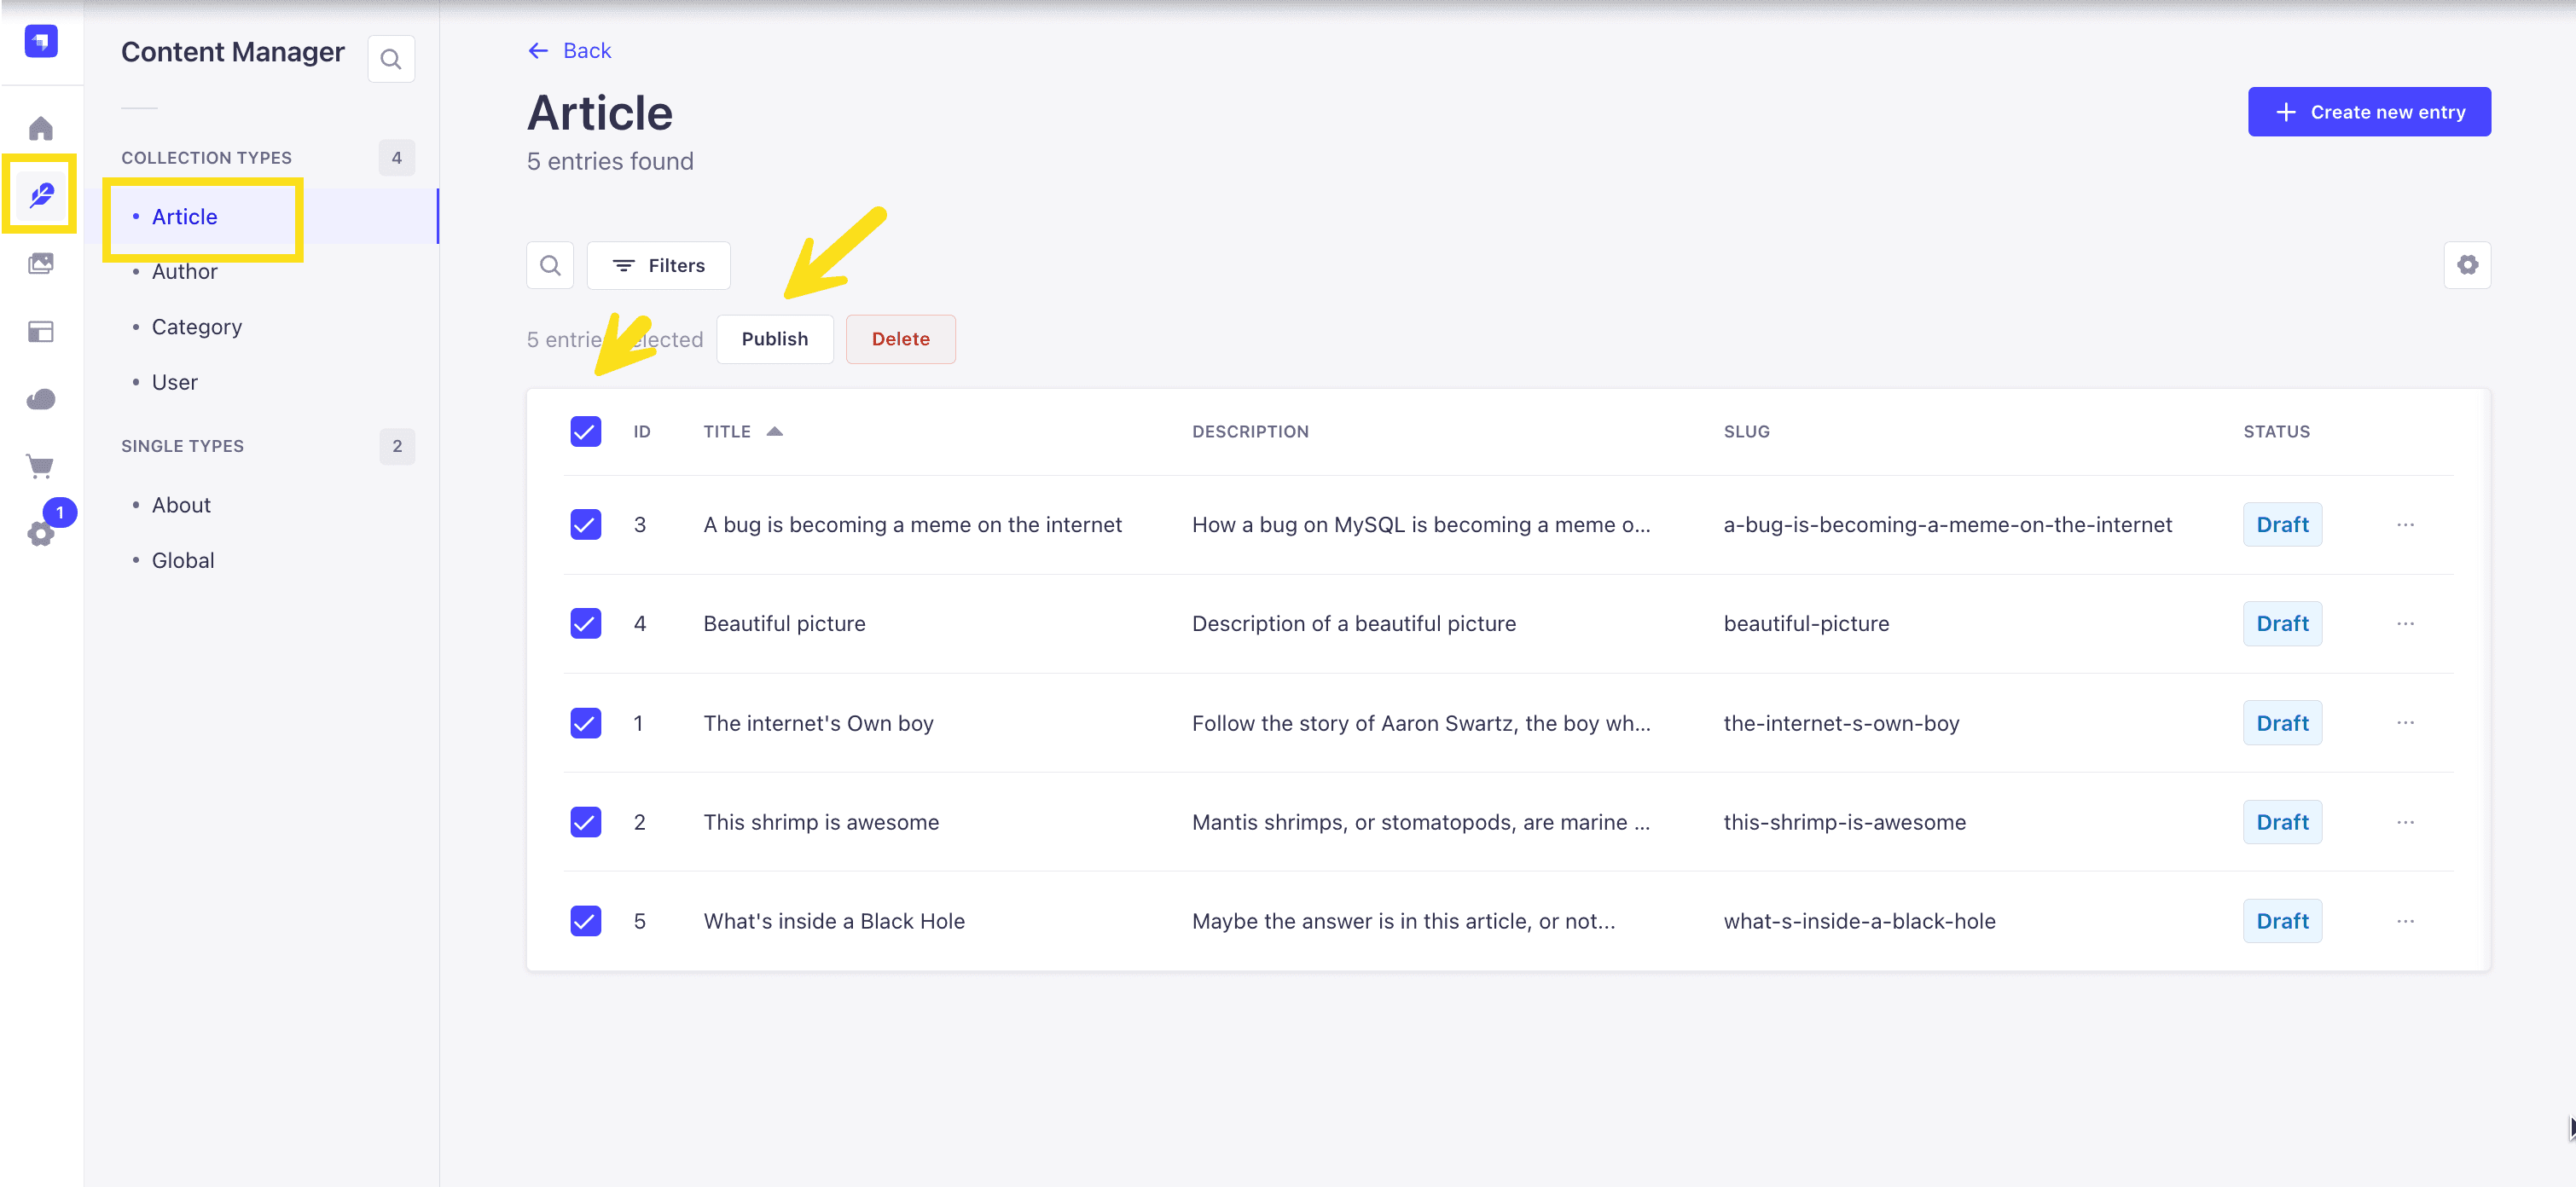
Now, let's make sure that all of the data is published. If not, you can select all items via the checkbox and then click the Publish button.
Enable API Access
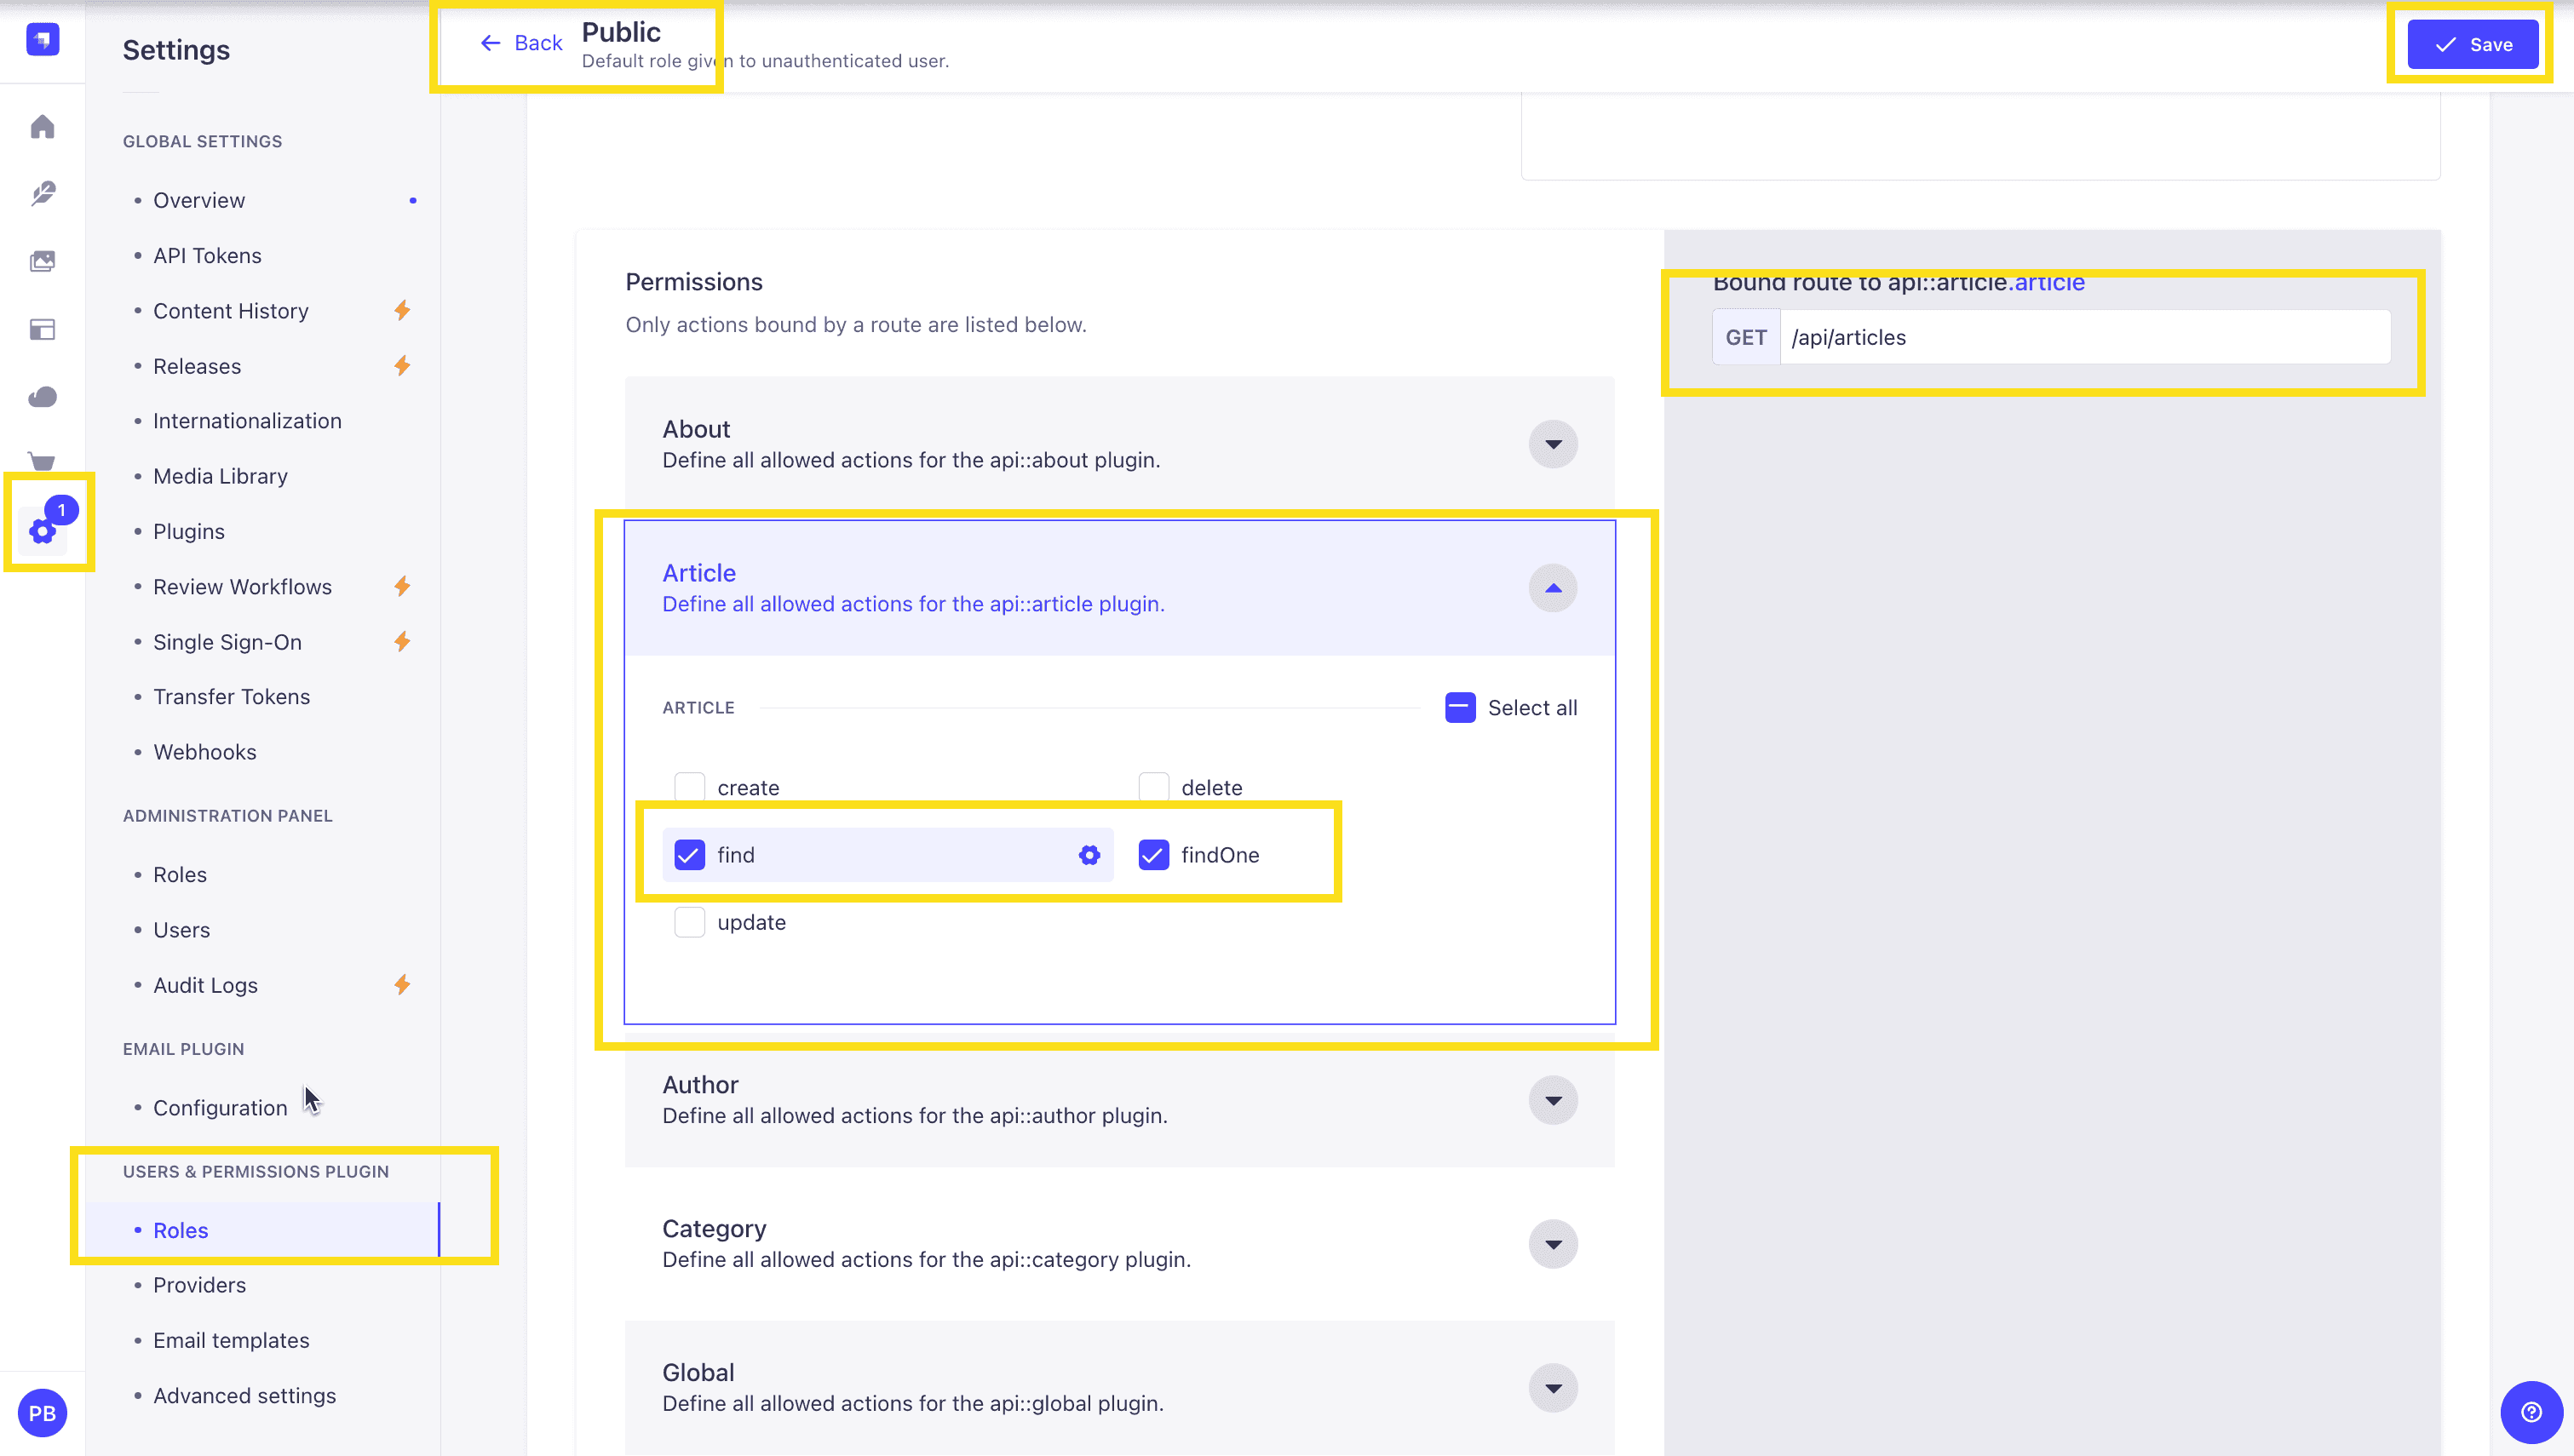
Once all your articles are published, we will expose our Strapi API for the Articles Collection. This can be done in Settings -> Users & Permissions plugin -> Roles -> Public -> Article.
You should have find and findOne selected. If not, go ahead and select them.
Test API
Now, if we make a GET request to http://localhost:1337/api/articles, we should see the following data for our articles.
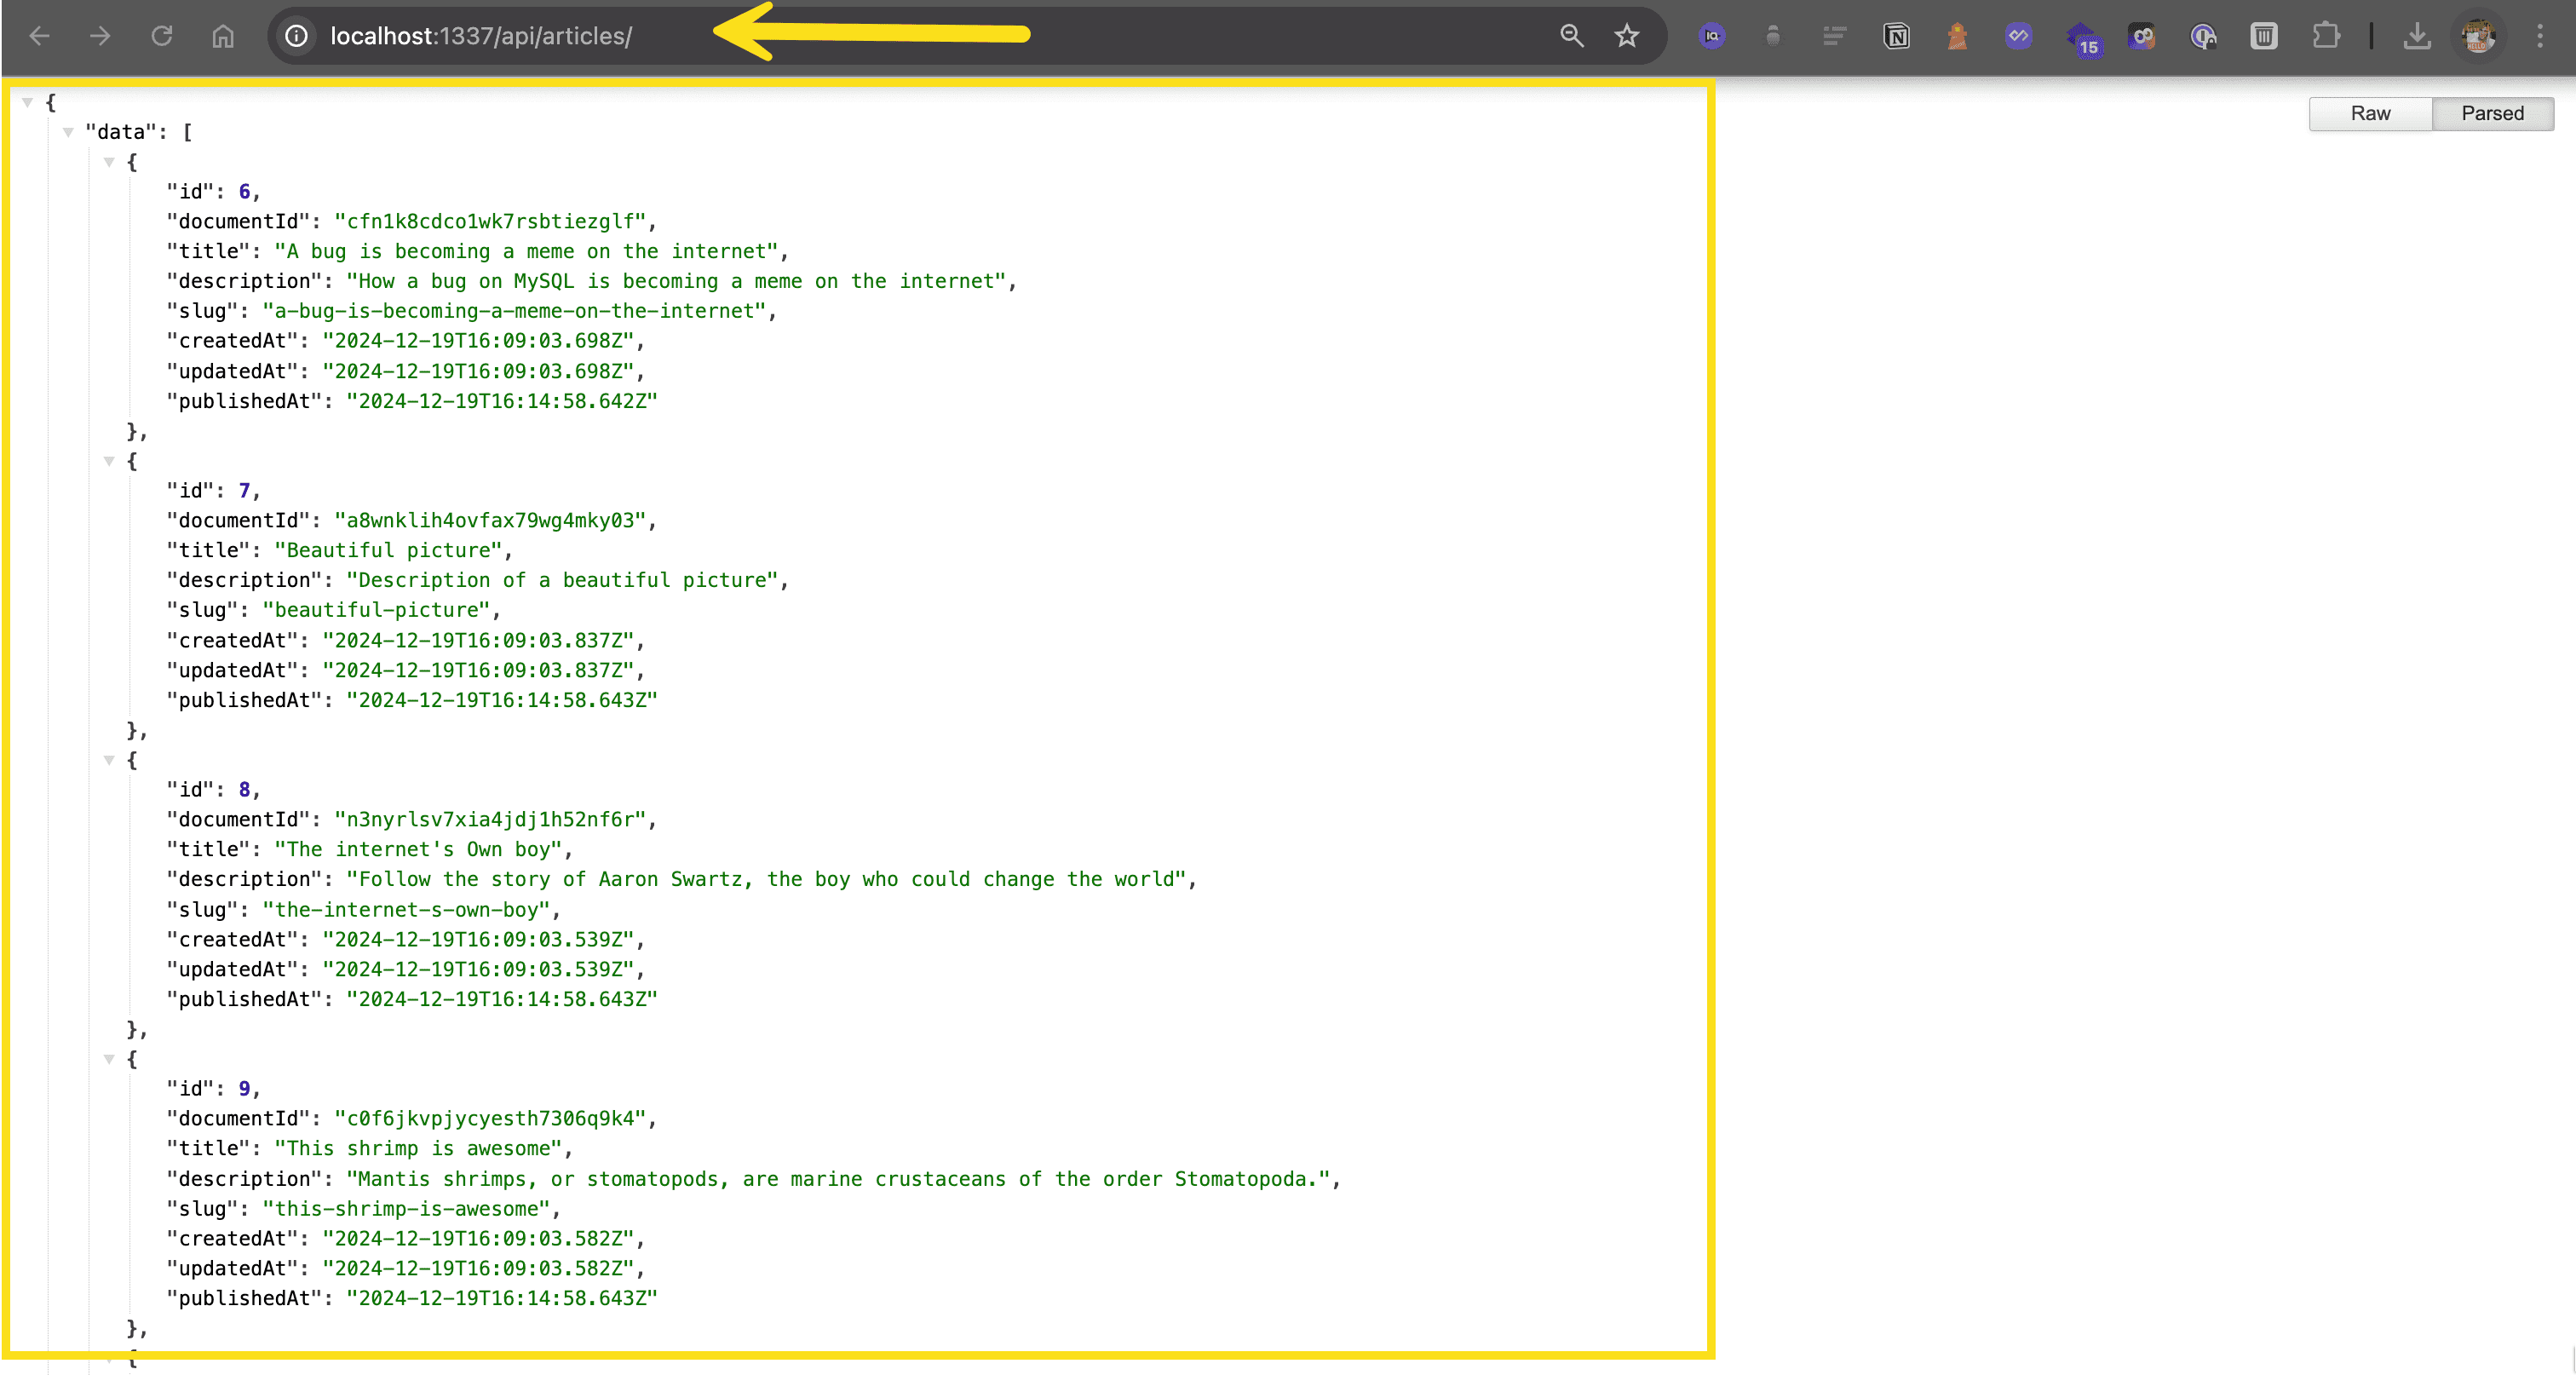
🖐️ Note: that article covers (images) are not returned. This is because the REST API by default does not populate any relations, media fields, components, or dynamic zones.. Learn more about REST API: Population & Field Selection.
So let's get the article covers by using the populate=* parameter: http://localhost:1337/api/articles?populate=*
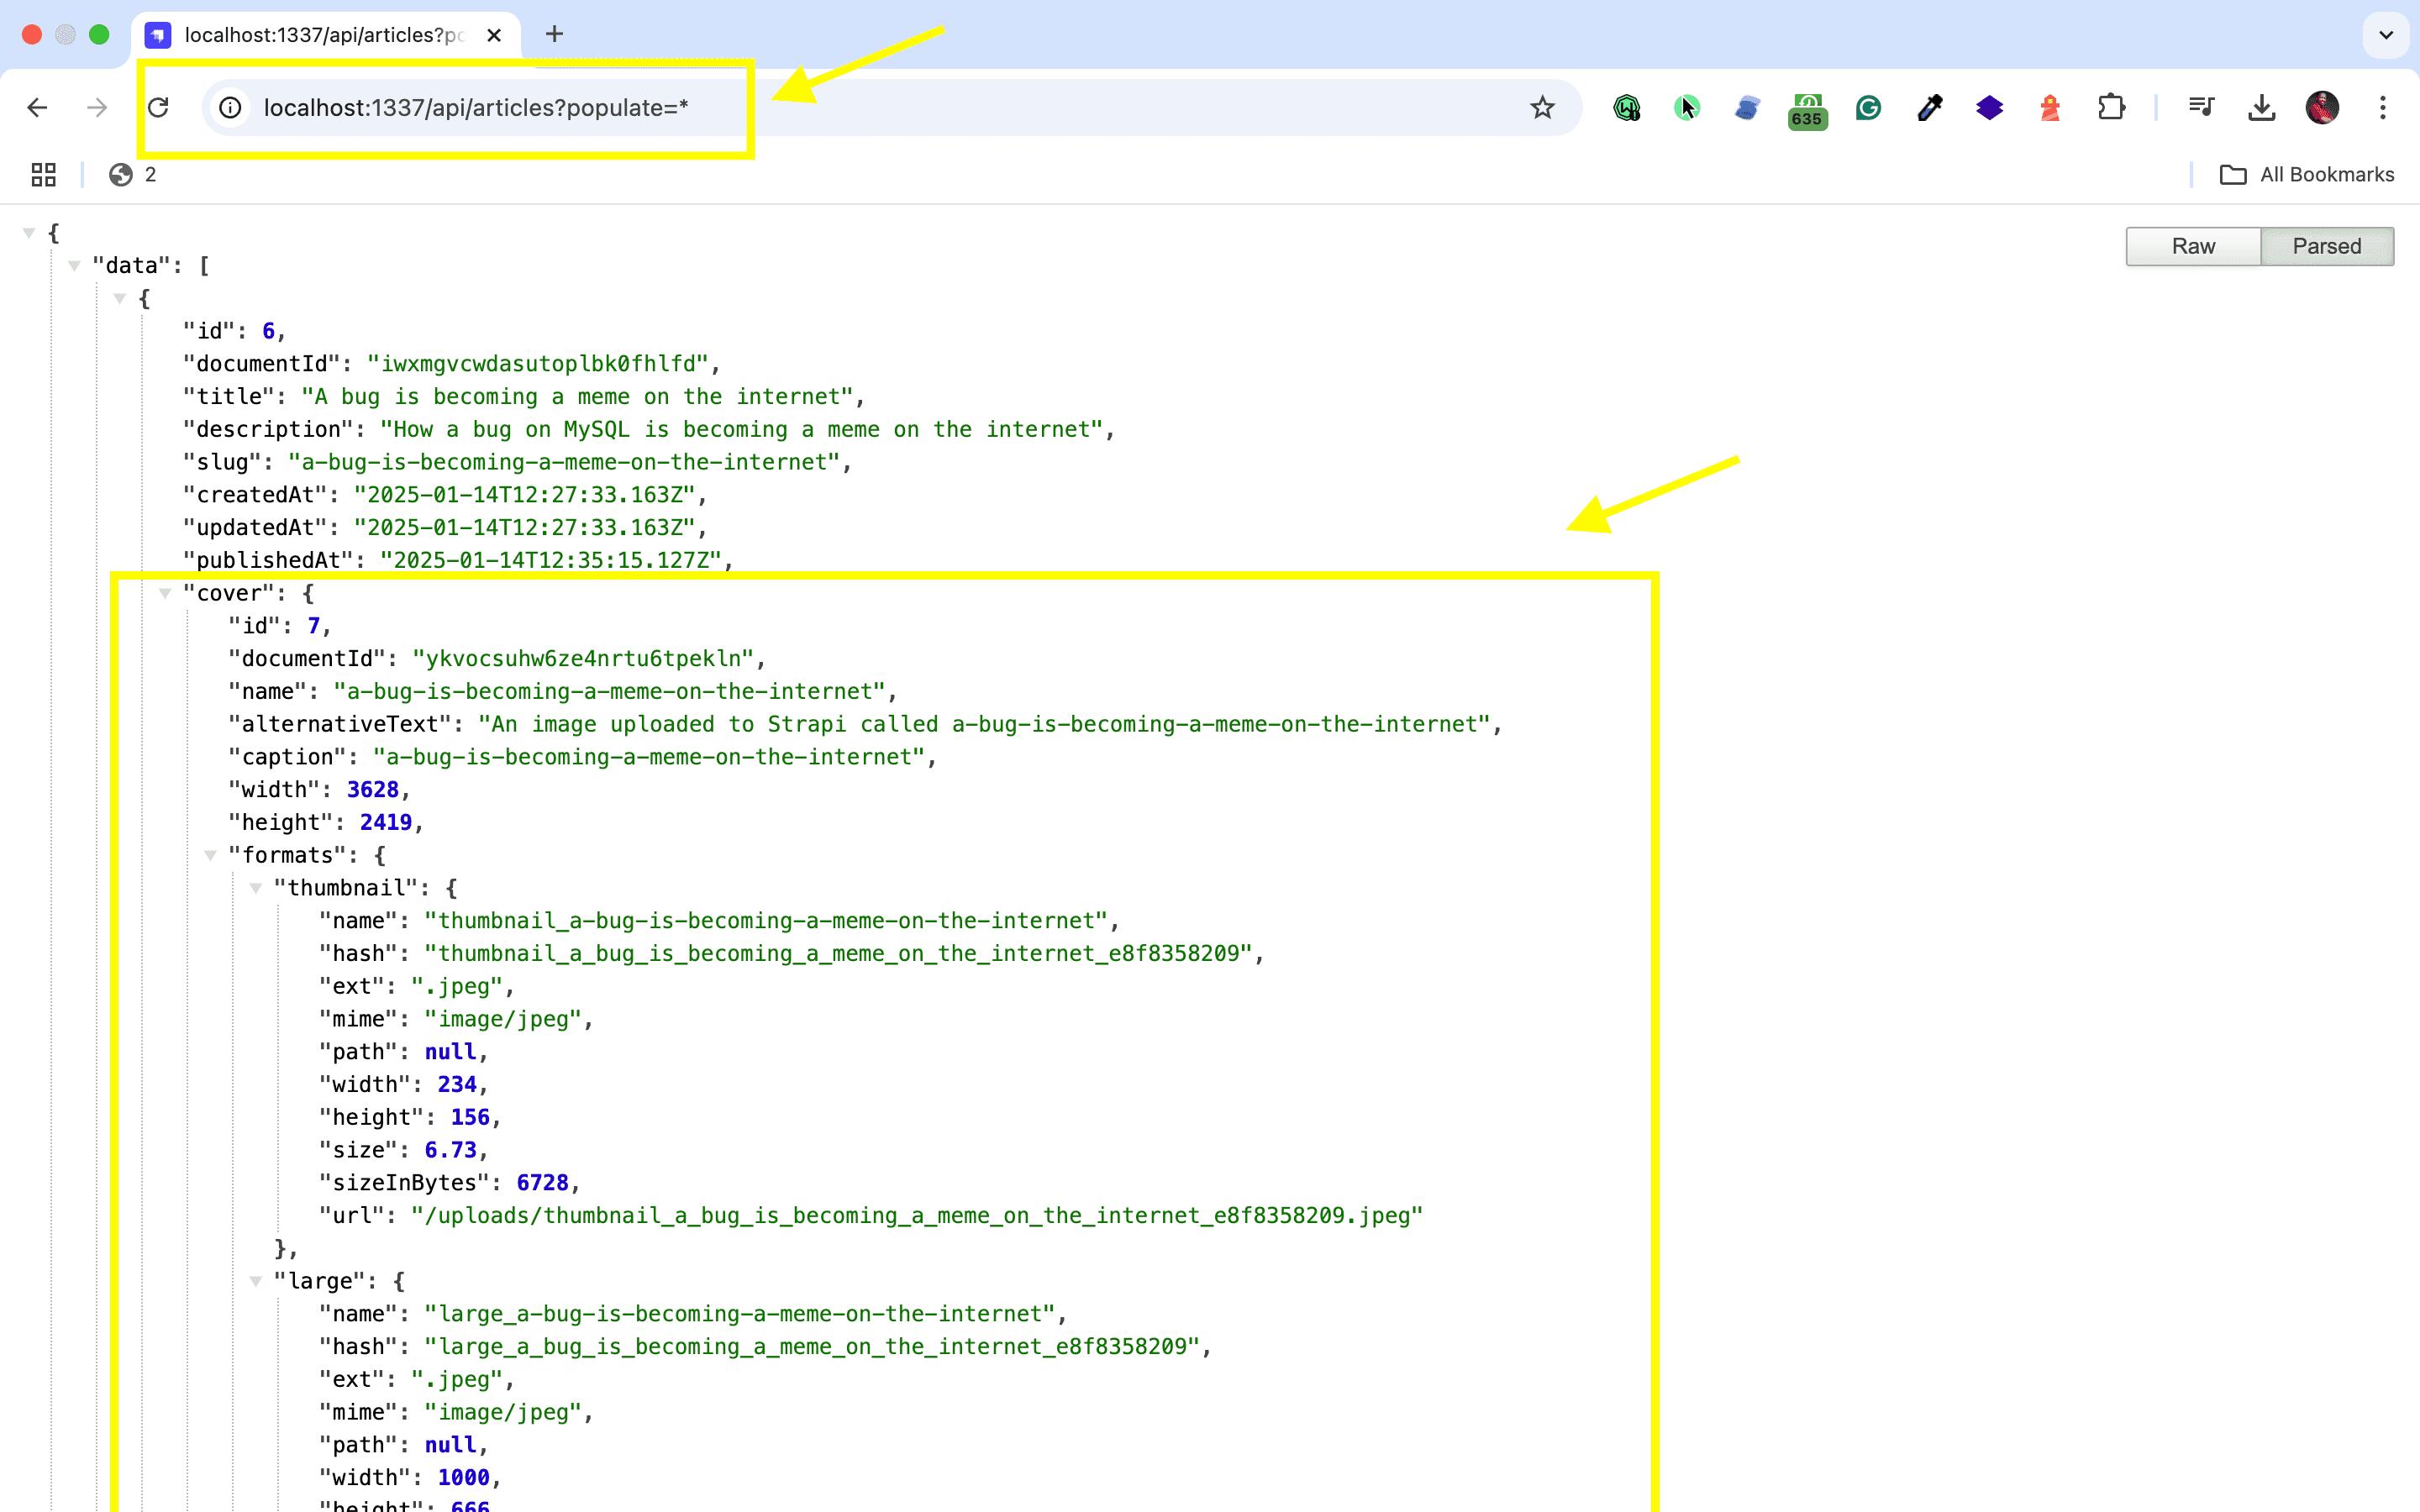
Nice, now that we have our Strapi 5 server setup, we can start to setup our Astro.js application.
Create an Astro.js App
It is recommended to use the npm create astro@latest, which sets up everything automatically for you.
npm create astro@latestDepending on your project setup, you will answer the following prompts:
aul@dev astro npm create astro@latest
Need to install the following packages:
create-astro@4.13.2
Ok to proceed? (y) y


> npx
> "create-astro"


 astro   Launch sequence initiated.

   dir   Where should we create your new project?
         ./client

  tmpl   How would you like to start your new project?
         A basic, helpful starter project

  deps   Install dependencies?
         Yes

   git   Initialize a new git repository?
         Yes

 ██████  Project initializing...
         ■ Template copied
         ▶ Dependencies installing with npm...
         □ Git

               ✔  Project initialized!
         ■ Template copied
         ■ Dependencies installed
         ■ Git initialized

  next   Liftoff confirmed. Explore your project!

 Enter your project directory using cd ./client
 Run npm run dev to start the dev server. CTRL+C to stop.
 Add frameworks like react or tailwind using astro add.

 Stuck? Join us at https://astro.build/chat

╭─────╮  Houston:
│ ◠ ◡ ◠  Good luck out there, astronaut! 🚀
╰─────╯
Nice, now that we have the project setup, let's install Tailwind CSS.
Let's add Tailwind with the following command npx astro add tailwind.
paul@dev astro npx astro add tailwind

Need to install the following packages:
astro@5.16.9
Ok to proceed? (y) y

✔ Resolving packages...
15:00:11 [add] Unable to locate a config file, generating one for you.

  Astro will make the following changes to your config file:

 ╭ astro.config.mjs ─────────────────────────────╮
 │ import { defineConfig } from 'astro/config';  │
 │ import tailwindcss from '@tailwindcss/vite';  │
 │ // https://astro.build/config                 │
 │ export default defineConfig({                 │
 │   vite: {                                     │
 │     plugins: [tailwindcss()]                  │
 │   }                                           │
 │ });                                           │
 ╰───────────────────────────────────────────────╯

  To run this command without prompts, pass the --yes flag

✔ Continue? … yes

   success  Added the following integration to your project:
  - tailwind

   action required  You must import your Tailwind stylesheet, e.g. in a shared layout:

 ╭ src/layouts/Layout.astro ──────╮
 │ ---                            │
 │ import '../styles/global.css'  │
 │ ---                            │
 ╰────────────────────────────────╯
Make sure to import tailwindcss into src/styles/global.css to make Tailwind classes available to your Astro project.
src/styles/global.css
@import "tailwindcss";Import this file in the pages where you want Tailwind to apply. This is often done in a layout component so that Tailwind styles can be used on all pages sharing that layout:
src/layouts/Layout.astro
---
import "../styles/global.css";
---
Nice, we are now ready to build our app.
Data Loading In Astro with Strapi
There are several ways to load data from Strapi in your Astro application. Let's explore three common approaches:
- Using Fetch Directly - The simplest approach using the native Fetch API
- Using the Strapi Client SDK - A typed client for interacting with Strapi APIs
- Using the Strapi Loader - An Astro content loader for Strapi collections
But first, let's define our TypeScript types for type safety across all methods.
TypeScript Types for Strapi Response
Create a types file to define the structure of your Strapi API response:
src/types/strapi.ts
interface Image {
  id: number;
  documentId: string;
  name: string;
  alternativeText: string;
  width: number;
  height: number;
  url: string;
  createdAt: string;
  updatedAt: string;
  publishedAt: string;
}

interface Author {
  id: number;
  documentId: string;
  name: string;
  email: string;
  createdAt: string;
  updatedAt: string;
  publishedAt: string;
}

interface Category {
  id: number;
  documentId: string;
  name: string;
  slug: string;
  description: string | null;
  createdAt: string;
  updatedAt: string;
  publishedAt: string;
}

interface RichTextBlock {
  __component: "shared.rich-text";
  id: number;
  body: string;
}

interface QuoteBlock {
  __component: "shared.quote";
  id: number;
  title: string;
  body: string;
}

interface MediaBlock {
  __component: "shared.media";
  id: number;
}

interface SliderBlock {
  __component: "shared.slider";
  id: number;
}

type Block = RichTextBlock | QuoteBlock | MediaBlock | SliderBlock;

export interface Article {
  id: number;
  documentId: string;
  title: string;
  description: string;
  slug: string;
  createdAt: string;
  updatedAt: string;
  publishedAt: string;
  cover: Image;
  author: Author;
  category: Category;
  blocks: Block[];
}

interface Pagination {
  page: number;
  pageSize: number;
  pageCount: number;
  total: number;
}

export interface ArticlesResponse {
  data: Article[];
  meta: {
    pagination: Pagination;
  };
}
Now let's look at the different ways to fetch data from Strapi.
1. Using Fetch Directly
The simplest way to load data from Strapi is using the native fetch API directly in your Astro components.
src/pages/index.astro
---
import Layout from "../layouts/Layout.astro";
import type { ArticlesResponse } from "../types/strapi";

const STRAPI_URL = "http://localhost:1337";

const response = await fetch(`${STRAPI_URL}/api/articles?populate=*`);
const { data: articles }: ArticlesResponse = await response.json();
---

<Layout>
  <main class="container mx-auto px-4 py-8">
    <h1 class="text-4xl font-bold mb-8 text-center">Articles</h1>
    <ul class="grid grid-cols-1 md:grid-cols-2 lg:grid-cols-3 gap-6">
      {articles.map((article) => (
        <li class="bg-white rounded-xl shadow-lg overflow-hidden hover:shadow-xl transition-shadow duration-300">
          <img
            src={`${STRAPI_URL}${article.cover.url}`}
            alt={article.cover.alternativeText}
            class="w-full h-48 object-cover"
          />
          <div class="p-5">
            <span class="inline-block px-3 py-1 text-xs font-semibold text-blue-600 bg-blue-100 rounded-full mb-3">
              {article.category.name}
            </span>
            <h2 class="text-xl font-bold mb-2 text-gray-800">{article.title}</h2>
            <p class="text-gray-600 text-sm mb-4 line-clamp-2">{article.description}</p>
            <div class="flex items-center justify-between text-sm text-gray-500">
              <span>By {article.author.name}</span>
              <span>{new Date(article.publishedAt).toLocaleDateString()}</span>
            </div>
          </div>
        </li>
      ))}
    </ul>
  </main>
</Layout>
Tip: For production, store your Strapi URL in environment variables:
.env
STRAPI_URL=http://localhost:1337Then use it in your components:
---
import type { ArticlesResponse } from "../types/strapi";

const response = await fetch(`${import.meta.env.STRAPI_URL}/api/articles?populate=*`);
const { data: articles }: ArticlesResponse = await response.json();
---
You should see the following:

2. Using the Strapi Client SDK
The Strapi Client SDK provides a typed client for interacting with Strapi APIs with better developer experience and type safety.
First, install the package:
npm install @strapi/clientCreate a Strapi client instance:
src/lib/strapi.ts
import { strapi } from "@strapi/client";

export const client = strapi({
  baseURL: "http://localhost:1337/api",
});
Use the client in your Astro components:
src/pages/index.astro
---
import Layout from "../layouts/Layout.astro";
import { client } from "../lib/strapi";

const STRAPI_URL = "http://localhost:1337";

const { data: articles } = await client.collection("articles").find({
  populate: "*",
});
---

<Layout>
  <main class="container mx-auto px-4 py-8">
    <h1 class="text-4xl font-bold mb-8 text-center">Articles</h1>
    <ul class="grid grid-cols-1 md:grid-cols-2 lg:grid-cols-3 gap-6">
      {articles.map((article) => (
        <li class="bg-white rounded-xl shadow-lg overflow-hidden hover:shadow-xl transition-shadow duration-300">
          <img
            src={`${STRAPI_URL}${article.cover.url}`}
            alt={article.cover.alternativeText}
            class="w-full h-48 object-cover"
          />
          <div class="p-5">
            <span class="inline-block px-3 py-1 text-xs font-semibold text-blue-600 bg-blue-100 rounded-full mb-3">
              {article.category.name}
            </span>
            <h2 class="text-xl font-bold mb-2 text-gray-800">{article.title}</h2>
            <p class="text-gray-600 text-sm mb-4 line-clamp-2">{article.description}</p>
            <div class="flex items-center justify-between text-sm text-gray-500">
              <span>By {article.author.name}</span>
              <span>{new Date(article.publishedAt).toLocaleDateString()}</span>
            </div>
          </div>
        </li>
      ))}
    </ul>
  </main>
</Layout>
Notice that we still get our data like before.
The Strapi Client SDK also supports:
- Single types with
client.single("homepage") - Filtering, sorting, and pagination
- Authentication with API tokens
Learn more in the Strapi Client documentation.
Finally let's try the Strapi Community Astor Loader.
3. Using the Strapi Loader
The Strapi Community Astro Loader integrates Strapi collections with Astro's Content Layer API, providing type-safe access to your Strapi content.
First, install the package:
npm install strapi-community-astro-loader@3.0.0-rc.0Configure the loader in your Astro content config:
src/content.config.ts
import { defineCollection, z } from "astro:content";
import { strapiLoader } from "strapi-community-astro-loader";

const imageSchema = z.object({
  id: z.number(),
  documentId: z.string(),
  name: z.string(),
  alternativeText: z.string().nullable(),
  width: z.number(),
  height: z.number(),
  url: z.string(),
});

const authorSchema = z.object({
  id: z.number(),
  documentId: z.string(),
  name: z.string(),
  email: z.string(),
});

const categorySchema = z.object({
  id: z.number(),
  documentId: z.string(),
  name: z.string(),
  slug: z.string(),
});

const articleSchema = z.object({
  title: z.string(),
  description: z.string(),
  slug: z.string(),
  createdAt: z.string(),
  updatedAt: z.string(),
  publishedAt: z.string(),
  cover: imageSchema,
  author: authorSchema,
  category: categorySchema,
});

const articles = defineCollection({
  loader: strapiLoader({
    contentType: "article",
    clientConfig: { baseURL: "http://localhost:1337/api" },
    params: { populate: "*" },
  }),
  schema: articleSchema,
});

export const collections = { articles };
Notice that we needed to add our Zod schema for types.
Use the collection in your Astro components:
src/pages/index.astro
---
import Layout from "../layouts/Layout.astro";
import { getCollection } from "astro:content";

const STRAPI_URL = "http://localhost:1337";

const articles = await getCollection("articles");
---

<Layout>
  <main class="container mx-auto px-4 py-8">
    <h1 class="text-4xl font-bold mb-8 text-center">Articles</h1>
    <ul class="grid grid-cols-1 md:grid-cols-2 lg:grid-cols-3 gap-6">
      {articles.map((article) => (
        <li class="bg-white rounded-xl shadow-lg overflow-hidden hover:shadow-xl transition-shadow duration-300">
          <img
            src={`${STRAPI_URL}${article.data.cover.url}`}
            alt={article.data.cover.alternativeText}
            class="w-full h-48 object-cover"
          />
          <div class="p-5">
            <span class="inline-block px-3 py-1 text-xs font-semibold text-blue-600 bg-blue-100 rounded-full mb-3">
              {article.data.category.name}
            </span>
            <h2 class="text-xl font-bold mb-2 text-gray-800">{article.data.title}</h2>
            <p class="text-gray-600 text-sm mb-4 line-clamp-2">{article.data.description}</p>
            <div class="flex items-center justify-between text-sm text-gray-500">
              <span>By {article.data.author.name}</span>
              <span>{new Date(article.data.publishedAt).toLocaleDateString()}</span>
            </div>
          </div>
        </li>
      ))}
    </ul>
  </main>
</Layout>
Go ahead and restart your application after the update, everything should show up just like before.
Important: When using Astro's Content Layer API, all schema data is accessed via the
dataattribute (e.g.,article.data.title,article.data.cover.url). This is different from the fetch and SDK methods where you access properties directly on the article object.
Benefits of using the Strapi Loader:
- Integrates with Astro's Content Layer API
- Caching and incremental builds support
- Works seamlessly with Astro's
getCollectionandgetEntryhelpers
Learn more in the Strapi Community Astro Loader documentation.
Which Method Should You Choose?
| Method | Best For |
|---|---|
| Fetch Directly | Simple projects, quick prototypes, or when you need full control |
| Strapi Client SDK | Projects needing type safety and a cleaner API for complex queries |
| Strapi Loader | Content-heavy sites leveraging Astro's Content Layer for caching and type generation |
Nice, now that you have a basic Astro project, let's checkout some community starters and examples.
Community Examples
The Strapi community has built some great tools and starters for Astro integration:
VirtusLab Open Source
Special thanks to our friends at VirtusLab for their excellent open source contributions to the Strapi and Astro ecosystem.
| Resource | Description |
|---|---|
| Astro Strapi Starter | A full-featured starter template for building Astro sites with Strapi |
| Astro Strapi Loader | Content loader for integrating Strapi with Astro's Content Layer |
| Astro Strapi Blocks | Renderer for Strapi's block content in Astro components |
Other Resources
| Resource | Description |
|---|---|
| Strapi Community Astro Loader | Community-driven Astro loader for Strapi with automatic type inference |
| Strapi Client SDK | Official client for interacting with Strapi APIs |