Next.js
Next.js is a minimalistic framework for server-rendered React applications as well as statically exported React apps.

What is Strapi?
Strapi is the leading open-source headless CMS offering features, like customizable APIs, role-based permissions, multilingual support, etc. It simplifies content management and integrates effortlessly with modern frontend frameworks.
Explore the Strapi documentation for more details.
What is Next.js?
Next.js is a popular React framework known for its performance and ease of use. It includes features such as server-side rendering (SSR), static site generation (SSG), and other advanced features, which make it a go-to choice for modern web development.
Visit the Next.js documentation for more.
Strapi and Next.js Integration
The out-of-the-box Strapi features allow you to get up and running in no time:
- Single types: Create one-off pages that have a unique content structure
- Customizable API: With Strapi, you can just hop into your code editor and edit the code to fit your API to your needs.
- Integrations: Strapi supports integrations with Cloudinary, SendGrid, Algolia, and others.
- Editor interface: The editor allows you to pull in dynamic blocks of content.
- Authentication: Secure and authorize access to your API with JWT or providers.
- RBAC: Help maximize operational efficiency, reduce dev team support work, and safeguard against unauthorized access or configuration modifications.
- i18n: Manage content in multiple languages. Easily query the different locales through the API.
Learn more about Strapi features.
Setup Strapi 5 Headless CMS
We are going to start by setting up our Strapi 5 project with the following command:
🖐️ Note: Make sure that you have created a new directory for your project.
You can find the full documentation for Strapi 5 here.
npx create-strapi-app@latest serverYou will be asked to choose if you would like to use Strapi Cloud. We will choose to skip for now.
🚀 Welcome to Strapi! Ready to bring your project to life?

Create a free account and get:
30 days of access to the Growth plan, which includes:
✨ Strapi AI: content-type builder, media library, and translations
✅ Live Preview
✅ Single Sign-On (SSO) login
✅ Content History
✅ Releases

? Please log in or sign up.
  Login/Sign up
❯ Skip
After that, you will be asked how you would like to set up your project. We will choose the following options:
? Do you want to use the default database (sqlite) ? Yes
? Start with an example structure & data? Yes <-- make sure you say yes
? Start with Typescript? Yes
? Install dependencies with npm? Yes
? Initialize a git repository? Yes
Once everything is set up and all the dependencies are installed, you can start your Strapi server with the following command:
cd server
npm run develop
You will be greeted with the Admin Create Account screen.
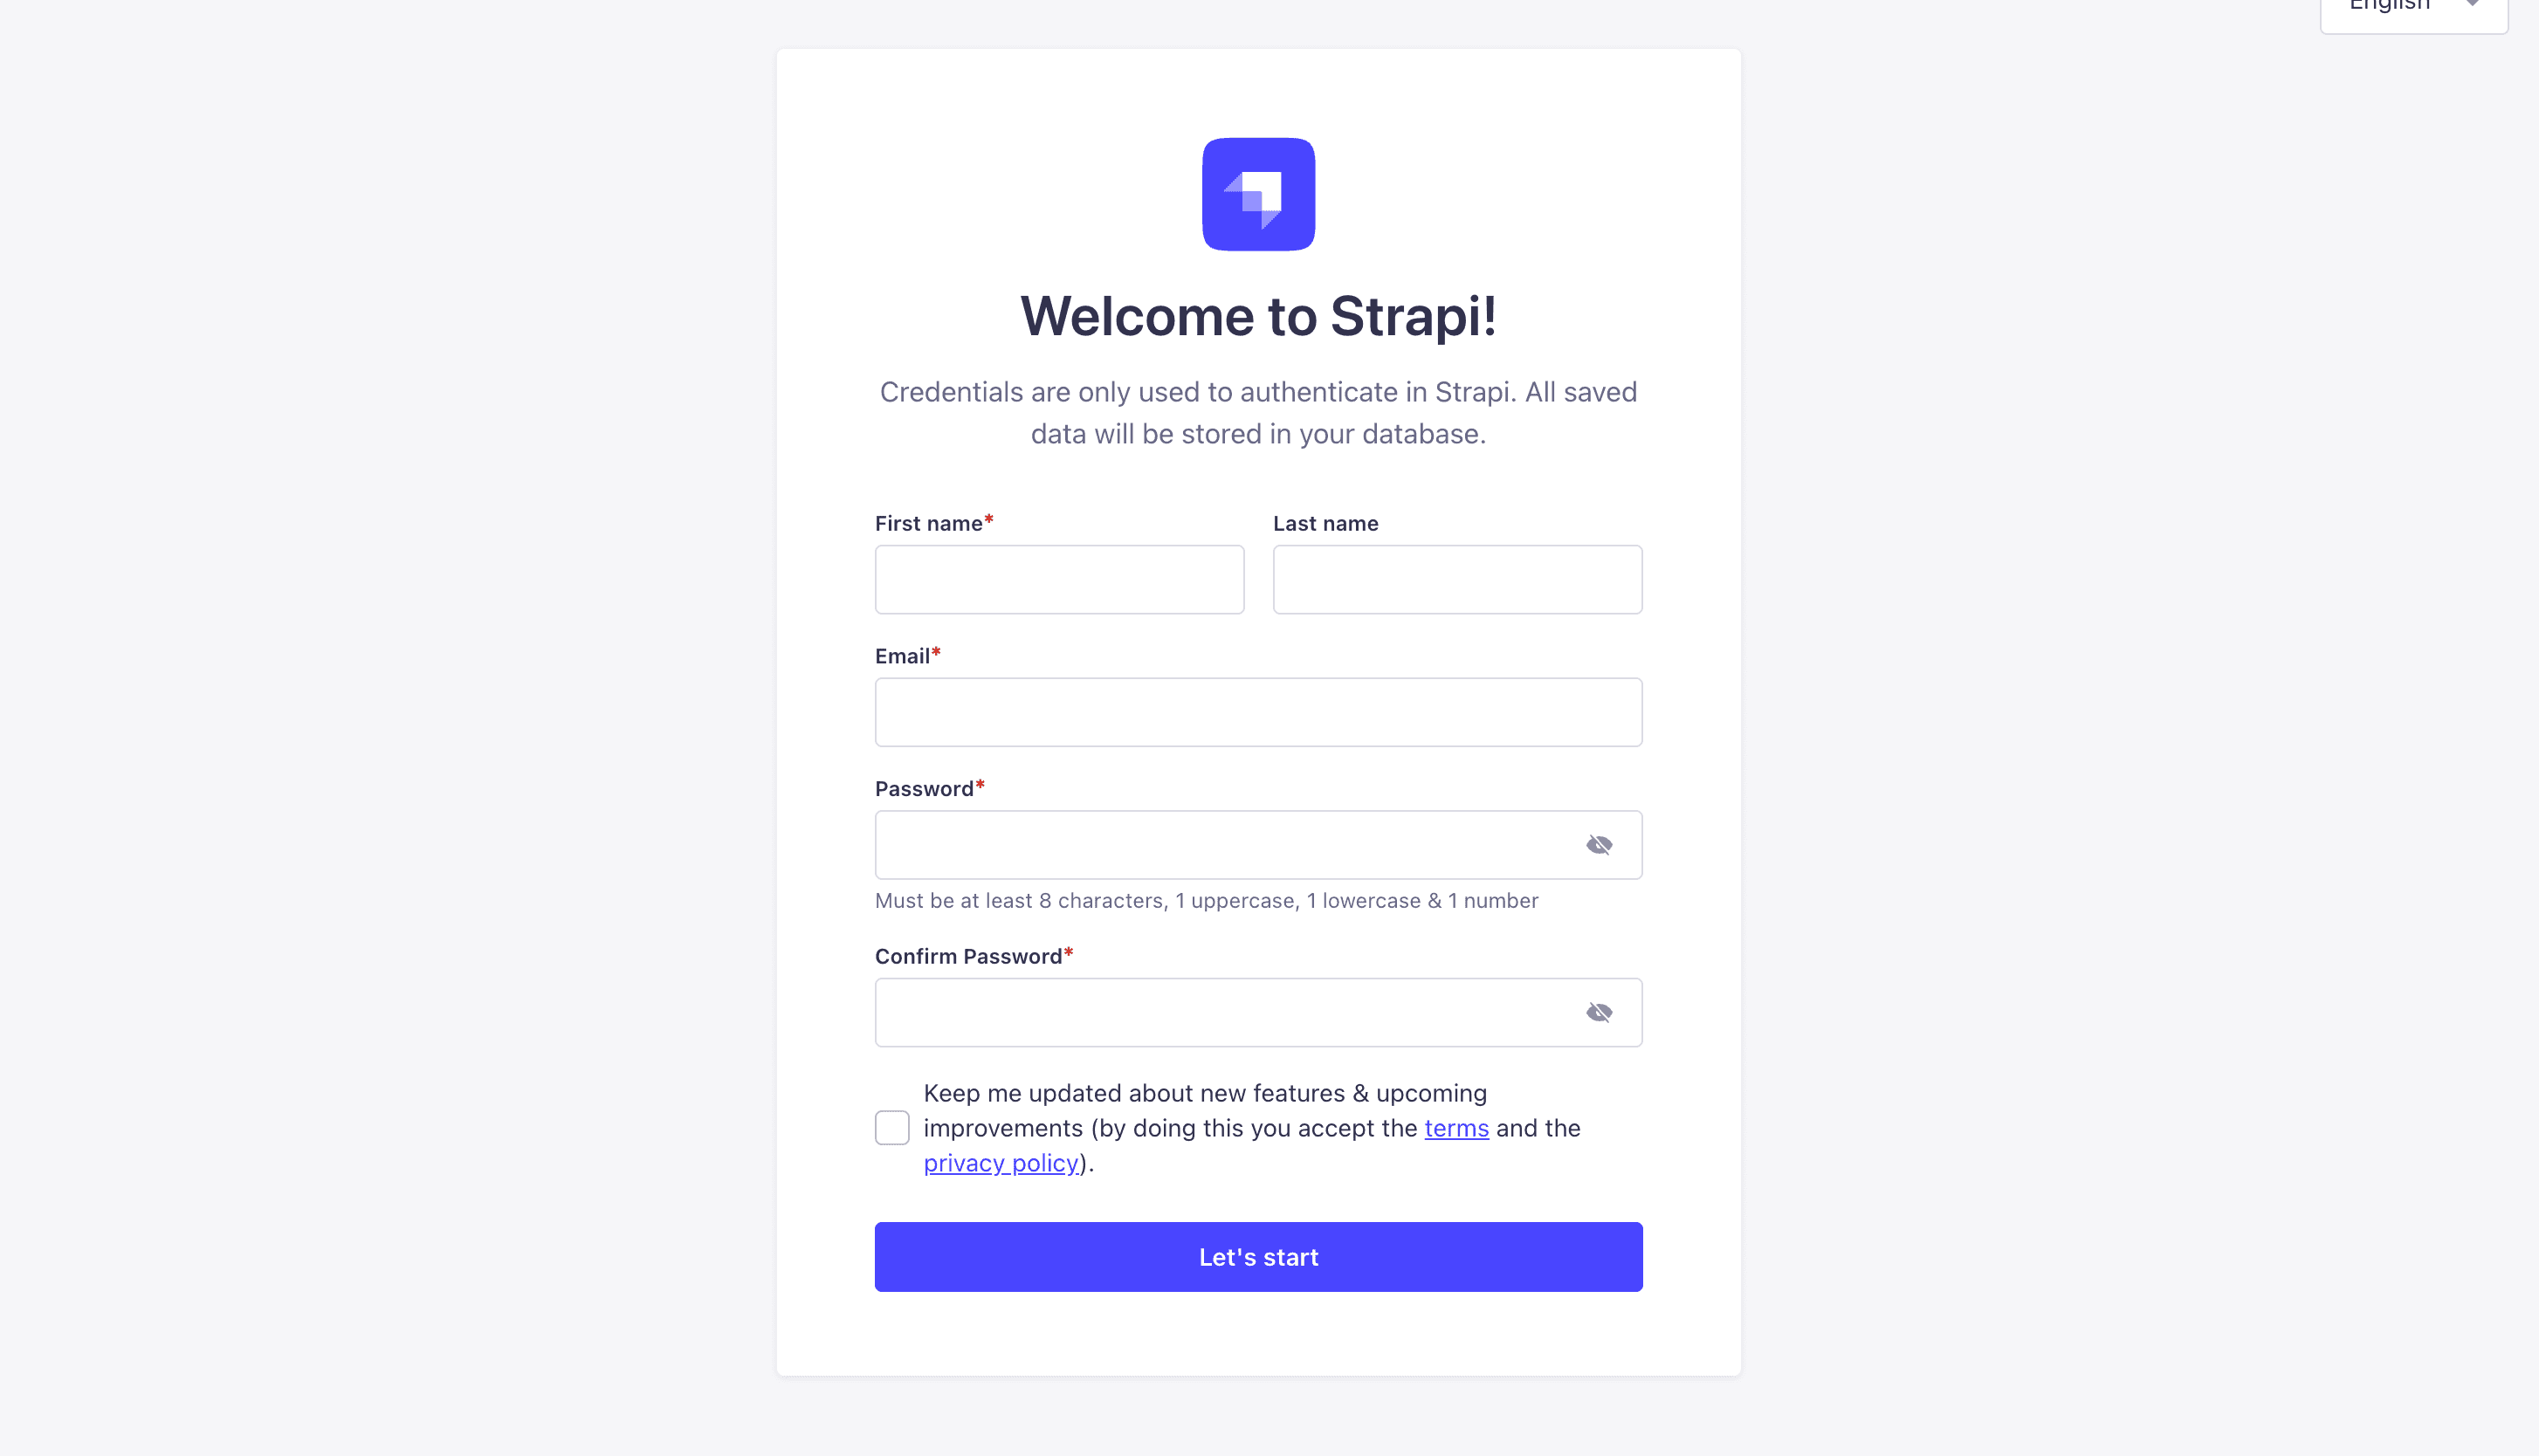
Go ahead and create your first Strapi user. All of this is local, so you can use whatever you want.
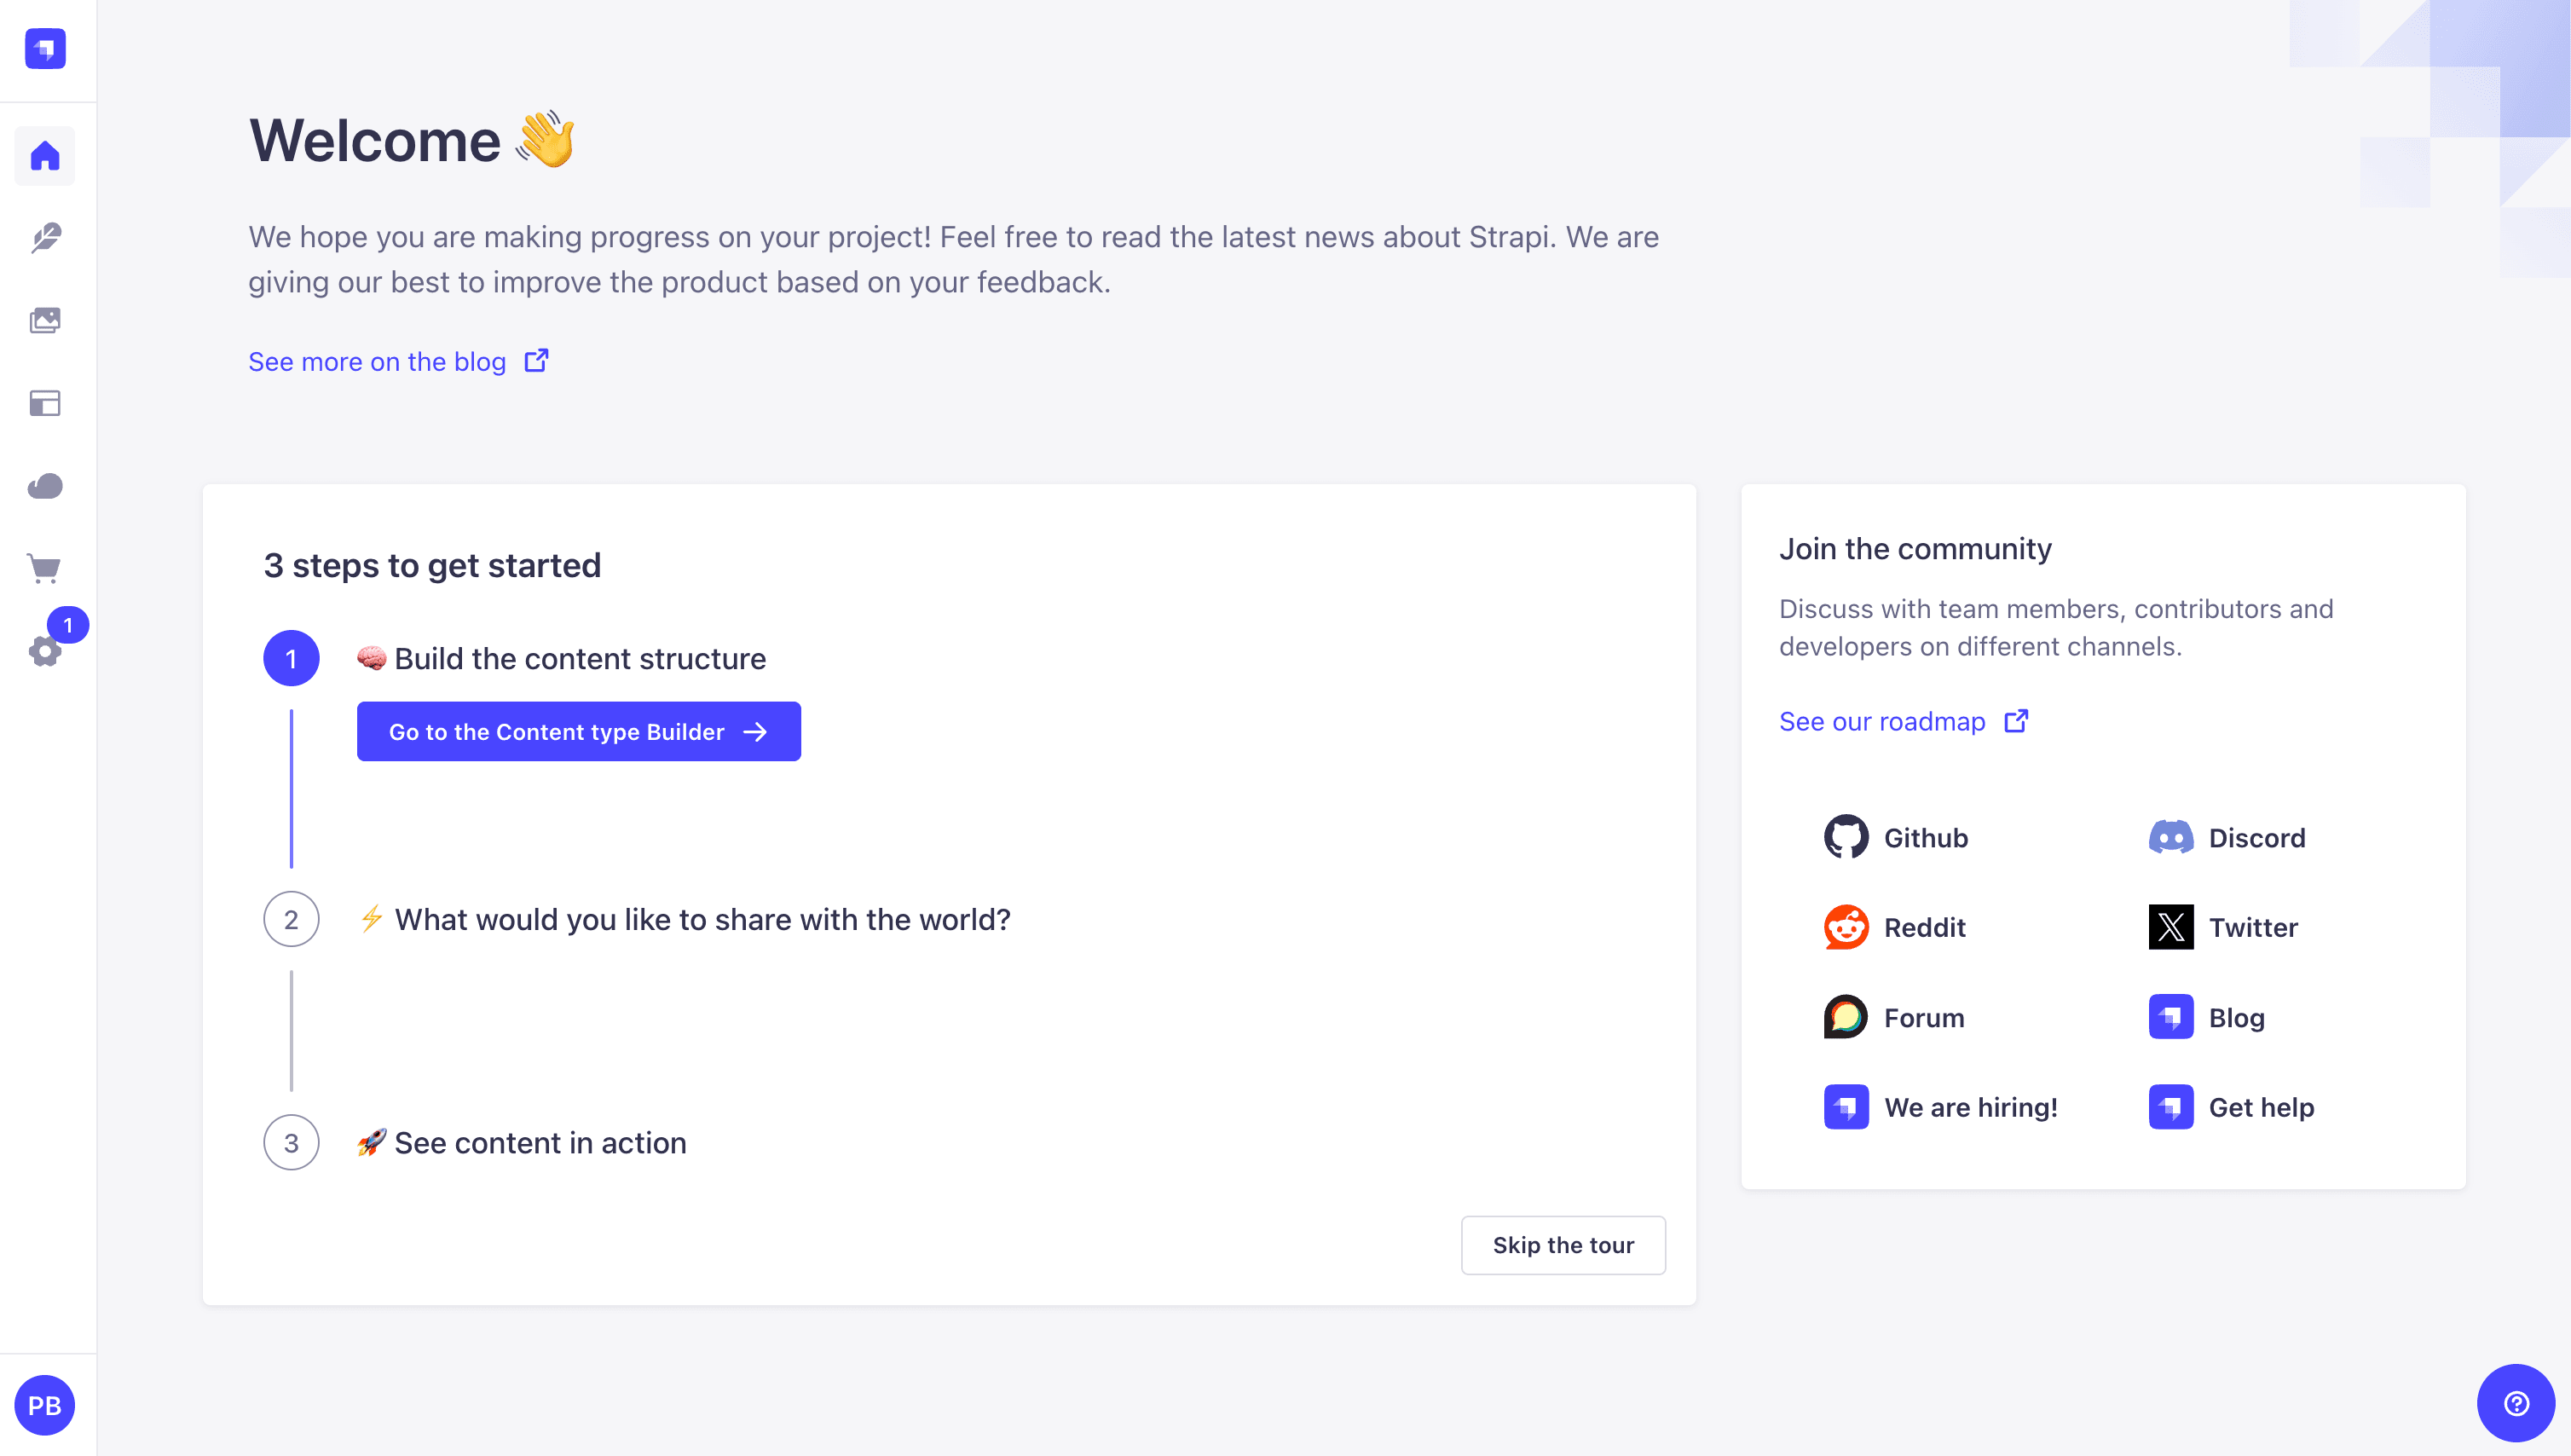
Once you have created your user, you will be redirected to the Strapi Dashboard screen.
Publish Article Entries
Since we created our app with the example data, you should be able to navigate to your Article collection and see the data that was created for us.
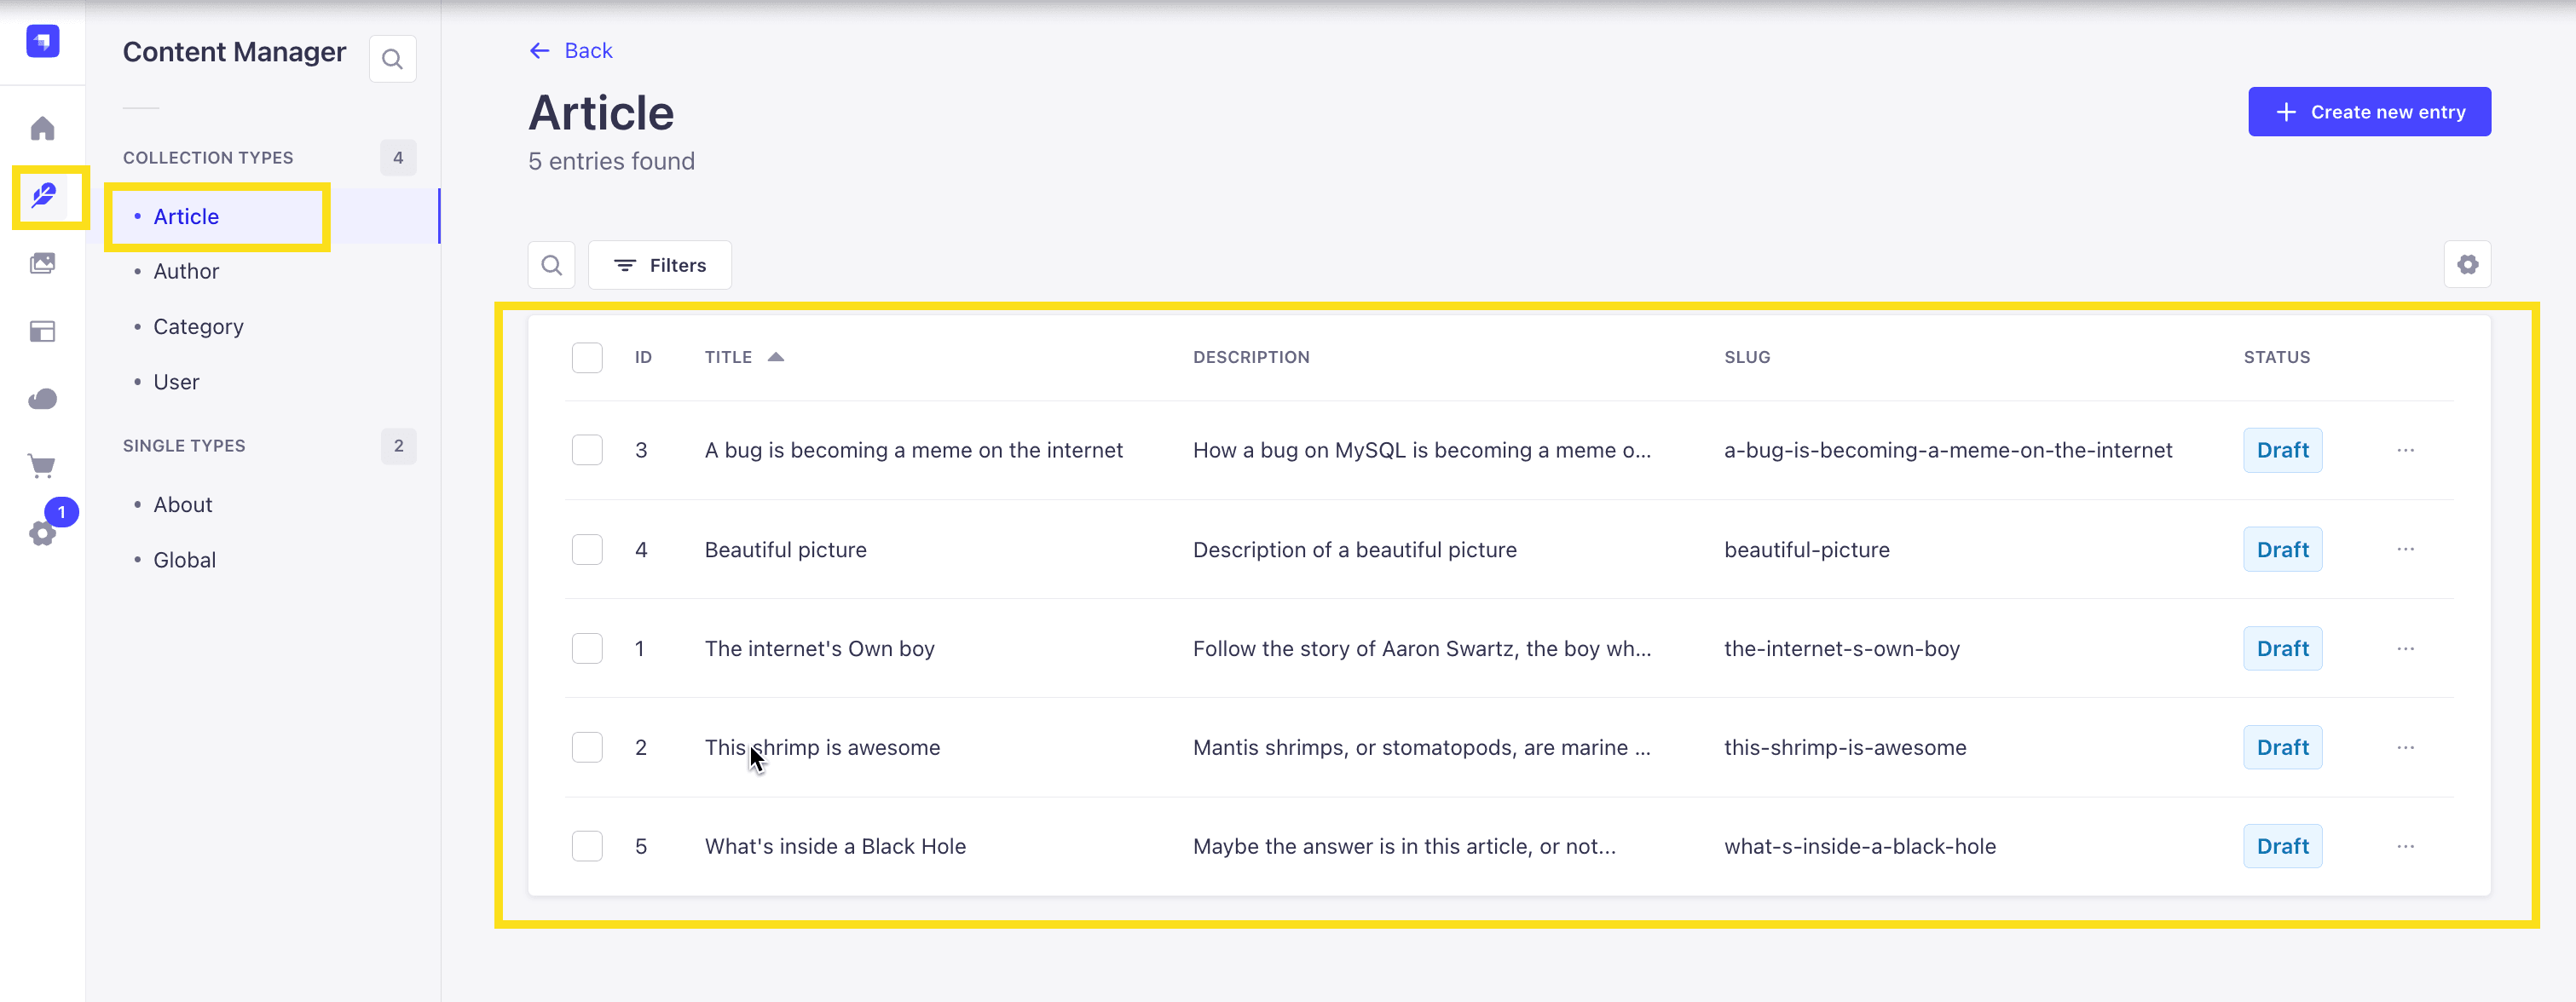
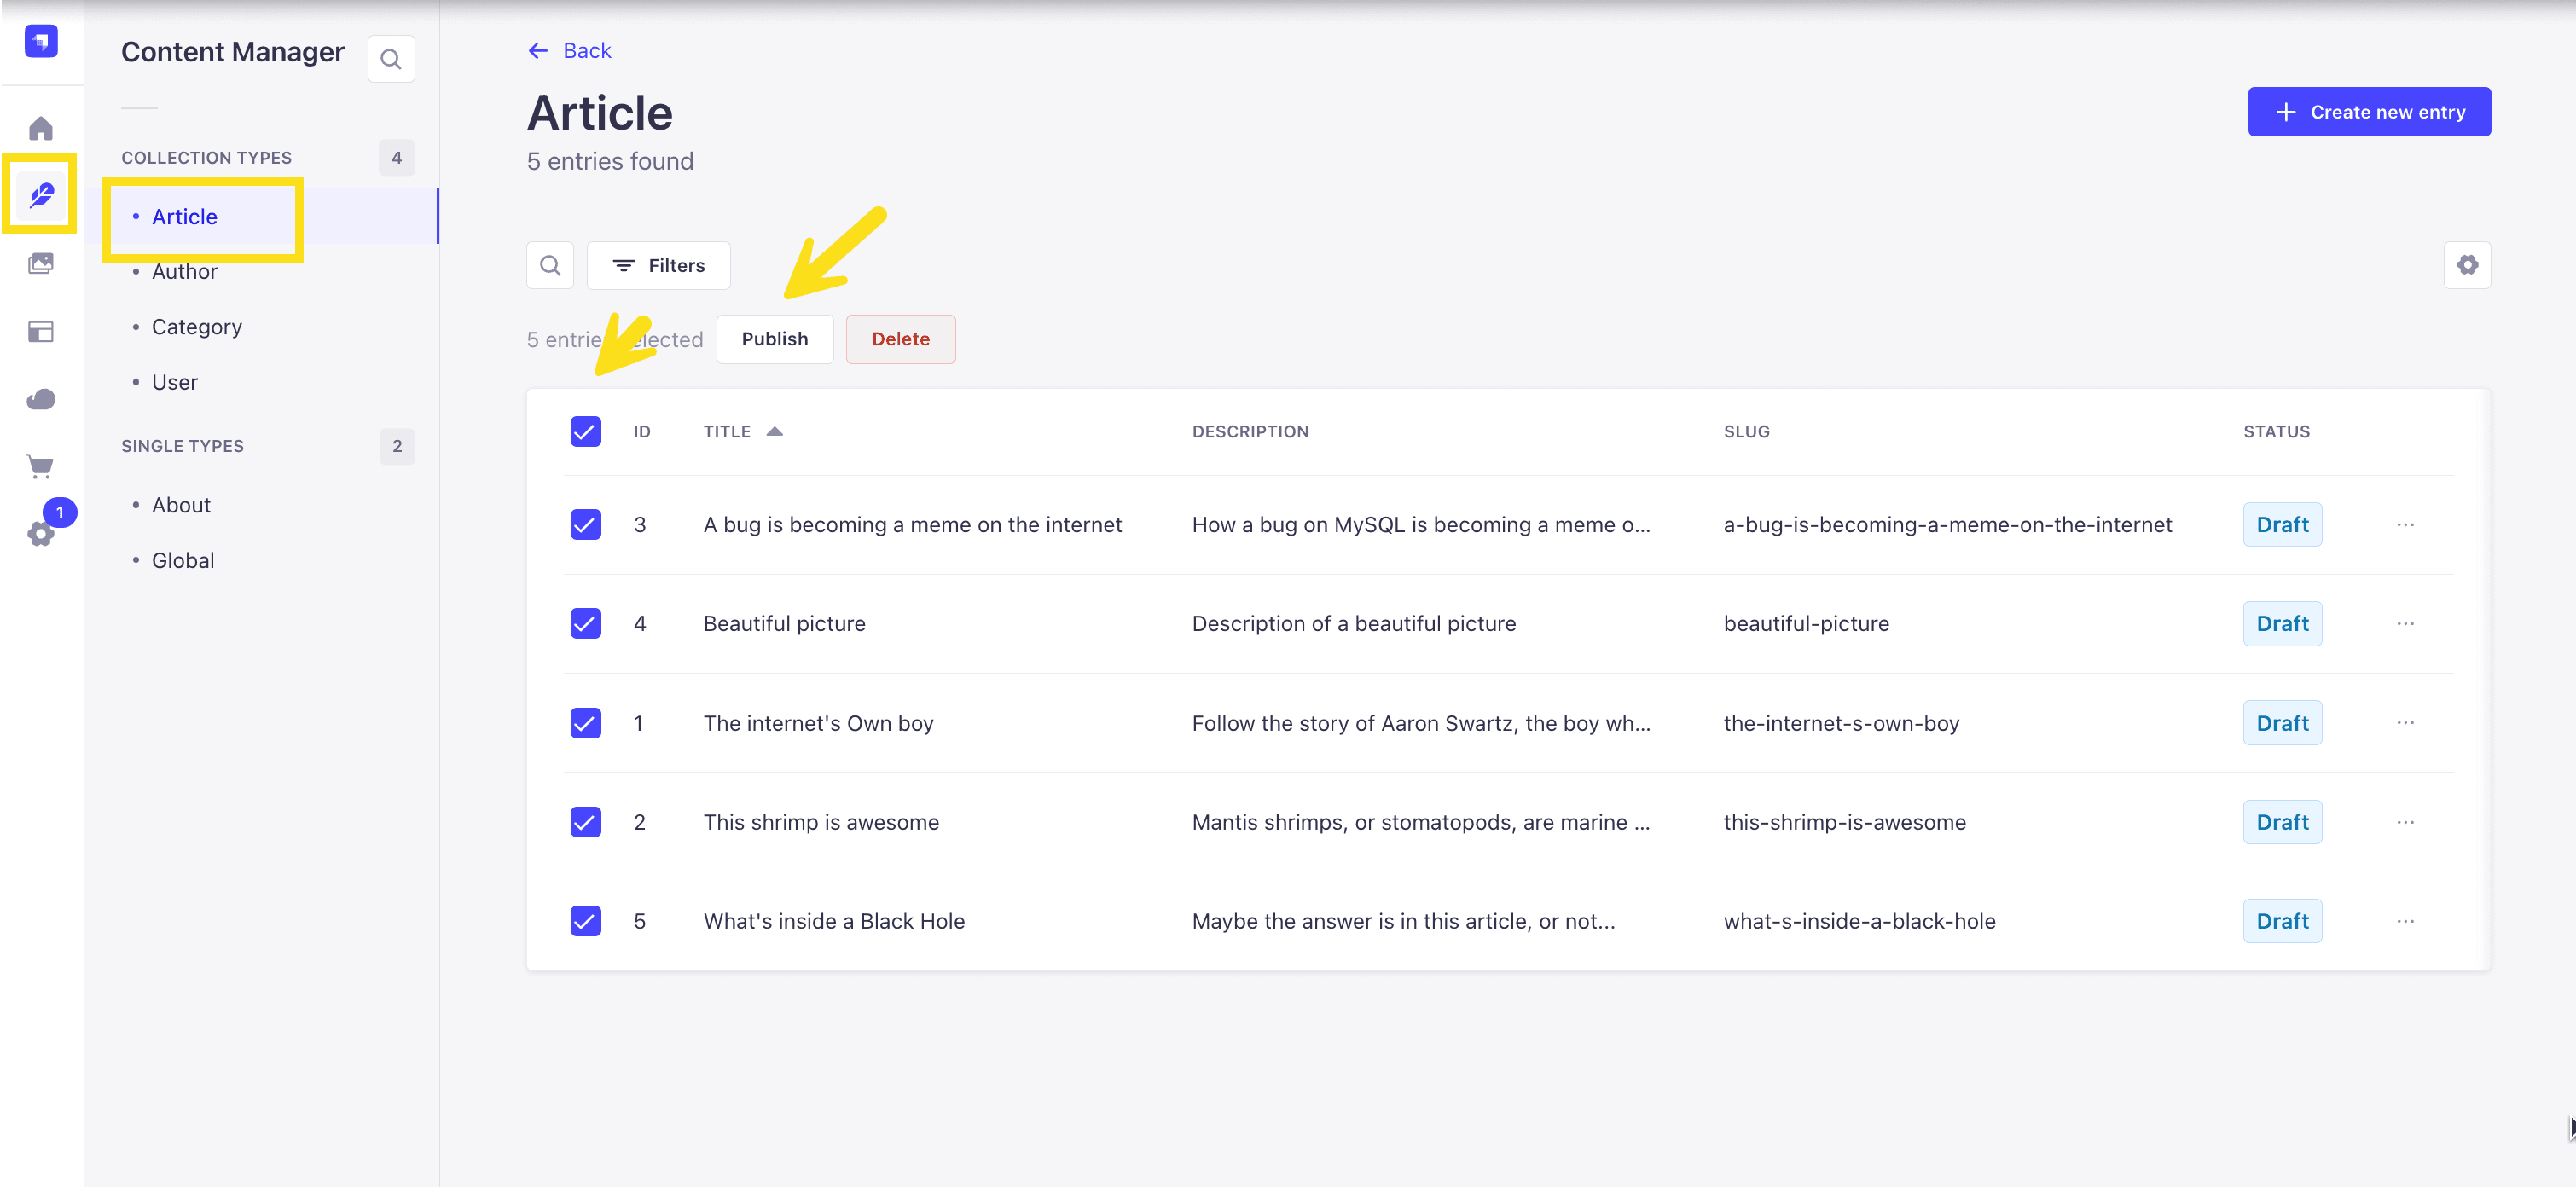
Now, let's make sure that all of the data is published. If not, you can select all items via the checkbox and then click the Publish button.
Enable API Access
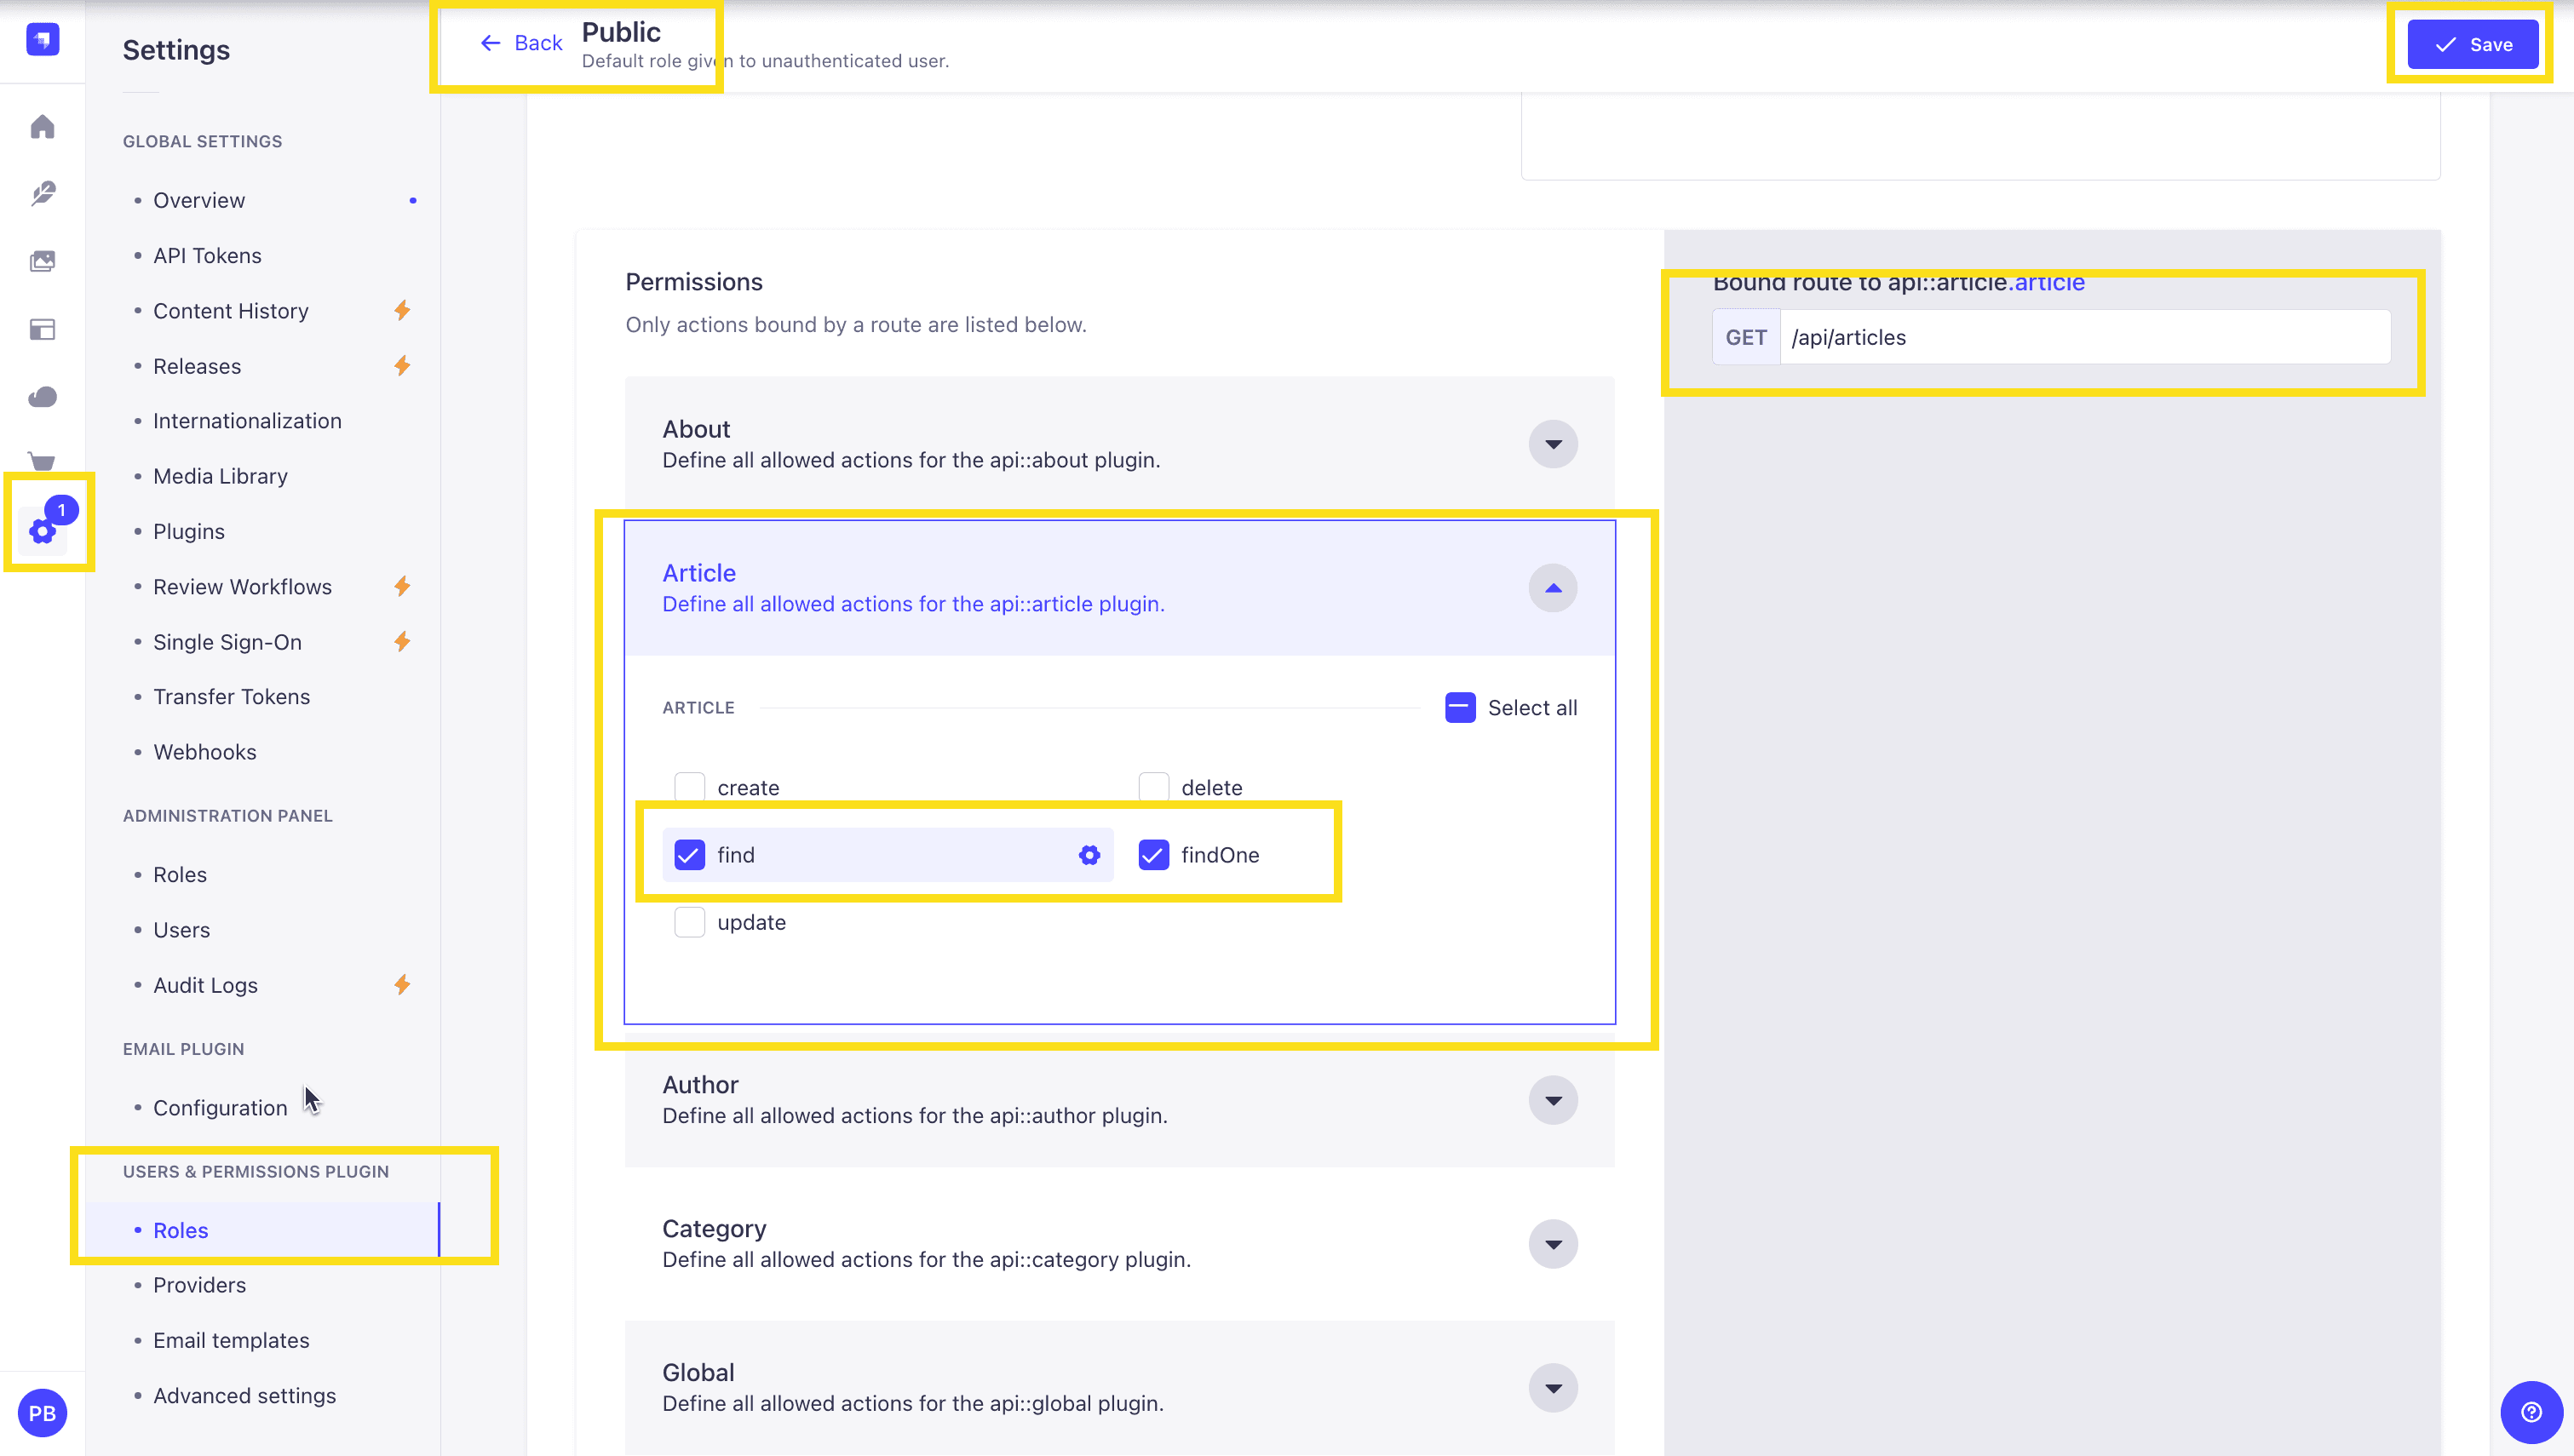
Once all your articles are published, we will expose our Strapi API for the Articles Collection. This can be done in Settings -> Users & Permissions plugin -> Roles -> Public -> Article.
You should have find and findOne selected. If not, go ahead and select them.
Test API
Now, if we make a GET request to http://localhost:1337/api/articles, we should see the following data for our articles.
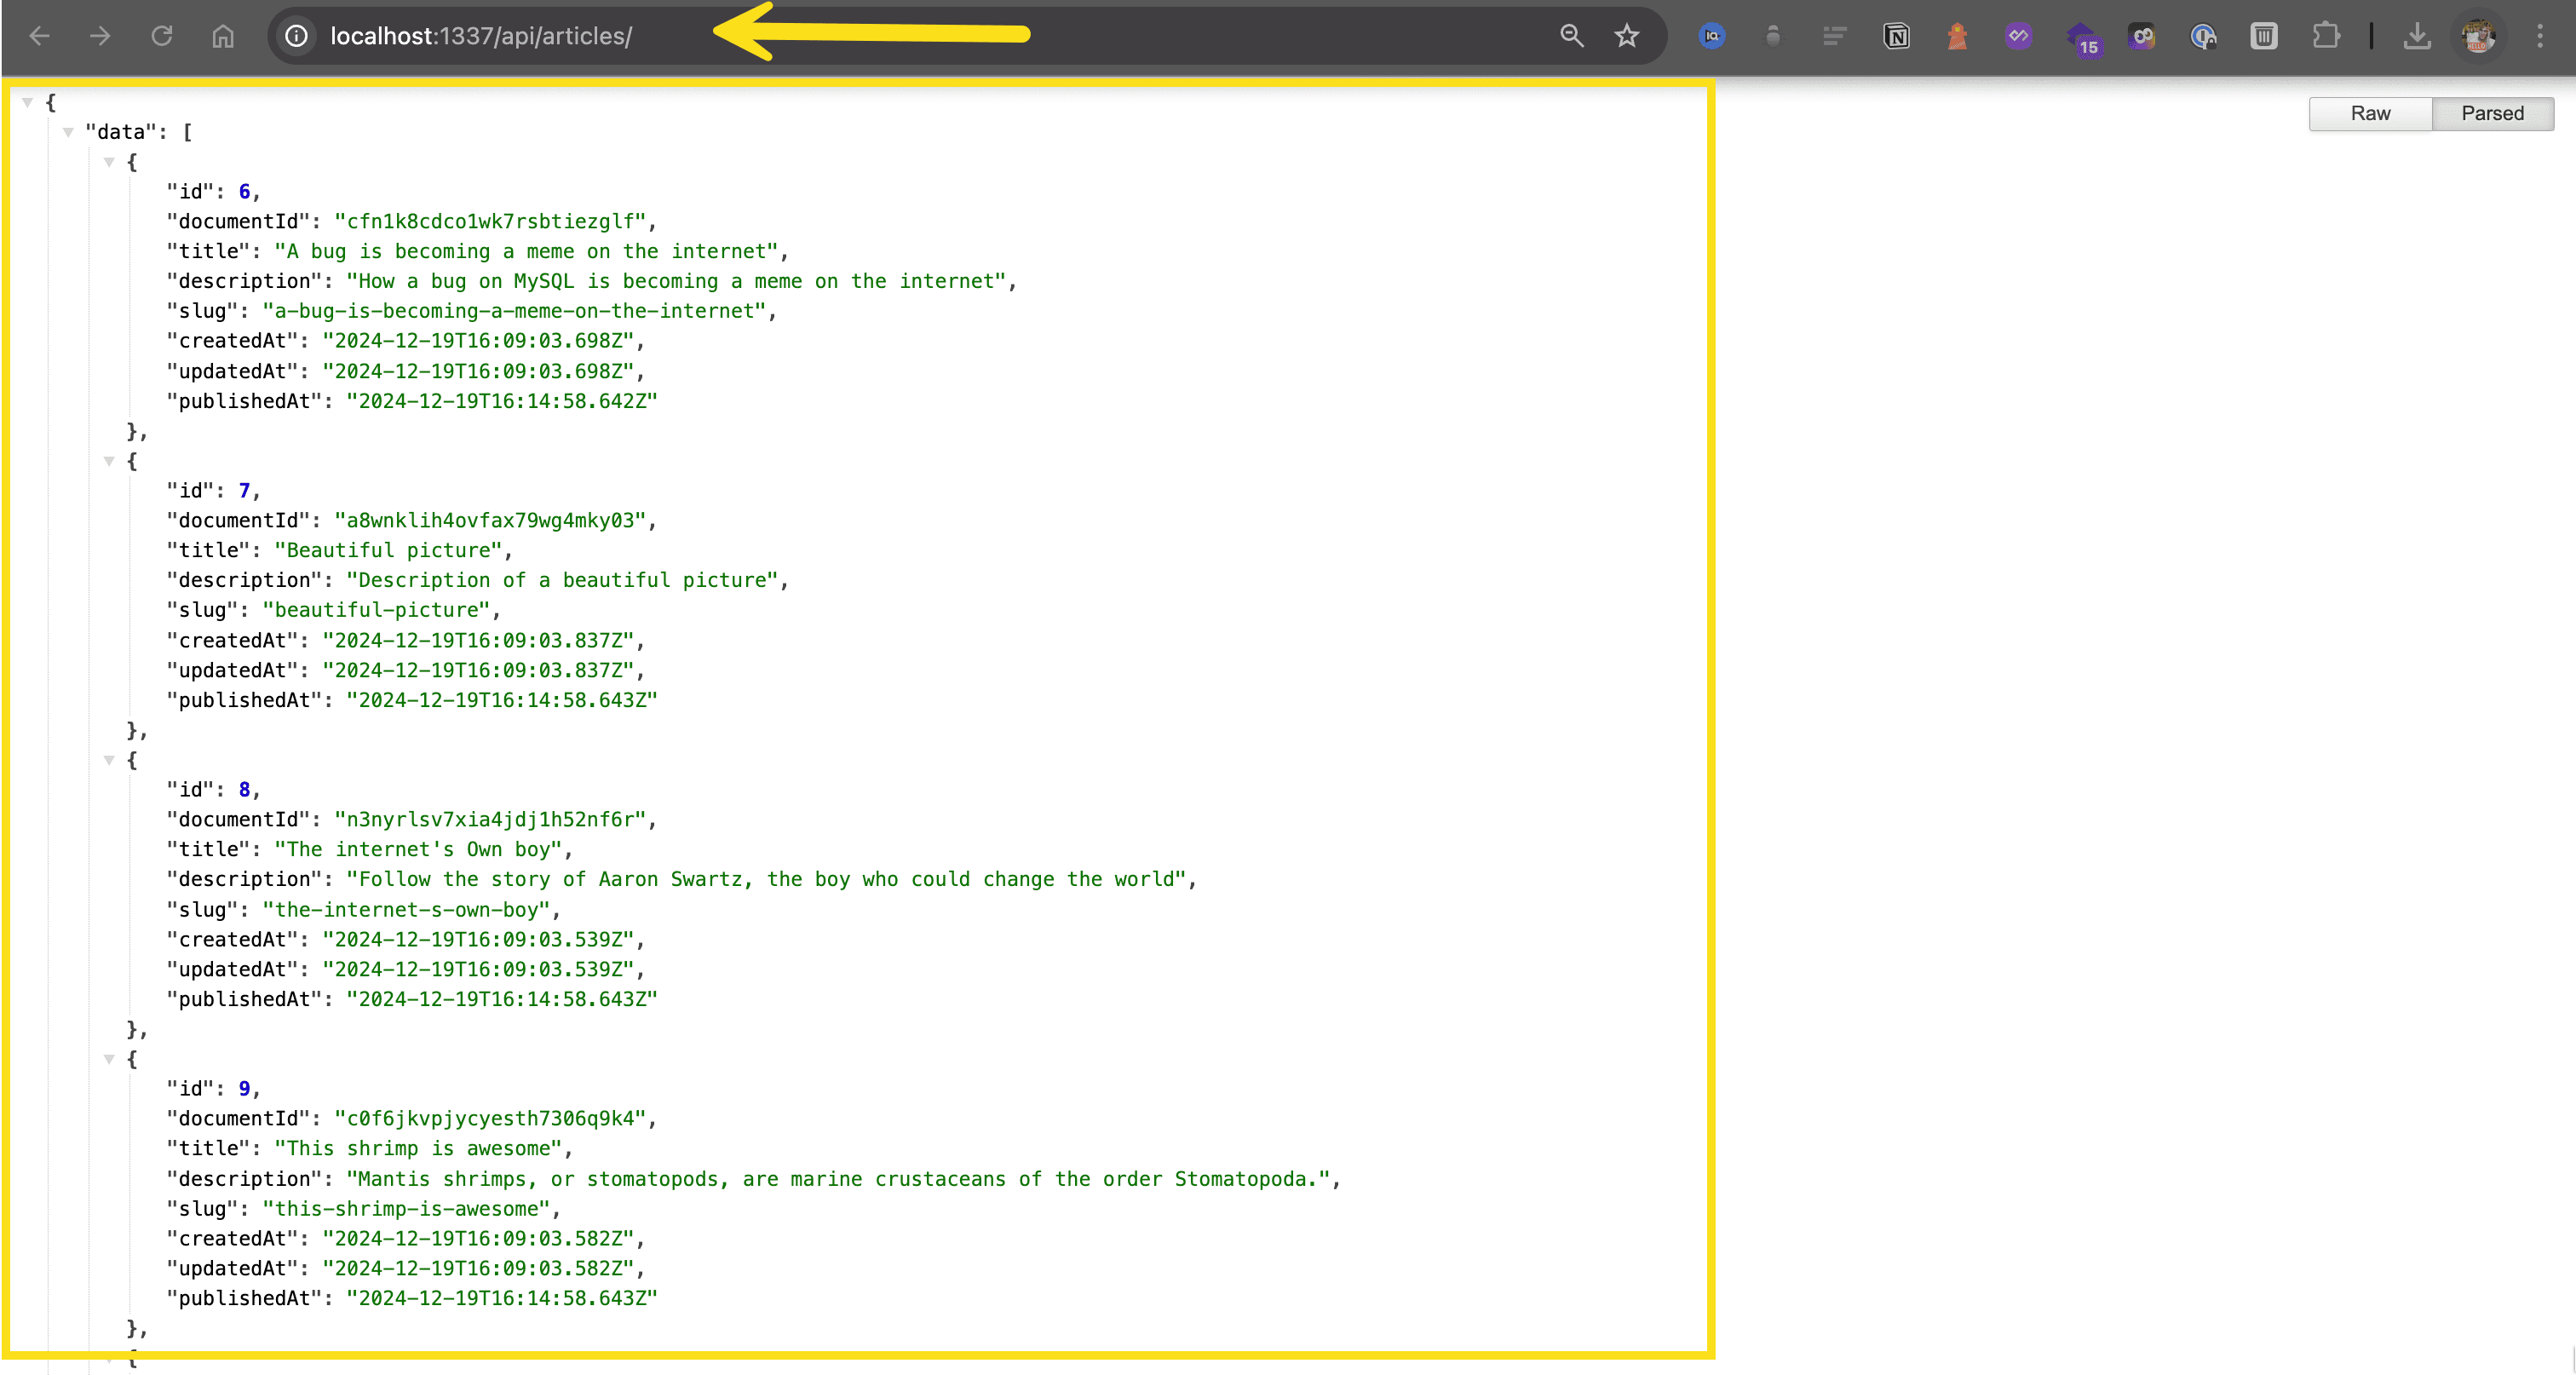
🖐️ Note: that article covers (images) are not returned. This is because the REST API, by default, does not populate any relations, media fields, components, or dynamic zones. Learn more about REST API: Population & Field Selection.
So let's get the article covers by using the populate=* parameter: http://localhost:1337/api/articles?populate=*
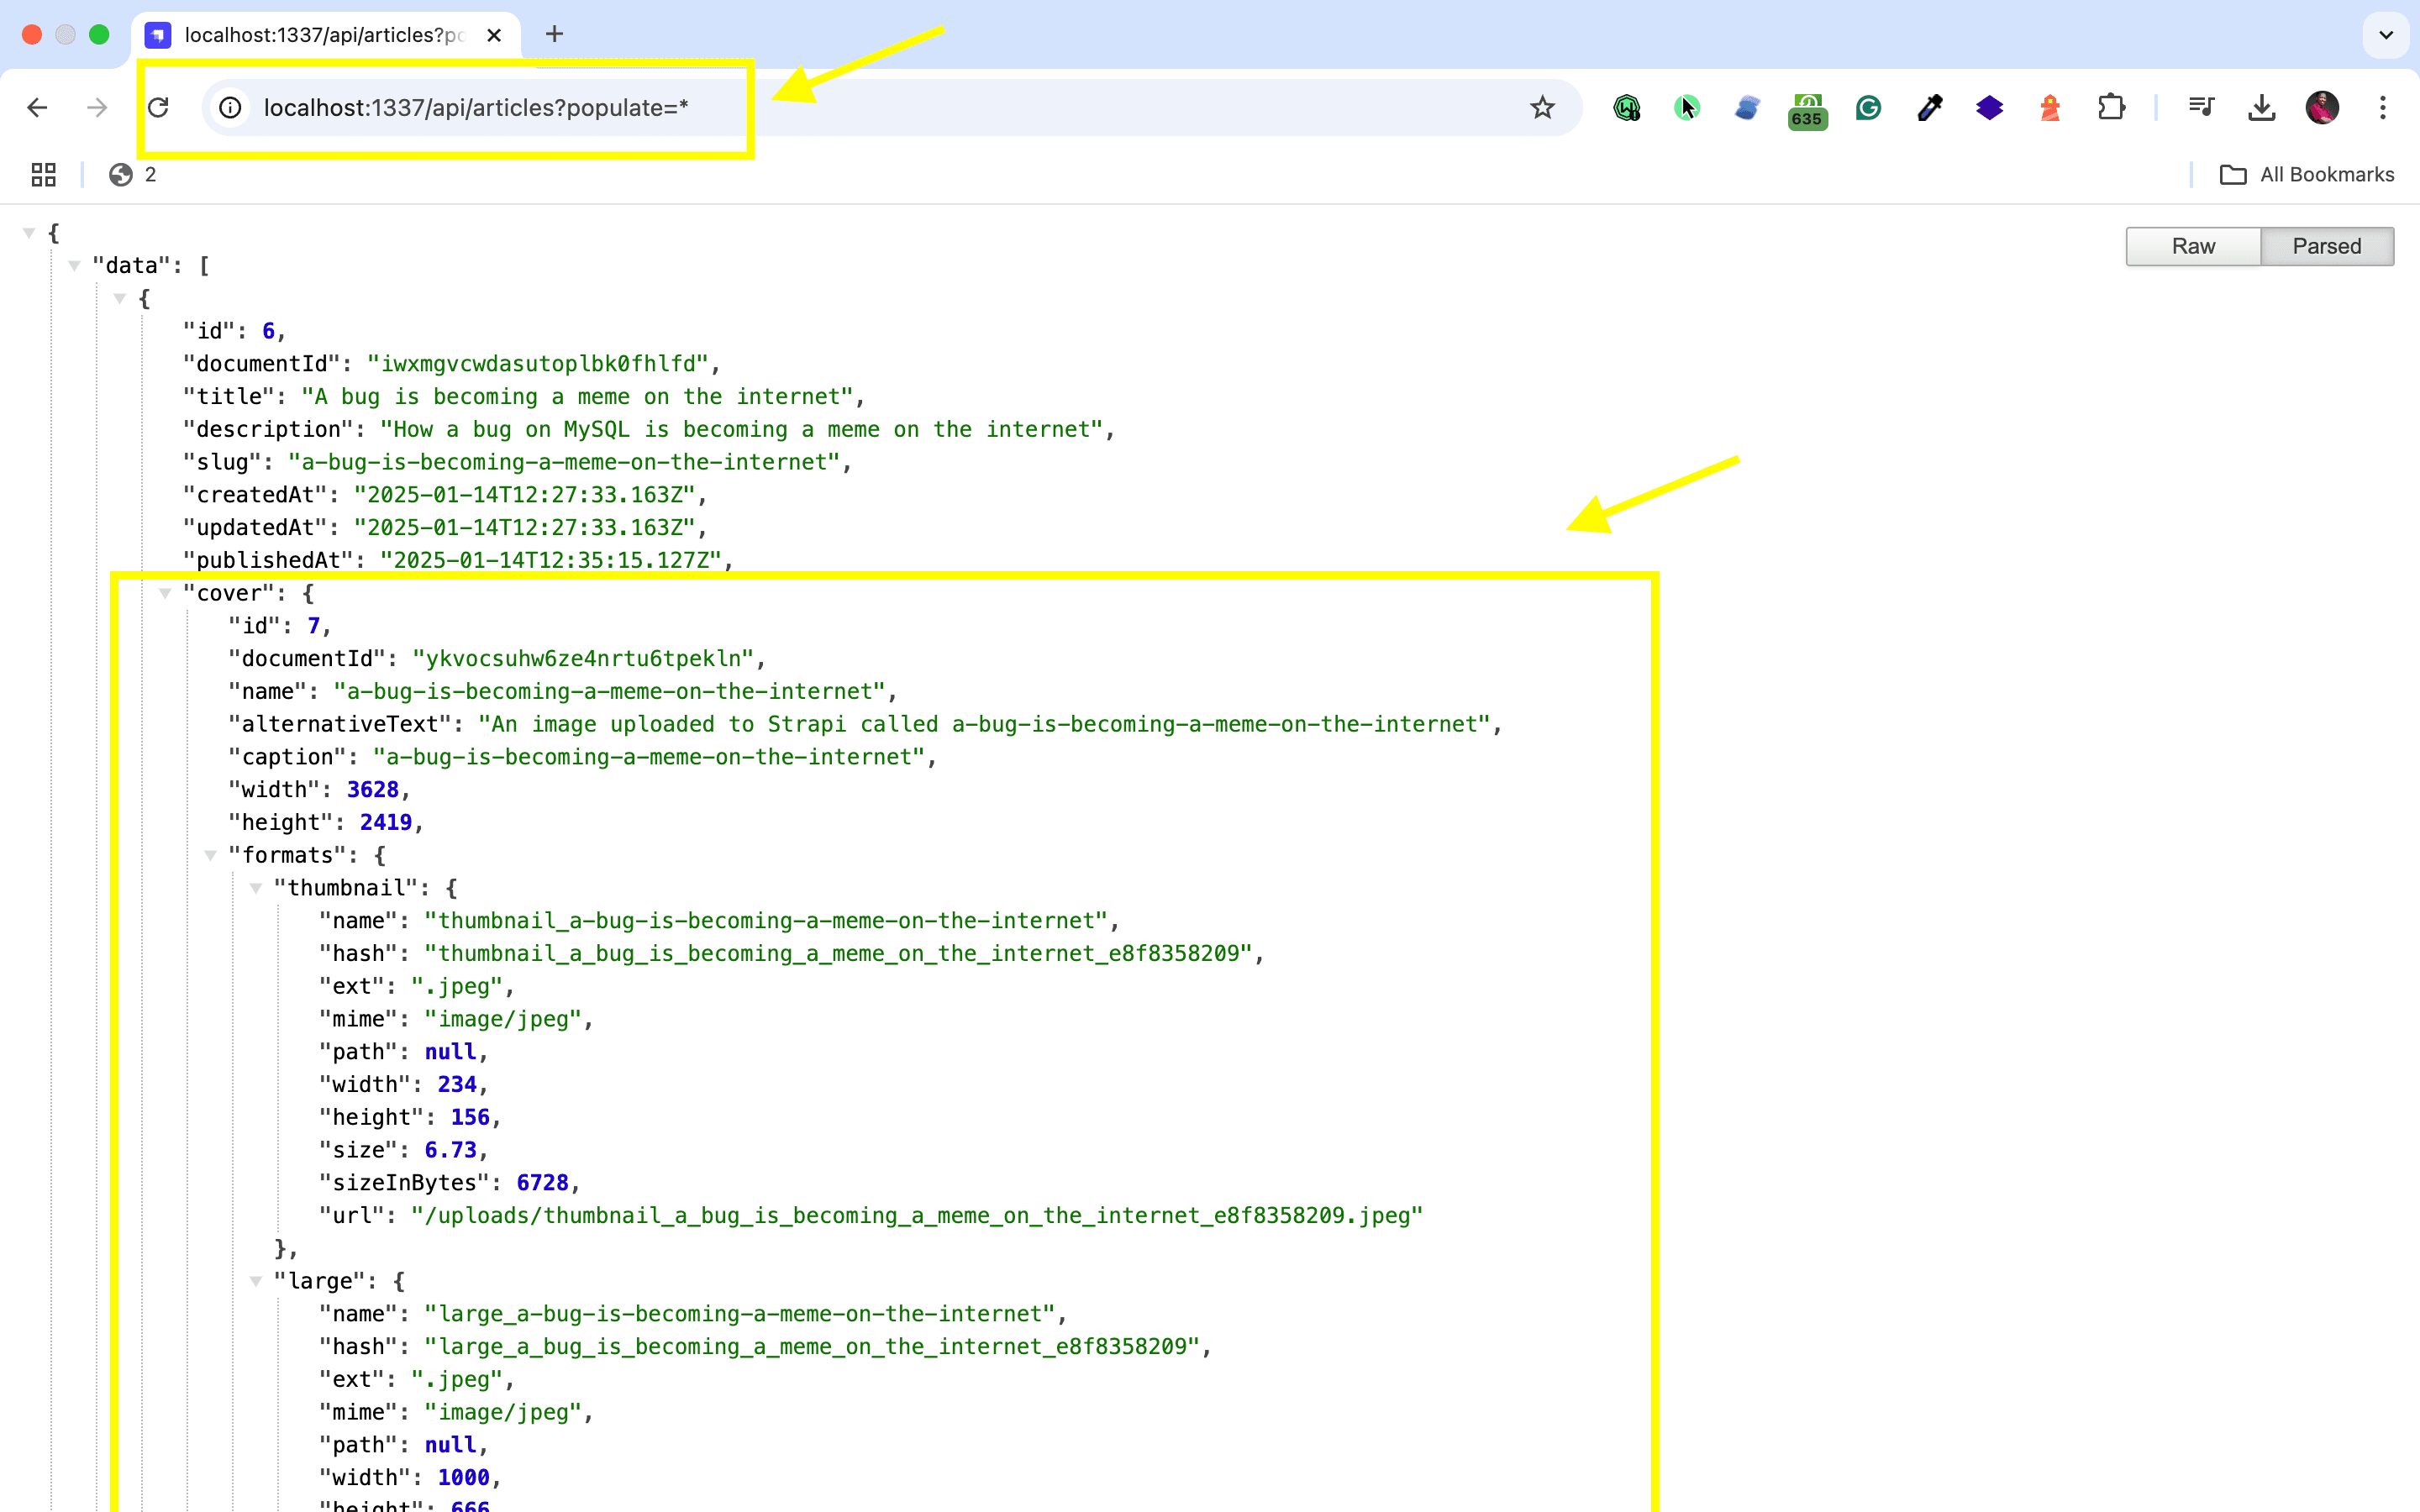
Nice, now that we have our Strapi 5 server set up, we can start to set up our Next.js application.
Create a Next.js App
Run the command below to locally create your new Next.js app, depending on your package manager.
The command below should do the following:
- Creates a new Next.js app named
nextjs-project - cd into your
nextjs-projectproject to start the dev server.
npm
# npm

npx create-next-app@latest nextjs-project --yes
cd nextjs-project
npm run dev
yarn
# yarn

yarn create next-app@latest nextjs-project --yes
cd nextjs-project
yarn dev
pnpm
# pnpm

pnpm create next-app@latest nextjs-project --yes
cd nextjs-project
pnpm dev
bun
# bun

bun create next-app@latest nextjs-project --yes
cd nextjs-project
bun dev
✋NOTE
The
--yesskips prompts using the default setup: TypeScript, Tailwind, ESLint, App Router, and Turbopack, with import alias @/*.
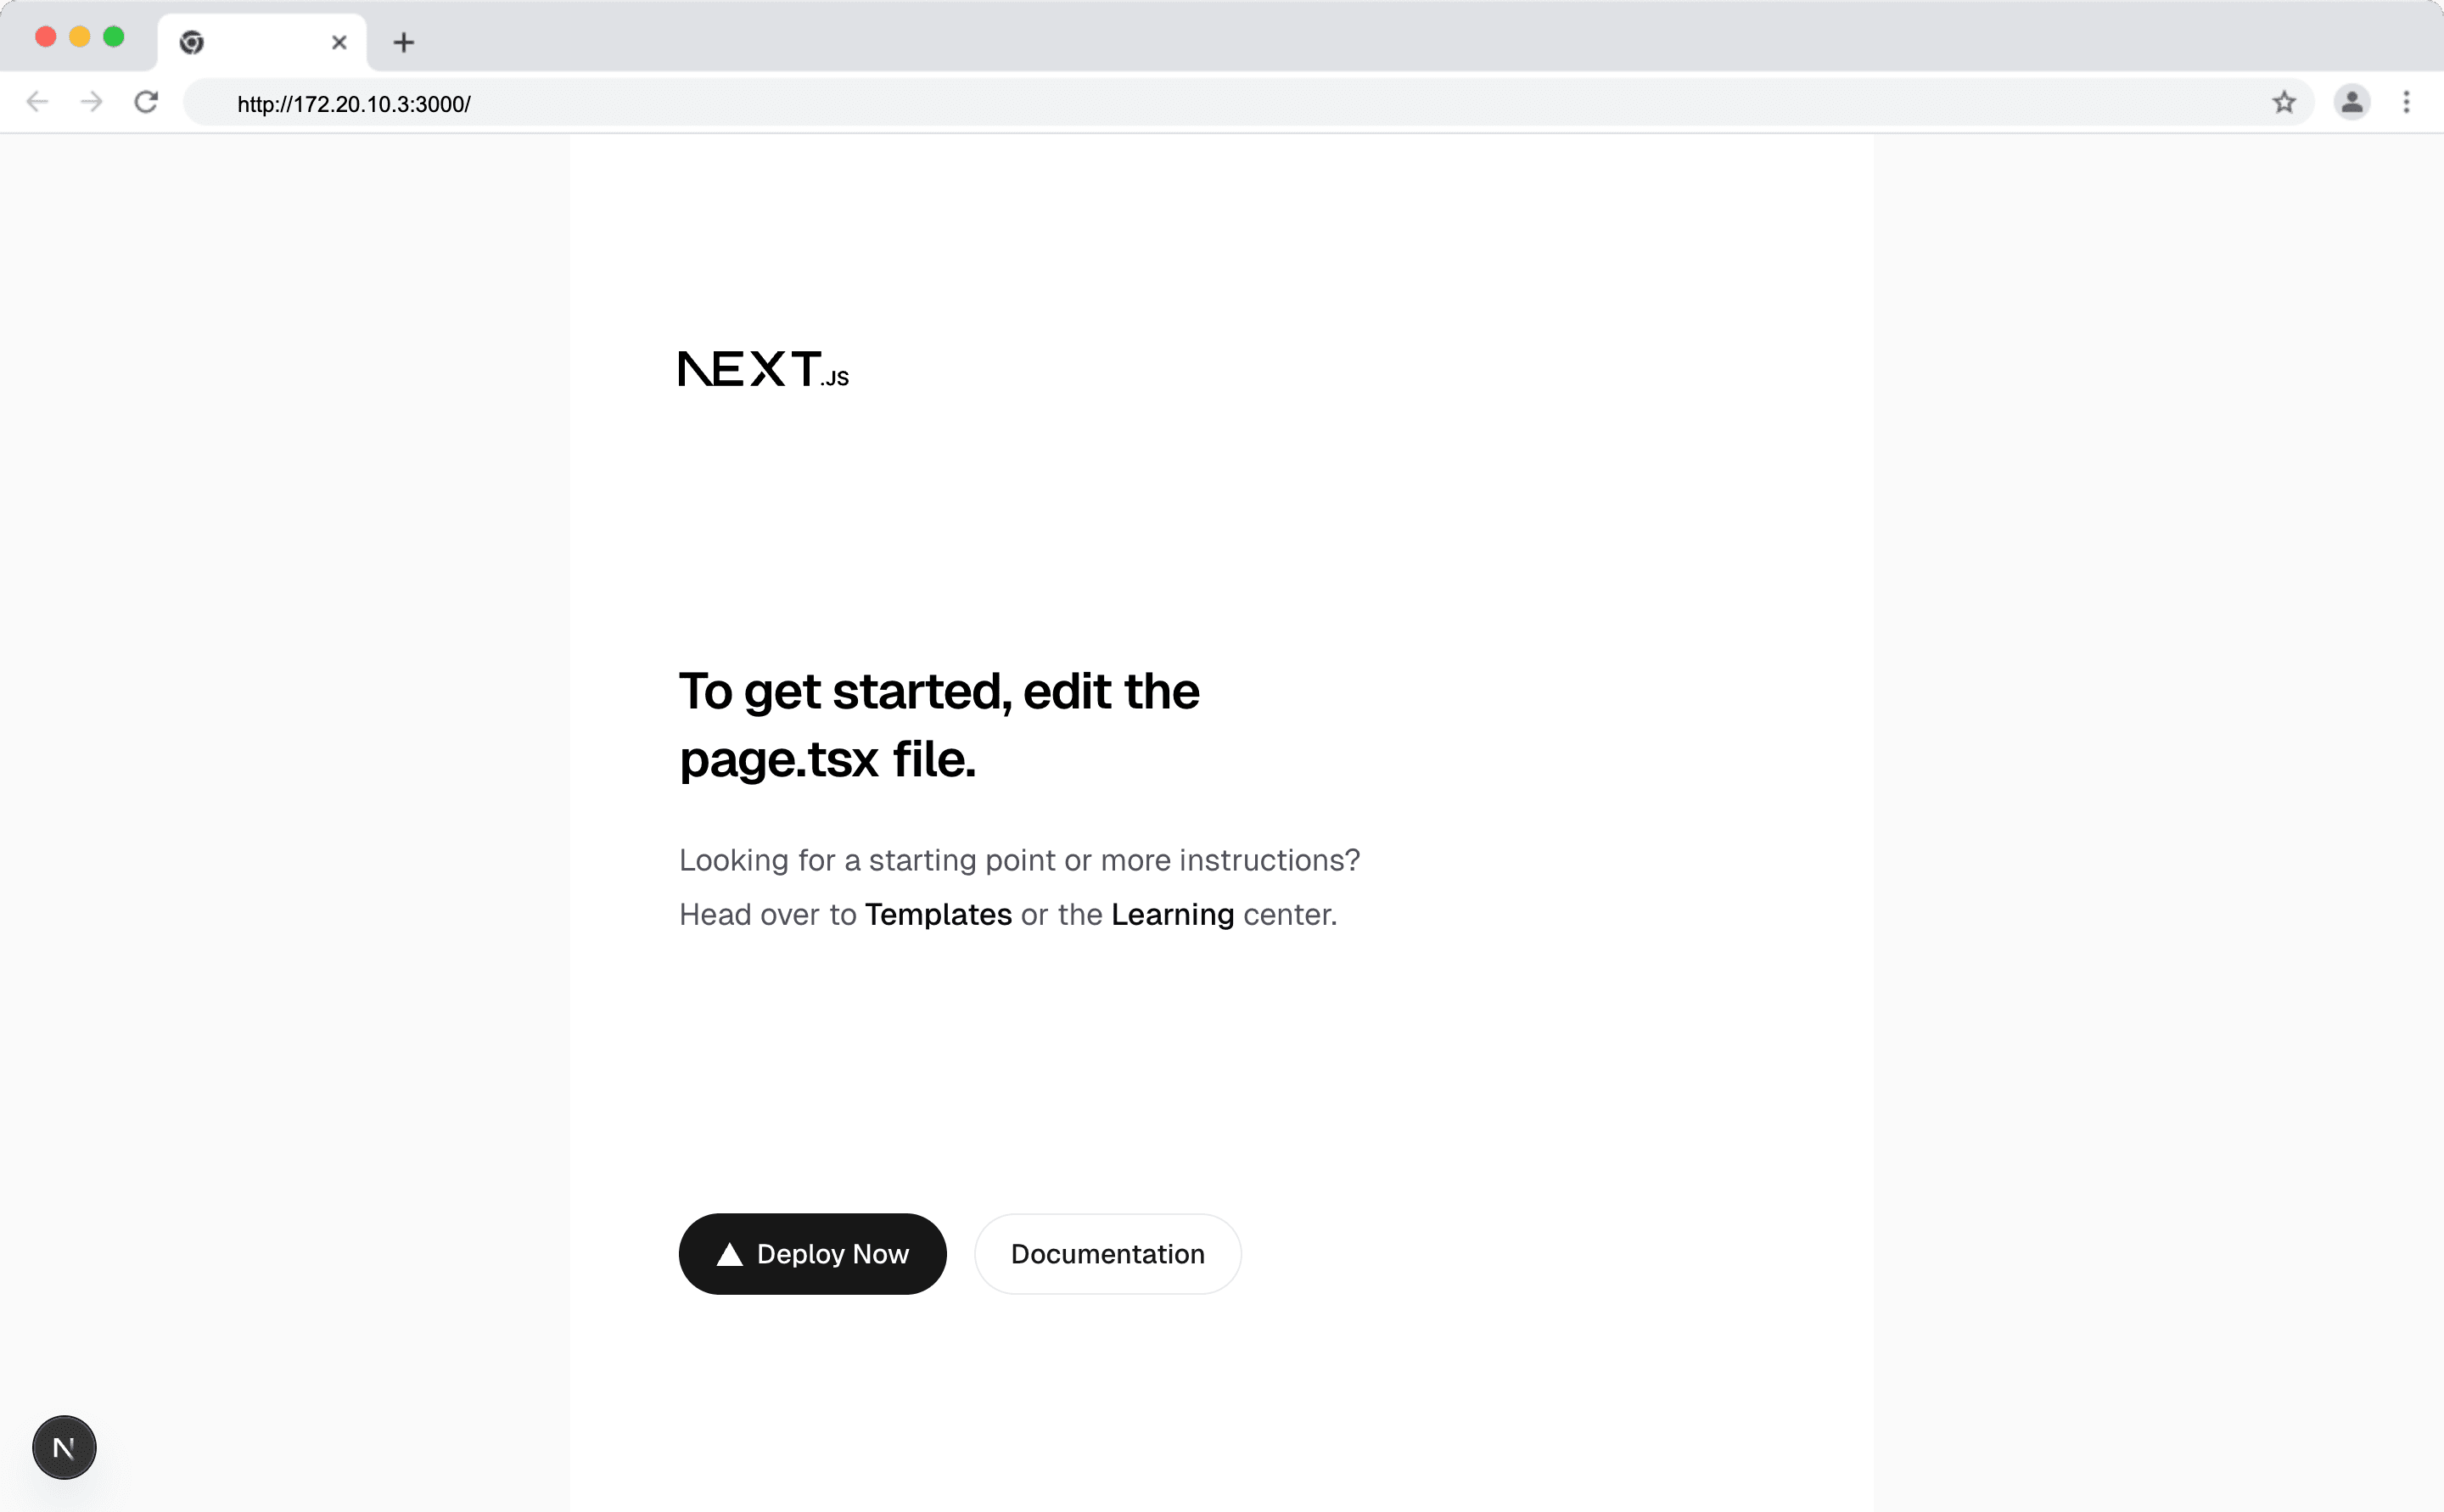
Visit http://localhost:3000 to view your new Next.js project.
To learn more about Next.js installation, visit the installation page.
Fetch Content from Strapi
To fetch content from Strapi, execute a GET request for the content type. In your case, you will fetch article entries in your Strapi backend.
Be sure that you activated the find permission for the Article collection type.
🖐️ NOTE: We also want to fetch covers (images) of articles, so we have to use the
populateparameter as seen below.
Fetching Strategies
We will fetch contents from Strapi using two strategies:
- Traditional (React
useEffecthook) - Server Components (
fetchAPI) - Client Components (React's
usehook)
1. Traditional (React useEffect hook)
Here, you will use the useEffect React hook.
// step 1: create a function to fetch articles
const getArticles = async () => {
  const response = await fetch(`${STRAPI_URL}/api/articles?populate=*`);
  const data = await response.json();
  setArticles(data.data);
};


// step 2: Fetch articles on component mount
useEffect(() => {
  getArticles();
}, []);
You can use any HTTP client such as Axios or Fetch
Using Axios
import axios;

// fetch articles along with their covers
const response = await axios.get("http://localhost:1337/api/articles?populate=*");
console.log(response.data.data);
Using Fetch
// fetch articles along with their covers
const response = await fetch("http://localhost:1337/api/articles?populate=*");
const articles = await response.json();
console.log(articles.data);
2. Server Components (The fetch API)
To fetch data in a server component, turn your component into an asynchronous function and await the fetch call.
For example:
// step 1: fetch content asynchronously
export default async function Page() {
  const response = await fetch("http://localhost:1337/api/articles?populate=*");
  const articles = await response.json();
  ...
}

// step 2: display or map over content
{
  articles.data.map((article) => <li key={article.id}>{article.title}</li>);
}
3. Client Components (React's use hook)
First, fetch articles in a server component and stream back to a client component with the Suspense boundary and the use hook:
// SERVER COMPONENT

// step 1: Import client component and Suspense inside server Component
import Articles from "@/app/ui/articles";
import { Suspense } from "react";


// step 2: fetch data inside server component
// Don't await the data fetching function
const articles = getArticles();

// step 3: stream data to client component
  return (
    <Suspense fallback={<div>Loading...</div>}>
      <Articles articles={articles} />
    </Suspense>
  );

...

// CLIENT COMPONENT

// step 4: import `use` hook
"use client";
import { use } from "react";


// step 5: read the promise
const allArticles = use(articles);

// step 6: display or map over content
{
  allArticles.map((article) => <li key={article.id}>{article.title}</li>);
}
Now, let's implement these 3 strategies with the same kind of example.
Project Example 1: Server Component
In this project example, you will fetch data from Strapi and display it in your Next.js server component using the fetch API.
Head over to your Next.js entry file ./src/app/page.tsx to proceed.
Step 1: Create Environment Variable
Add your Strapi backend URL to the environment variable file .env.local for the Strapi API and to bundle the Strapi URL to the browser.
# Path: ./.env

NEXT_PUBLIC_STRAPI_URL=http://localhost:1337
Step 2: Import the Image component and Allow Images
Import the Image component, which provides automatic image optimization.
// Path: ./src/app/page.tsx

import Image from "next/image";
Since you are working on a development environment on localhost, you have to configure Next.js to allow images.
Navigate to ./next.config.ts and add the following code:
// Path: ./next.config.ts

import type { NextConfig } from "next";

const nextConfig: NextConfig = {
  images: {
    remotePatterns: [
      {
        protocol: "http",
        hostname: "localhost",
        port: "1337",
        pathname: "/**",
      },
    ],
    dangerouslyAllowLocalIP: true,
  },
};

export default nextConfig;
With the dangerouslyAllowLocalIP, Next.js will now allow the Image Optimization API to process images from localhost.
Step 3: Fetch Articles using the fetch API
Now, fetch article entries using the fetch API.
// Path: ./src/app/page.tsx

const response = await fetch(
  `${process.env.NEXT_PUBLIC_STRAPI_URL}/api/articles?populate=*`,
);
const articles = await response.json();
Step 4: Create a Function to Format Article Dates
Create a helper function to format the publishedAt date of the article into a human-readable format (MM/DD/YYYY).
// Path: ./src/app/page.tsx

const formatDate = (date: Date) => {
  const options: Intl.DateTimeFormatOptions = {
    year: "numeric",
    month: "2-digit",
    day: "2-digit",
  };
  return new Date(date).toLocaleDateString("en-US", options);
};
Step 5: Render and Display Articles
// Path: ./src/app/page.tsx

<div className="p-6">
  <h1 className="text-4xl font-bold mb-8">Next.js and Strapi Integration</h1>
  <div>
    <h2 className="text-2xl font-semibold mb-6">Articles</h2>
    <div className="grid grid-cols-1 sm:grid-cols-2 lg:grid-cols-3 gap-6">
      {articles.data.length > 0 ? (
        articles.data.map((article) => (
          <article
            key={article.id}
            className="bg-white shadow-md rounded-lg overflow-hidden"
          >
            <Image
              className="w-full h-48 object-cover"
              src={process.env.NEXT_PUBLIC_STRAPI_URL + article.cover.url}
              alt={article.title}
              width={180}
              height={38}
              priority
            />
            <div className="p-4">
              <h3 className="text-lg font-bold mb-2">{article.title}</h3>
              <p className="text-gray-600 mb-4">{article.content}</p>
              <p className="text-sm text-gray-500">
                Published: {formatDate(article.publishedAt)}
              </p>
            </div>
          </article>
        ))
      ) : (
        <div>Nothing to fetch at the moment!</div>
      )}
    </div>
  </div>
</div>;
Now, this is what your Next.js project should look like:

Awesome, congratulations!
Next, let's use the traditional useEffect hook.
Project Example 2: useEffect
In this project example, you will fetch data from Strapi and display it in your Next.js application using the React useEffect hook.
Head over to your Next.js entry file ./src/app/page.tsx to proceed.
Step 1: Create Environment Variable
Add your Strapi backend URL to the environment variable file .env.local for the Strapi API and to bundle to the browser.
# Path: ./.env

NEXT_PUBLIC_STRAPI_URL=http://localhost:1337
Step 2: Specify the "use client" Directory
Inside the ./src/app/page.tsx file, add the code below:
// Path: ./src/app/page.tsx

"use client"; // This is a client-side component
The "use client" directive will tell Next.js to render a component on the client-side instead of the default server directive.
Step 3: Import React hooks and Image component
Import the React hooks useEffect and useState for side effects and state management, respectively.
Also, import the Image component, which provides automatic image optimization.
// Path: ./src/app/page.tsx

"use client"; // This is a client-side component

// Import React hooks and Image component
import { useEffect, useState } from "react";
import Image from "next/image";
Step 4: Allow Images from Localhost in Next.js
Since you are working on a development environment on localhost, you have to configure Next.js to allow images.
Navigate to ./next.config.ts and add the following code:
// Path: ./next.config.ts

import type { NextConfig } from "next";

const nextConfig: NextConfig = {
  images: {
    remotePatterns: [
      {
        protocol: "http",
        hostname: "localhost",
        port: "1337",
        pathname: "/**",
      },
    ],
    dangerouslyAllowLocalIP: true,
  },
};

export default nextConfig;
With the dangerouslyAllowLocalIP, Next.js will now allow the Image Optimization API to process images from localhost.
Step 5: Define articles State Variable
Create a state variable articles to hold the articles data fetched from Strapi.
// Path: ./src/app/page.tsx

// Define articles state
const [articles, setArticles] = useState();
Step 6: Create a Function to Fetch Articles
Create an asynchronous function that fetches the articles from the Strapi API. The data fetched is passed to setArticles to update the articles state.
// Path: ./src/app/page.tsx

// Fetch articles
const getArticles = async () => {
  const response = await fetch(
    `${process.env.NEXT_PUBLIC_STRAPI_URL}/api/articles?populate=*`,
  );
  const data = await response.json();
  setArticles(data.data);
};
Step 7: Create a Function to Format Article Dates
Create a helper function to format the publishedAt date of the article into a human-readable format (MM/DD/YYYY).
// Path: ./src/app/page.tsx

const formatDate = (date: Date) => {
  const options: Intl.DateTimeFormatOptions = {
    year: "numeric",
    month: "2-digit",
    day: "2-digit",
  };
  return new Date(date).toLocaleDateString("en-US", options);
};
Step 8: Fetch Articles on Component Mount
Use the useEffect to run the getArticles function when the component mounts.
// Path: ./src/app/page.tsx

useEffect(() => {
  getArticles();
}, []);
Step 9: Render and Display Articles
// Path: ./src/app/page.tsx

<div className="p-6">
  <h1 className="text-4xl font-bold mb-8">Next.js and Strapi Integration</h1>
  <div>
    <h2 className="text-2xl font-semibold mb-6">Articles</h2>
    <div className="grid grid-cols-1 sm:grid-cols-2 lg:grid-cols-3 gap-6">
      {articles?.length > 0 ? (
        articles.map((article) => (
          <article
            key={article.id}
            className="bg-white shadow-md rounded-lg overflow-hidden"
          >
            <Image
              className="w-full h-48 object-cover"
              src={process.env.NEXT_PUBLIC_STRAPI_URL + article.cover.url}
              alt={article.title}
              width={180}
              height={38}
              priority
            />
            <div className="p-4">
              <h3 className="text-lg font-bold mb-2">{article.title}</h3>
              <p className="text-gray-600 mb-4">{article.content}</p>
              <p className="text-sm text-gray-500">
                Published: {formatDate(article.publishedAt)}
              </p>
            </div>
          </article>
        ))
      ) : (
        <div>Nothing to fetch at the moment!</div>
      )}
    </div>
  </div>
</div>;
Now, this is what your Next.js project should look like:
Awesome, congratulations!
Project Example 3: Client Component
In this example, you will fetch data from a server component and stream to a client component using the use hook and Suspense boundary.
Step 1: Create Environment Variable
Add your Strapi backend URL to the environment variable file .env.local for the Strapi API and to bundle to the browser.
# Path: ./.env

NEXT_PUBLIC_STRAPI_URL=http://localhost:1337
Step 2: Import Suspense Boundary and Client Component
Inside your server component, import the Suspense boundary and the client component that you want to stream data to.
// Path: ./src/app/page.tsx

import { Suspense } from "react";
import Articles from "./ui/articles";
Step 3: Create a Function to Fetch Articles
Next, create a getArticles() function to fetch articles from your Strapi backend.
// Path: ./src/app/page.tsx

// function to fetch articles
const getArticles = async () => {
  const response = await fetch(
    `${process.env.NEXT_PUBLIC_STRAPI_URL}/api/articles?populate=*`,
  );
  const articles = await response.json();
  return articles;
};
Step 4: Pass Data to Client Component as Props
Pass the promise to your Client Component as a prop. Do not await the getArticles() function because it should be a promise.
Notice the fallback component while we await the promise.
// Path: ./src/app/page.tsx

export default async function Home() {
  const articles = getArticles();
  return (
    <div className="p-6">
      <h1 className="text-4xl font-bold mb-8">
        Next.js and Strapi Integration
      </h1>
      <Suspense fallback={<div>Loading....</div>}>
        <Articles articles={articles} />
      </Suspense>
    </div>
  );
}
The <Articles> component is wrapped in a <Suspense> boundary. This means the fallback component will be shown while the promise is being resolved.
Step 5: Create Client Component
Inside the app folder, create a folder called ui. Inside the ui folder, create a file called articles.tsx.
Inside the ./src/app/ui/articles.tsx file, add the code below:
// Path: ./src/app/ui/articles.tsx

"use client"; // This is a client-side component
The "use client" directive will tell Next.js to render a component on the client-side instead of the default server directive.
Step 6: Import use Hook
Import the use hook that will read the streamed data in your client component:
// Path: ./src/app/ui/articles.tsx

import { use } from "react";
Step 7: Import the Image component and Allow Images
Import the Image component, which provides automatic image optimization.
// Path: ./src/app/page.tsx

import Image from "next/image";
Since you are working on a development environment on localhost, you have to configure Next.js to allow images.
Navigate to ./next.config.ts and add the following code:
// Path: ./next.config.ts

import type { NextConfig } from "next";

const nextConfig: NextConfig = {
  images: {
    remotePatterns: [
      {
        protocol: "http",
        hostname: "localhost",
        port: "1337",
        pathname: "/**",
      },
    ],
    dangerouslyAllowLocalIP: true,
  },
};

export default nextConfig;
With the dangerouslyAllowLocalIP, Next.js will now allow the Image Optimization API to process images from localhost.
Step 8: Read Promise and Render Data
The last step is to:
- Use the
usehook to read the promise. And lastly, - Create a function to format the date of the article
- Map and render fetched articles
// Path: ./src/app/ui/articles.tsx

export default function Articles({ articles }: { articles: Promise<any> }) {
  const allArticles = use(articles);

  // Format date of articles
  const formatDate = (date: Date) => {
    const options: Intl.DateTimeFormatOptions = {
      year: "numeric",
      month: "2-digit",
      day: "2-digit",
    };
    return new Date(date).toLocaleDateString("en-US", options);
  };

  return (
    <ul>
      <div>
        <h2 className="text-2xl font-semibold mb-6">Articles</h2>
        <div className="grid grid-cols-1 sm:grid-cols-2 lg:grid-cols-3 gap-6">
          {allArticles.data.map((article) => (
            <article
              key={article.id}
              className="bg-white shadow-md rounded-lg overflow-hidden"
            >
              <Image
                className="w-full h-48 object-cover"
                src={process.env.NEXT_PUBLIC_STRAPI_URL + article.cover.url}
                alt={article.title}
                width={180}
                height={38}
                priority
              />
              <div className="p-4">
                <h3 className="text-lg font-bold mb-2">{article.title}</h3>
                <p className="text-gray-600 mb-4">{article.content}</p>
                <p className="text-sm text-gray-500">
                  Published: {formatDate(article.publishedAt)}
                </p>
              </div>
            </article>
          ))}
        </div>
      </div>
    </ul>
  );
}
When you refresh your page, this is what you should see:
As shown above, the fallback component will be shown while the promise is being resolved.
Github Project Repo
You can find the complete code for each of the example projects in this Github repo.
For specific examples, here are their branches:
Strapi Open Office Hours
If you have any questions about Strapi 5 or just would like to stop by and say hi, you can join us at Strapi's Discord Open Office Hours Monday through Friday at 12:30 pm - 1:30 pm CST: Strapi Discord Open Office Hours
For more details, visit the Strapi documentation and Next.js documentation.
Frequently Asked Questions
To connect Next.js to Strapi, you expose Strapi’s REST API and fetch content from your Next.js application using HTTP requests.
In this guide, you:
- Create a Strapi project and enable find and findOne permissions for your content type.
- Store your Strapi backend URL in an environment variable (e.g.
NEXT_PUBLIC_STRAPI_URL). - Fetch content from endpoints like
/api/articlesusing fetch or Axios from either Server Components or Client Components in Next.js.
This setup allows Next.js to consume Strapi content seamlessly.
Strapi supports authentication using JWT and third-party providers (Google, GitHub, etc.). For public content, you can enable access via the Public role in Strapi.
For protected content:
- Use Strapi’s authentication endpoints to log users in.
- Store the JWT securely (preferably using HTTP-only cookies).
- Send the token in the Authorization header when making requests from Next.js.
- In production, it’s recommended to fetch protected data from Next.js Server Components or API routes to avoid exposing tokens in the browser.
Learn more here.
At a minimum, you need to define your Strapi backend URL:NEXT_PUBLIC_STRAPI_URL=http://localhost:1337.
This variable is used to:
- Fetch content from Strapi’s REST API.
- Resolve media URLs (such as images).
- Configure client-side and server-side data fetching consistently.
In production, you should replace this value with your deployed Strapi URL.
By default, Strapi does not populate relations or media fields. To fetch images:
- Use the populate parameter in your API request, for example:
/api/articles?populate=* - Configure
next.config.tsto allow images from your Strapi domain (or localhost during development). - Use Next.js’s
<Image />component for optimized image loading.
This ensures media files are properly fetched and displayed in your Next.js app.
Images not loading Ensure remotePatterns are configured in next.config.ts and that media fields are populated.
Empty API responses Check that content is published and that the correct permissions are enabled in Strapi.
CORS or network errors Verify the Strapi server is running and that the correct backend URL is used.
Unexpected data shape Inspect the API response and adjust your frontend mapping logic accordingly, especially for relations and media fields.