Imgix
Find out how to integrate Imgix with Strapi

Why Use Imgix
Imgix is a powerful real-time image processing and optimization service that transforms how websites handle visual content. Imgix processes images on-demand through their globally distributed network, ensuring optimal delivery of high-quality visuals while maintaining fast loading speeds—a critical factor for modern web applications.
Visit the Imgix documentation for a complete overview of features and implementation details.
Why Use Strapi
Strapi is the leading open-source headless CMS offering features, like customizable APIs, role-based permissions, multilingual support, etc. It simplifies content management and integrates effortlessly with modern frontend frameworks.
Explore the Strapi documentation for more details.
Strapi 5 Highlights
The out-of-the-box Strapi features allow you to get up and running in no time:
- Single types: Create one-off pages that have a unique content structure
- Customizable API: With Strapi, you can just hop in your code editor and edit the code to fit your API to your needs.
- Integrations: Strapi supports integrations with Cloudinary, SendGrid, Algolia, and others.
- Editor interface: The editor allows you to pull in dynamic blocks of content.
- Authentication: Secure and authorize access to your API with JWT or providers.
- RBAC: Help maximize operational efficiency, reduce dev team support work, and safeguard against unauthorized access or configuration modifications.
- i18n: Manage content in multiple languages. Easily query the different locales through the API.
Learn more about Strapi 5.
Setup Strapi 5 Headless CMS
We are going to start by setting up our Strapi 5 project with the following command:
🖐️ Note: make sure that you have created a new directory for your project.
You can find the full documentation for Strapi 5 here.
Install Strapi
npx create-strapi-app@latest serverYou will be asked to choose if you would like to use Strapi Cloud we will choose to skip for now.
 Strapi   v5.6.0 🚀 Let's create your new project

To deploy your project, create a new project on the Strapi Cloud dashboard.

? Please log in or sign up.
  Login/Sign up
❯ Skip
After that, you will be asked how you would like to set up your project. We will choose the following options:
? Do you want to use the default database (sqlite) ? Yes
? Start with an example structure & data? Yes <-- make sure you say yes
? Start with Typescript? Yes
? Install dependencies with npm? Yes
? Initialize a git repository? Yes
Once everything is set up and all the dependencies are installed, you can start your Strapi server with the following command:
cd server
npm run develop
You will be greeted with the Admin Create Account screen.

Go ahead and create your first Strapi user. All of this is local so you can use whatever you want.
Once you have created your user, you will be redirected to the Strapi Dashboard screen.

Publish Article Entries
Since we created our app with the example data, you should be able to navigate to your Article collection and see the data that was created for us.
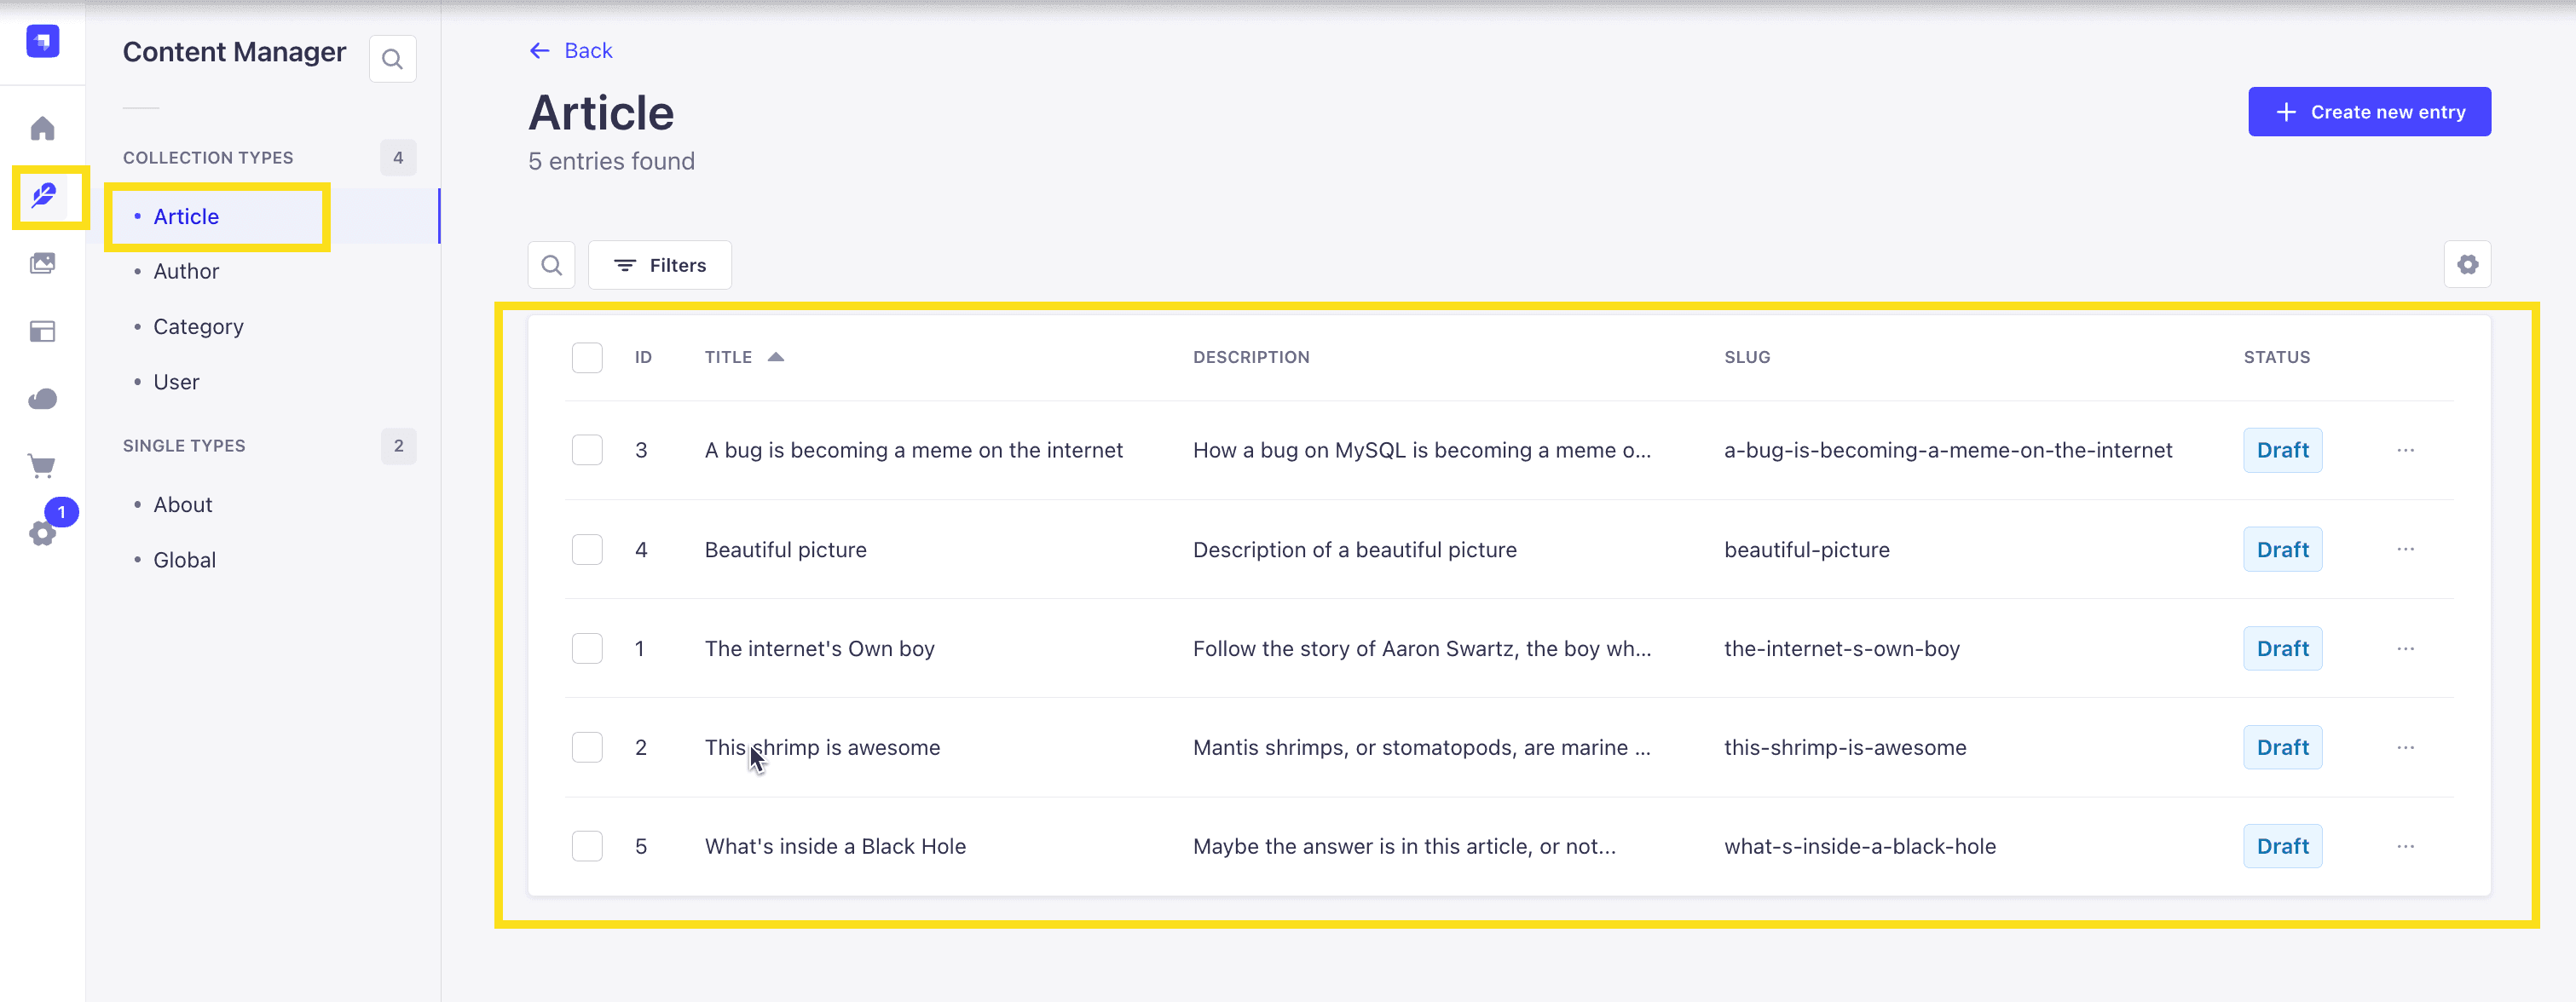
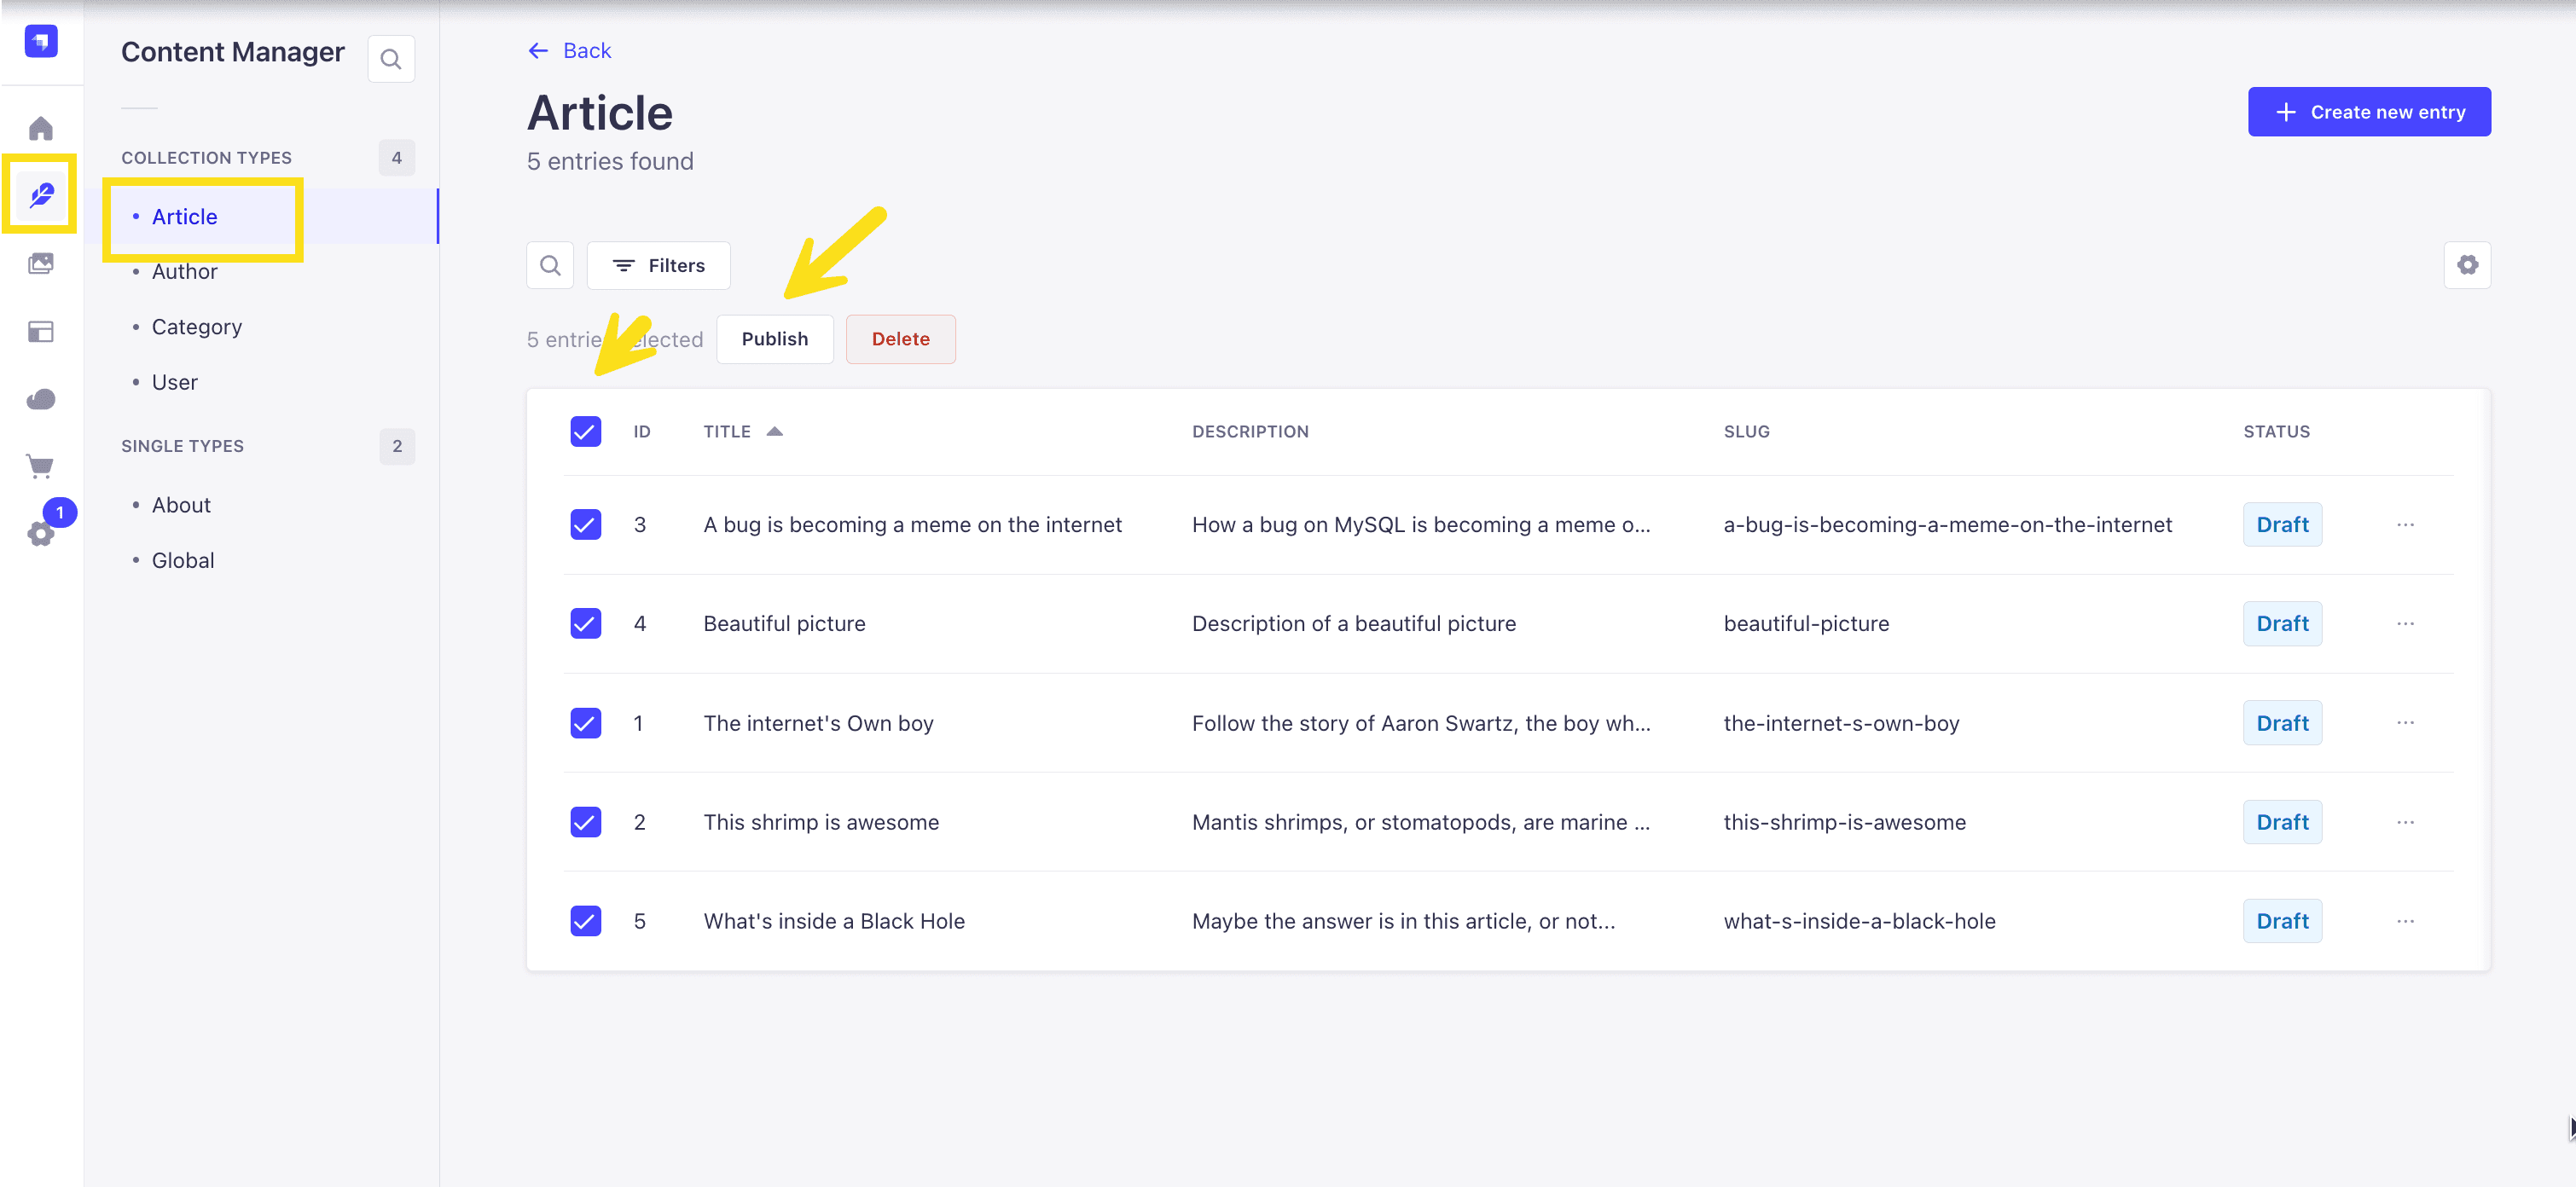
Now, let's make sure that all of the data is published. If not, you can select all items via the checkbox and then click the Publish button.
Enable API Access
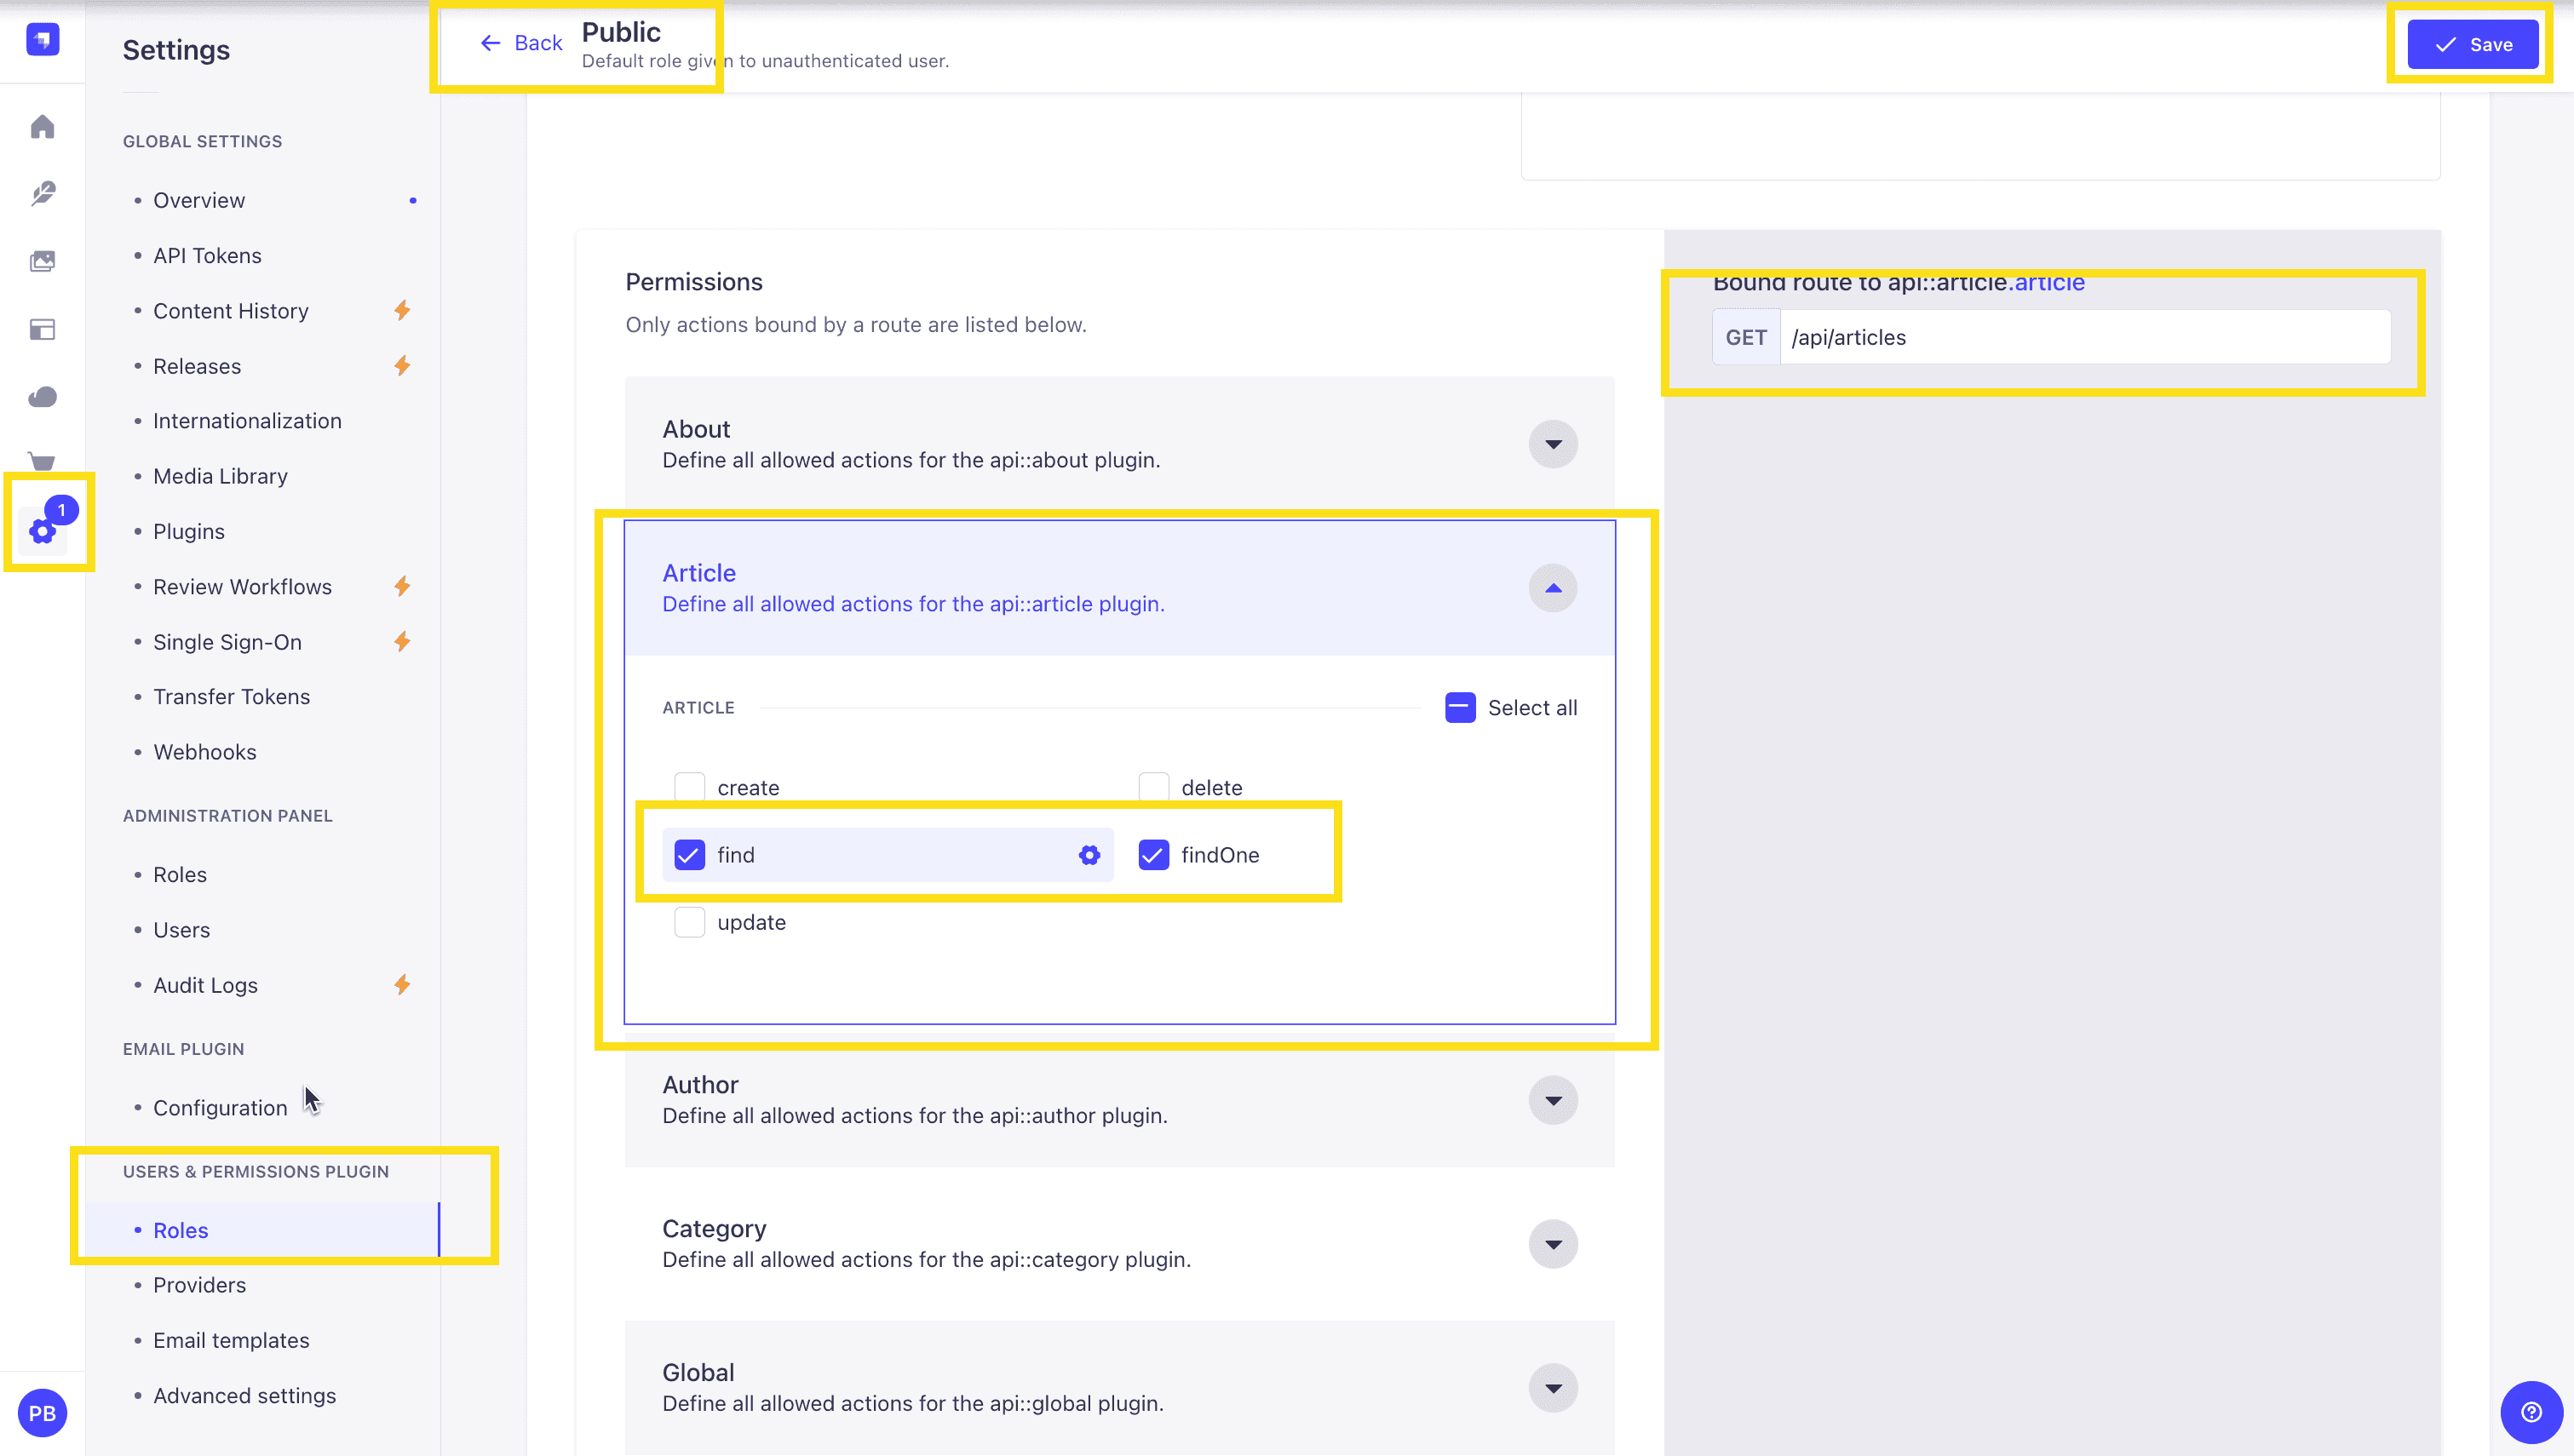
Once all your articles are published, we will expose our Strapi API for the Articles Collection. This can be done in Settings -> Users & Permissions plugin -> Roles -> Public -> Article.
You should have find and findOne selected. If not, go ahead and select them.
Test API
Now, if we make a GET request to http://localhost:1337/api/articles, we should see the following data for our articles.
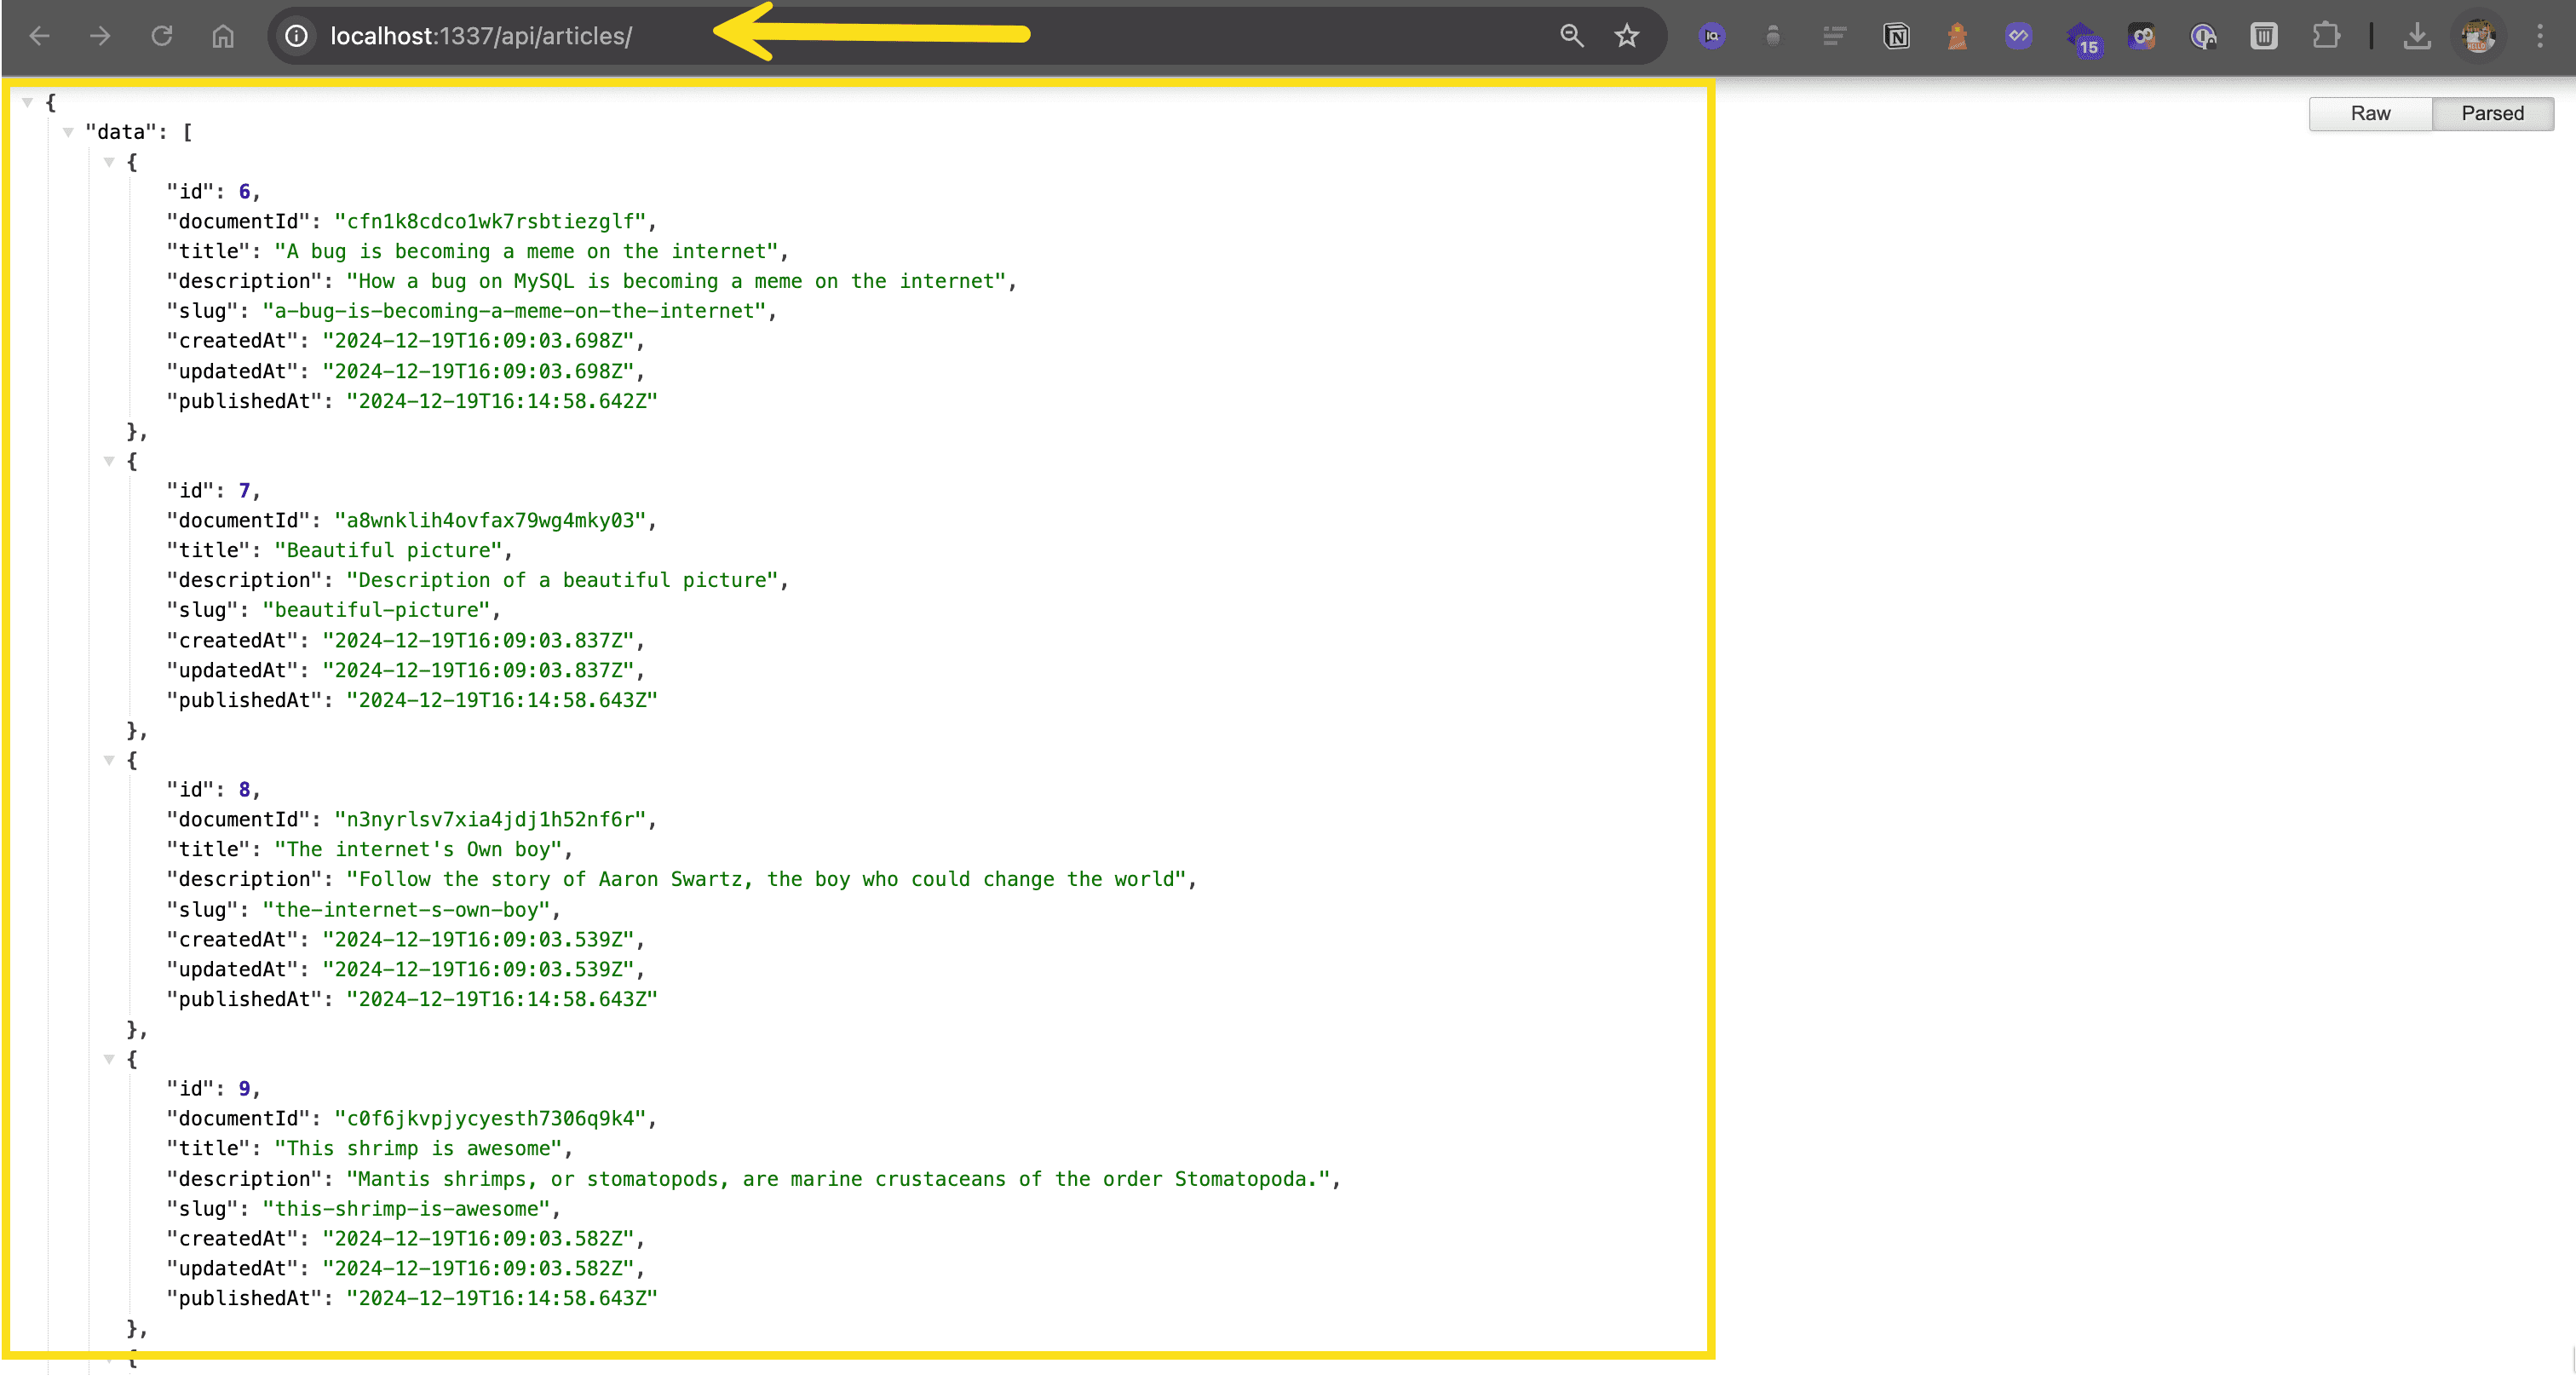
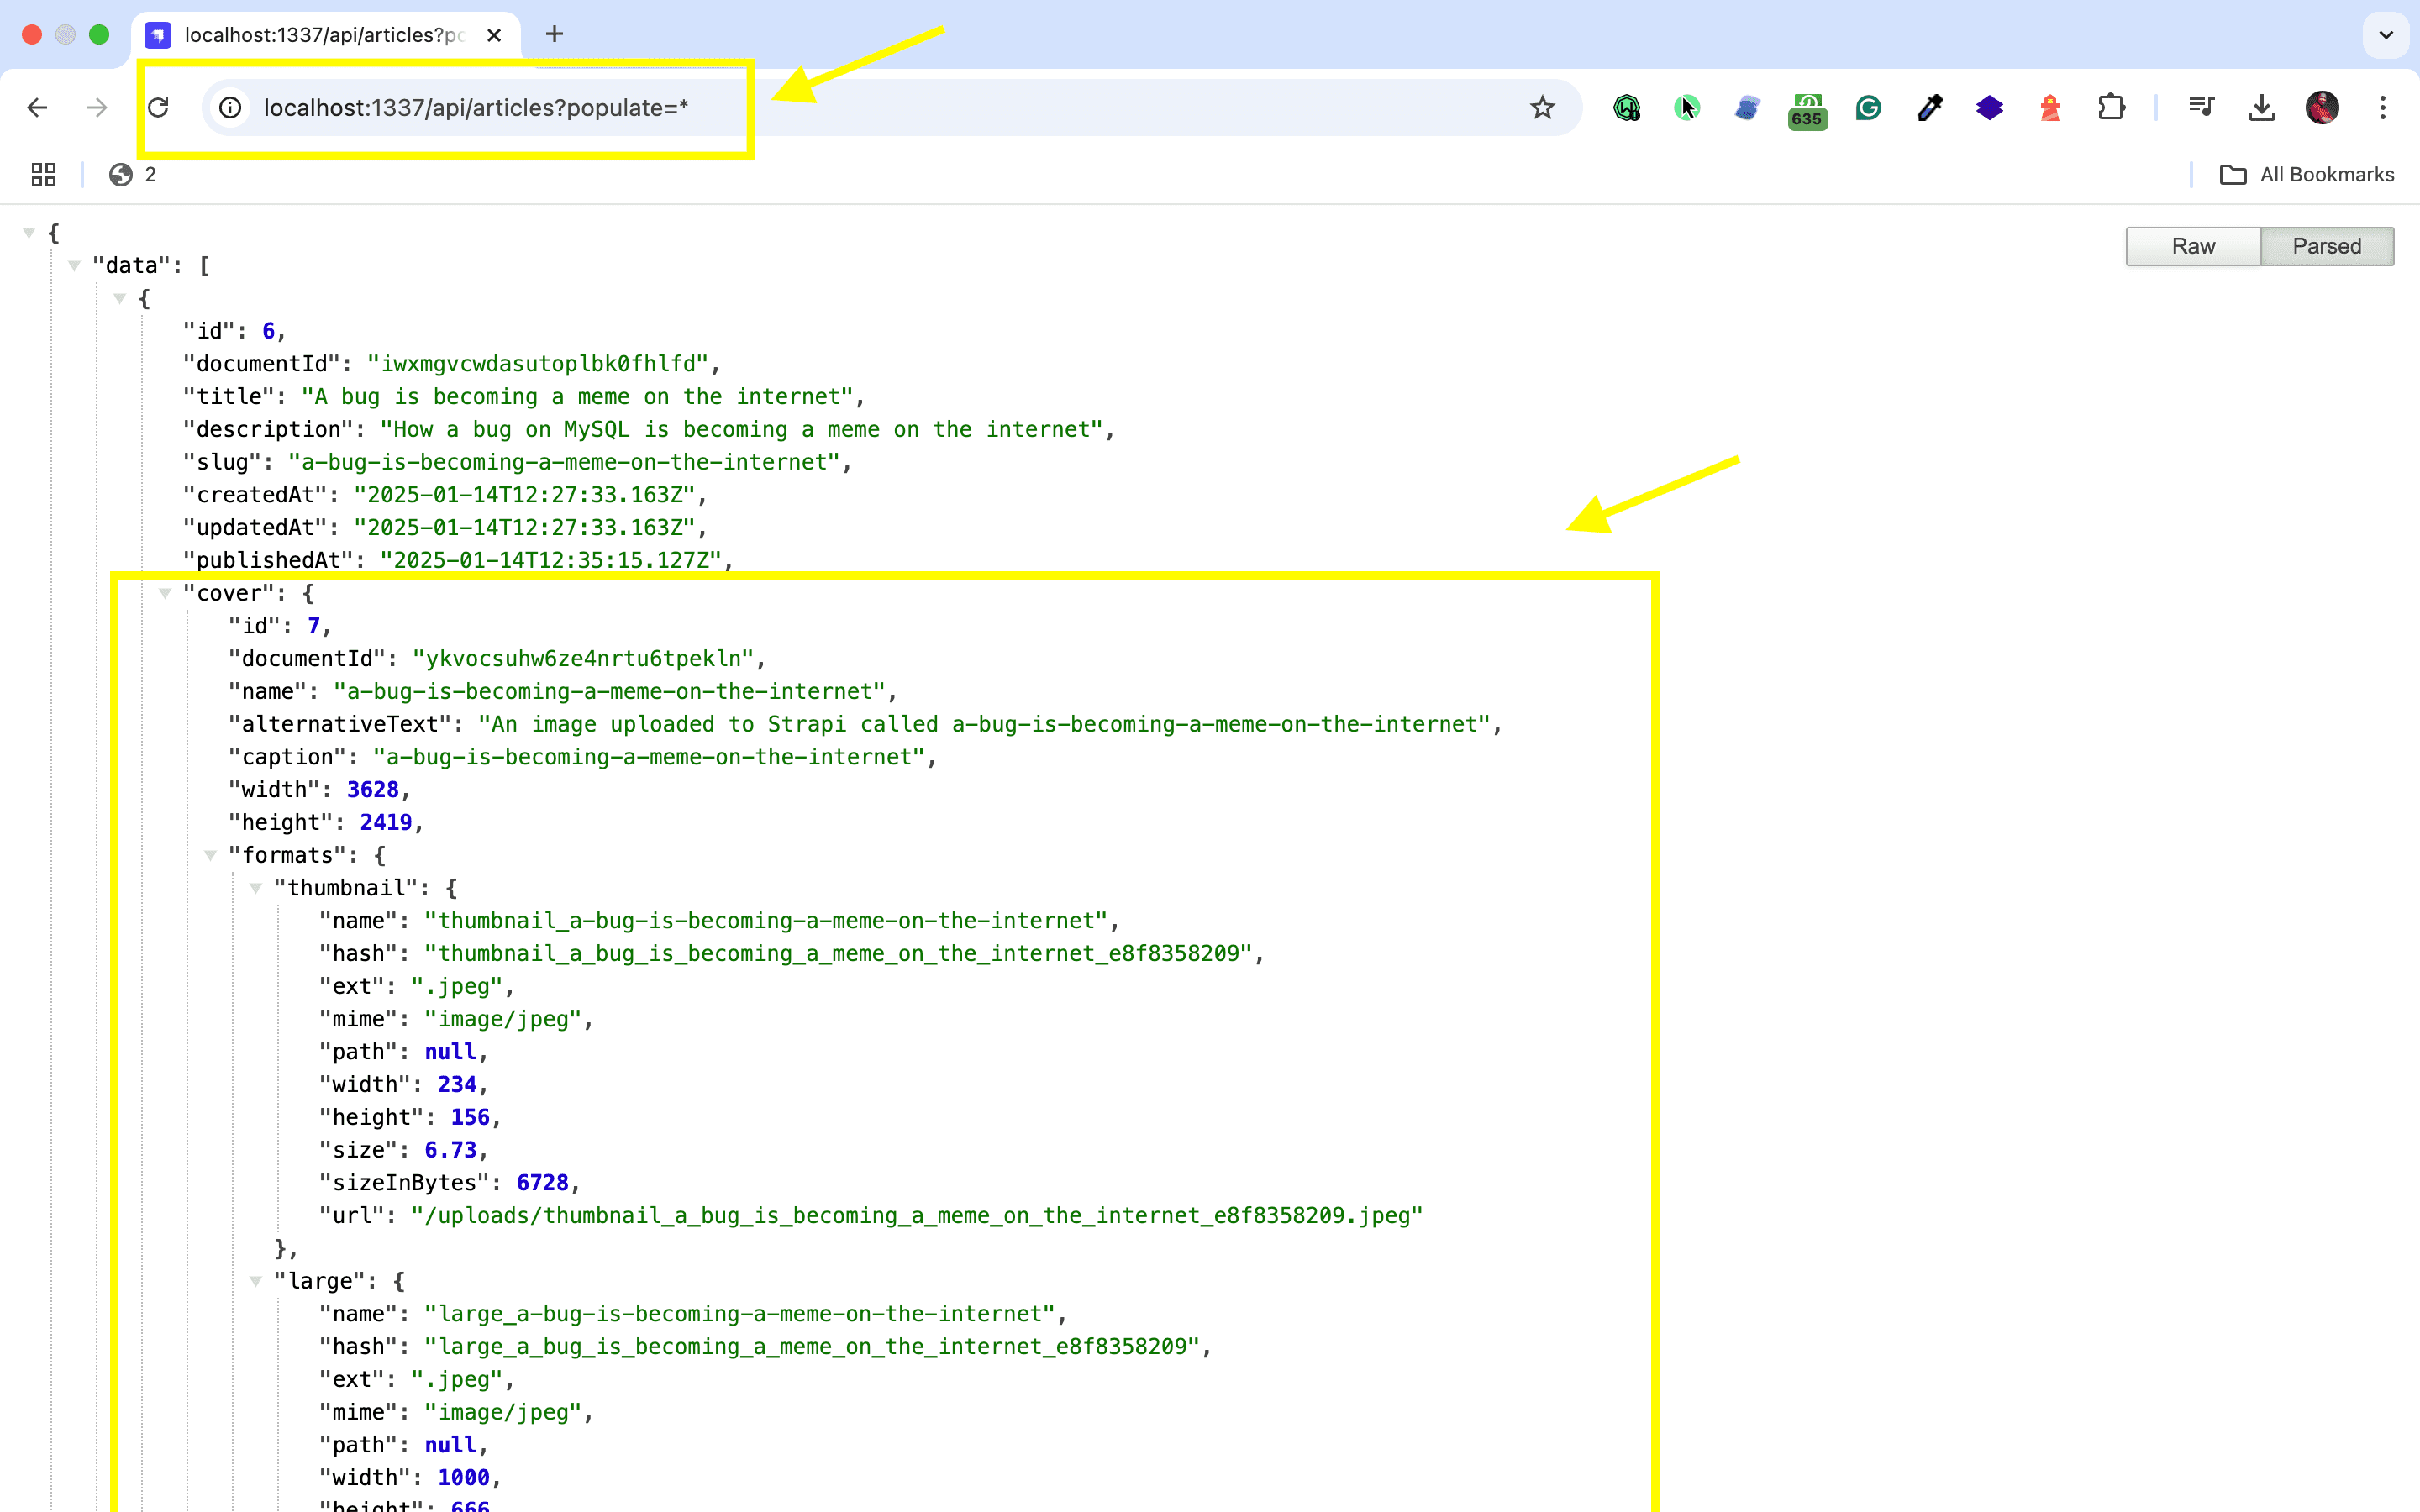
🖐️ Note: The article covers (images) are not returned. This is because the REST API by default does not populate any relations, media fields, components, or dynamic zones.. Learn more about REST API: Population & Field Selection.
So, let's get the article covers by using the populate=* parameter: http://localhost:1337/api/articles?populate=*
Getting Started with Imgix
Integrating Imgix with Strapi can significantly enhance image management, but it is important to implement proper testing and troubleshooting strategies to ensure reliable image delivery and email functionality.
Using the strapi-plugin-imgix Strapi Plugin
A Strapi Plugin to integrate imgix with your Strapi Media Library.
If you manage your assets using Strapi's built-in Media Library, this plugin allows you to rewrite the asset URLs so that they are served from an imgix Source.
Learn more here.
Implement Testing Strategies
Start with a layered testing approach to ensure comprehensive coverage when you test Strapi applications:
- Unit Testing
- Write tests for individual components that interact with Imgix.
- Test image URL generation and parameter handling.
- Verify error handling mechanisms.
- Integration Testing
- Use Postman or Insomnia to test API endpoints.
- Verify image delivery through the Imgix CDN.
- Test different image transformation parameters.
- End-to-End Testing
- Implement Cypress or Selenium tests for user interaction flows.
- Verify image loading across different viewport sizes.
- Test image optimization parameters in real-world scenarios.
Handle Errors and Troubleshoot
Common issues you might encounter and their solutions:
- Image Loading Issues
- If images aren't loading, verify your Imgix source URL configuration.
- Check network requests for proper response codes.
- Ensure image paths are correctly encoded.
- Performance Problems
- Monitor image loading times across different devices.
- Use appropriate Imgix parameters for optimization.
- Implement progressive loading for larger images.
Here's a robust error handling pattern:
try {
  // Imgix request code
  const imgixResponse = await imgix.fetch(imageUrl);

  if (!imgixResponse.ok) {
    throw new Error(`Imgix error: ${imgixResponse.status}`);
  }
} catch (error) {
  console.error("Image processing failed:", error.message); // Implement fallback strategy

  handleImageError(error);
}
Use Debugging Tips and Tools
For effective debugging:
- Use Browser Developer Tools
- Monitor Network tab for image requests.
- Inspect response headers for Imgix-specific information.
- Track performance metrics in the Performance tab.
- Implement Logging
- Add detailed logging for image transformations.
- Track API response times.
- Monitor CDN performance.
Test Email Functionality
When using Imgix for email images:
- Cross-Client Testing
- Test email rendering in major clients (Gmail, Outlook, Apple Mail).
- Verify image loading across mobile devices.
- Check image fallback behavior when images are blocked.
- Performance Optimization
- Use appropriate image dimensions for email clients.
- Implement progressive loading where supported.
- Monitor email delivery and open rates.
- Best Practices
- Always include descriptive alt text.
- Set appropriate image dimensions.
- Test with different network conditions.
Monitor Performance
Implement continuous monitoring:
- Track Key Metrics
- Image load times.
- CDN response times.
- Cache hit rates.
- Error rates.
- Set Up Alerts
- Configure alerts for high error rates.
- Monitor for unusual traffic patterns.
- Track API usage limits.
For more detailed information about Imgix features and implementation guidelines, refer to the Imgix Documentation. Additionally, consult the Strapi v5 Documentation for CMS-specific integration details.
Following these testing and troubleshooting strategies will ensure a robust integration between Imgix and Strapi, delivering optimized images efficiently while maintaining reliable email functionality.
Awesome, great job!
Strapi Open Office Hours
If you have any questions about Strapi 5 or just would like to stop by and say hi, you can join us at Strapi's Discord Open Office Hours Monday through Friday at 12:30 pm - 1:30 pm CST: Strapi Discord Open Office Hours
For more details, visit the Strapi documentation and Imgix documentation.
Frequently Asked Questions
imgix is a real-time image processing and optimization service that transforms images on-demand through URL parameters. A Strapi plugin rewrites media library URLs to serve optimized images through imgix's global CDN.
Install the strapi-plugin-imgix package, configure it with your imgix source URL in Strapi's plugin settings, and your media library assets will automatically be served through imgix with optimization applied.
imgix supports over 100 transformations including resizing, cropping, format conversion, quality adjustment, and filters. Apply these by adding parameters to the image URL, which imgix processes in real-time.
Verify your imgix source URL configuration, check network requests for proper response codes, and ensure image paths are correctly encoded. Monitor the browser's Network tab for imgix-specific response headers.
Yes, imgix optimizes images for different devices and serves them through a global CDN. This reduces bandwidth, improves load times, and provides automatic format selection (like WebP) for browsers that support it.