n8n
Connect Strapi with n8n to automate content operations without writing custom middleware. Use the visual node editor to build webhook-triggered workflows, perform CRUD operations on your CMS, and distribute content across multiple channels—all with built-in retry logic and error handling

If you're managing content in Strapi and need to automate workflows like publishing notifications, syncing data across tools, triggering AI enrichment, or orchestrating approval flows, integrating n8n gives you a powerful automation layer without writing custom backend services.
What Is n8n?
n8n is a workflow automation platform built with Node.js, featuring a visual node-based editor and a backend execution engine.
It allows you to design automation pipelines by connecting Nodes. Nodes are discrete components that can trigger workflows, perform actions (such as API calls or data processing), or apply logic (including conditional branching and loops) within a drag-and-drop interface.
Why Integrate n8n with Strapi?
Strapi is a powerful headless CMS for managing content, and n8n adds an automation layer on top of it. Without n8n, you might resort to writing custom middleware or scripts to connect Strapi with other services like handling webhooks, API calls, retries, and data transformations manually. That approach often results in a significant amount of boilerplate code and maintenance overhead for your team.
-
Event-driven automation: Strapi includes a built-in webhook system, which can notify external services (like n8n) whenever certain events happen in the CMS.
Rather than polling Strapi’s API for changes, you can configure Strapi to send a webhook on events such as creating, updating, publishing, or deleting a content entry.
-
Simplified two-way integration: n8n provides a dedicated Strapi node (integration) that supports common CMS operations like Create, Update, Get, and Delete for content entries. With this, your n8n workflows can easily pull data from Strapi or push updates back to it through a friendly interface.
-
Less code, more control: By using n8n, you gain robust features out of the box: automatic retries on failures, error handling logic, and the ability to build complex multi-step flows visually. At the same time, you’re not limited by a simple template – you can insert Code nodes for custom JavaScript, or use HTTP Request nodes when you need to call a Strapi API endpoint that the built-in node doesn’t cover.
Common real-world use cases:
- Notify Slack when content is published
- Automatically summarize articles using AI
- Sync product data with an e-commerce platform
- Trigger approval workflows
- Update CRM when new leads are created, etc.
How to Integrate n8n with Strapi v5
Integrating n8n with Strapi involves connecting the two systems and setting up workflows that respond to Strapi events, perform actions on Strapi data, and smart workflows.
- Capture Events in Strapi: Trigger automations from Strapi using webhooks
- Perform CRUD Operations on Strapi Content: Let n8n create, read, update, or delete Strapi entries with the Strapi node or the HTTP Request node
- Logic & Orchestration: Turn events into intelligent workflows across systems
Prepare Strapi and n8n Environment
Prerequisistes
The following steps assume you have
- Node.js 20+ LTS, so ensure your environment meets that.
- Basic understanding of REST APIs and webhooks
Prepare Your Strapi Environment
Bootstrap a Strapi 5 Project We are going to start by setting up a Strapi 5 project with the following command:
🖐️ Note: Make sure that you have created a new directory for your project.
You can find the full documentation for Strapi 5 here.
npx create-strapi-app@latest serverYou will be asked to choose if you would like to use Strapi Cloud. We will choose to skip for now.
🚀 Welcome to Strapi! Ready to bring your project to life?

...

? Please log in or sign up.
  Login/Sign up
❯ Skip
After that, you will be asked how you would like to set up your project. We will choose the following options:
? Do you want to use the default database (sqlite) ? Yes
? Start with an example structure & data? Yes <-- make sure you say yes
? Start with Typescript? Yes
? Install dependencies with npm? Yes
? Initialize a git repository? Yes
✋ NOTE: We answered "Yes" to start with an example structure and data.
Once everything is set up and all the dependencies are installed, you can start your Strapi server with the following command:
cd server
npm run develop
You will be greeted with the Admin Create Account screen.
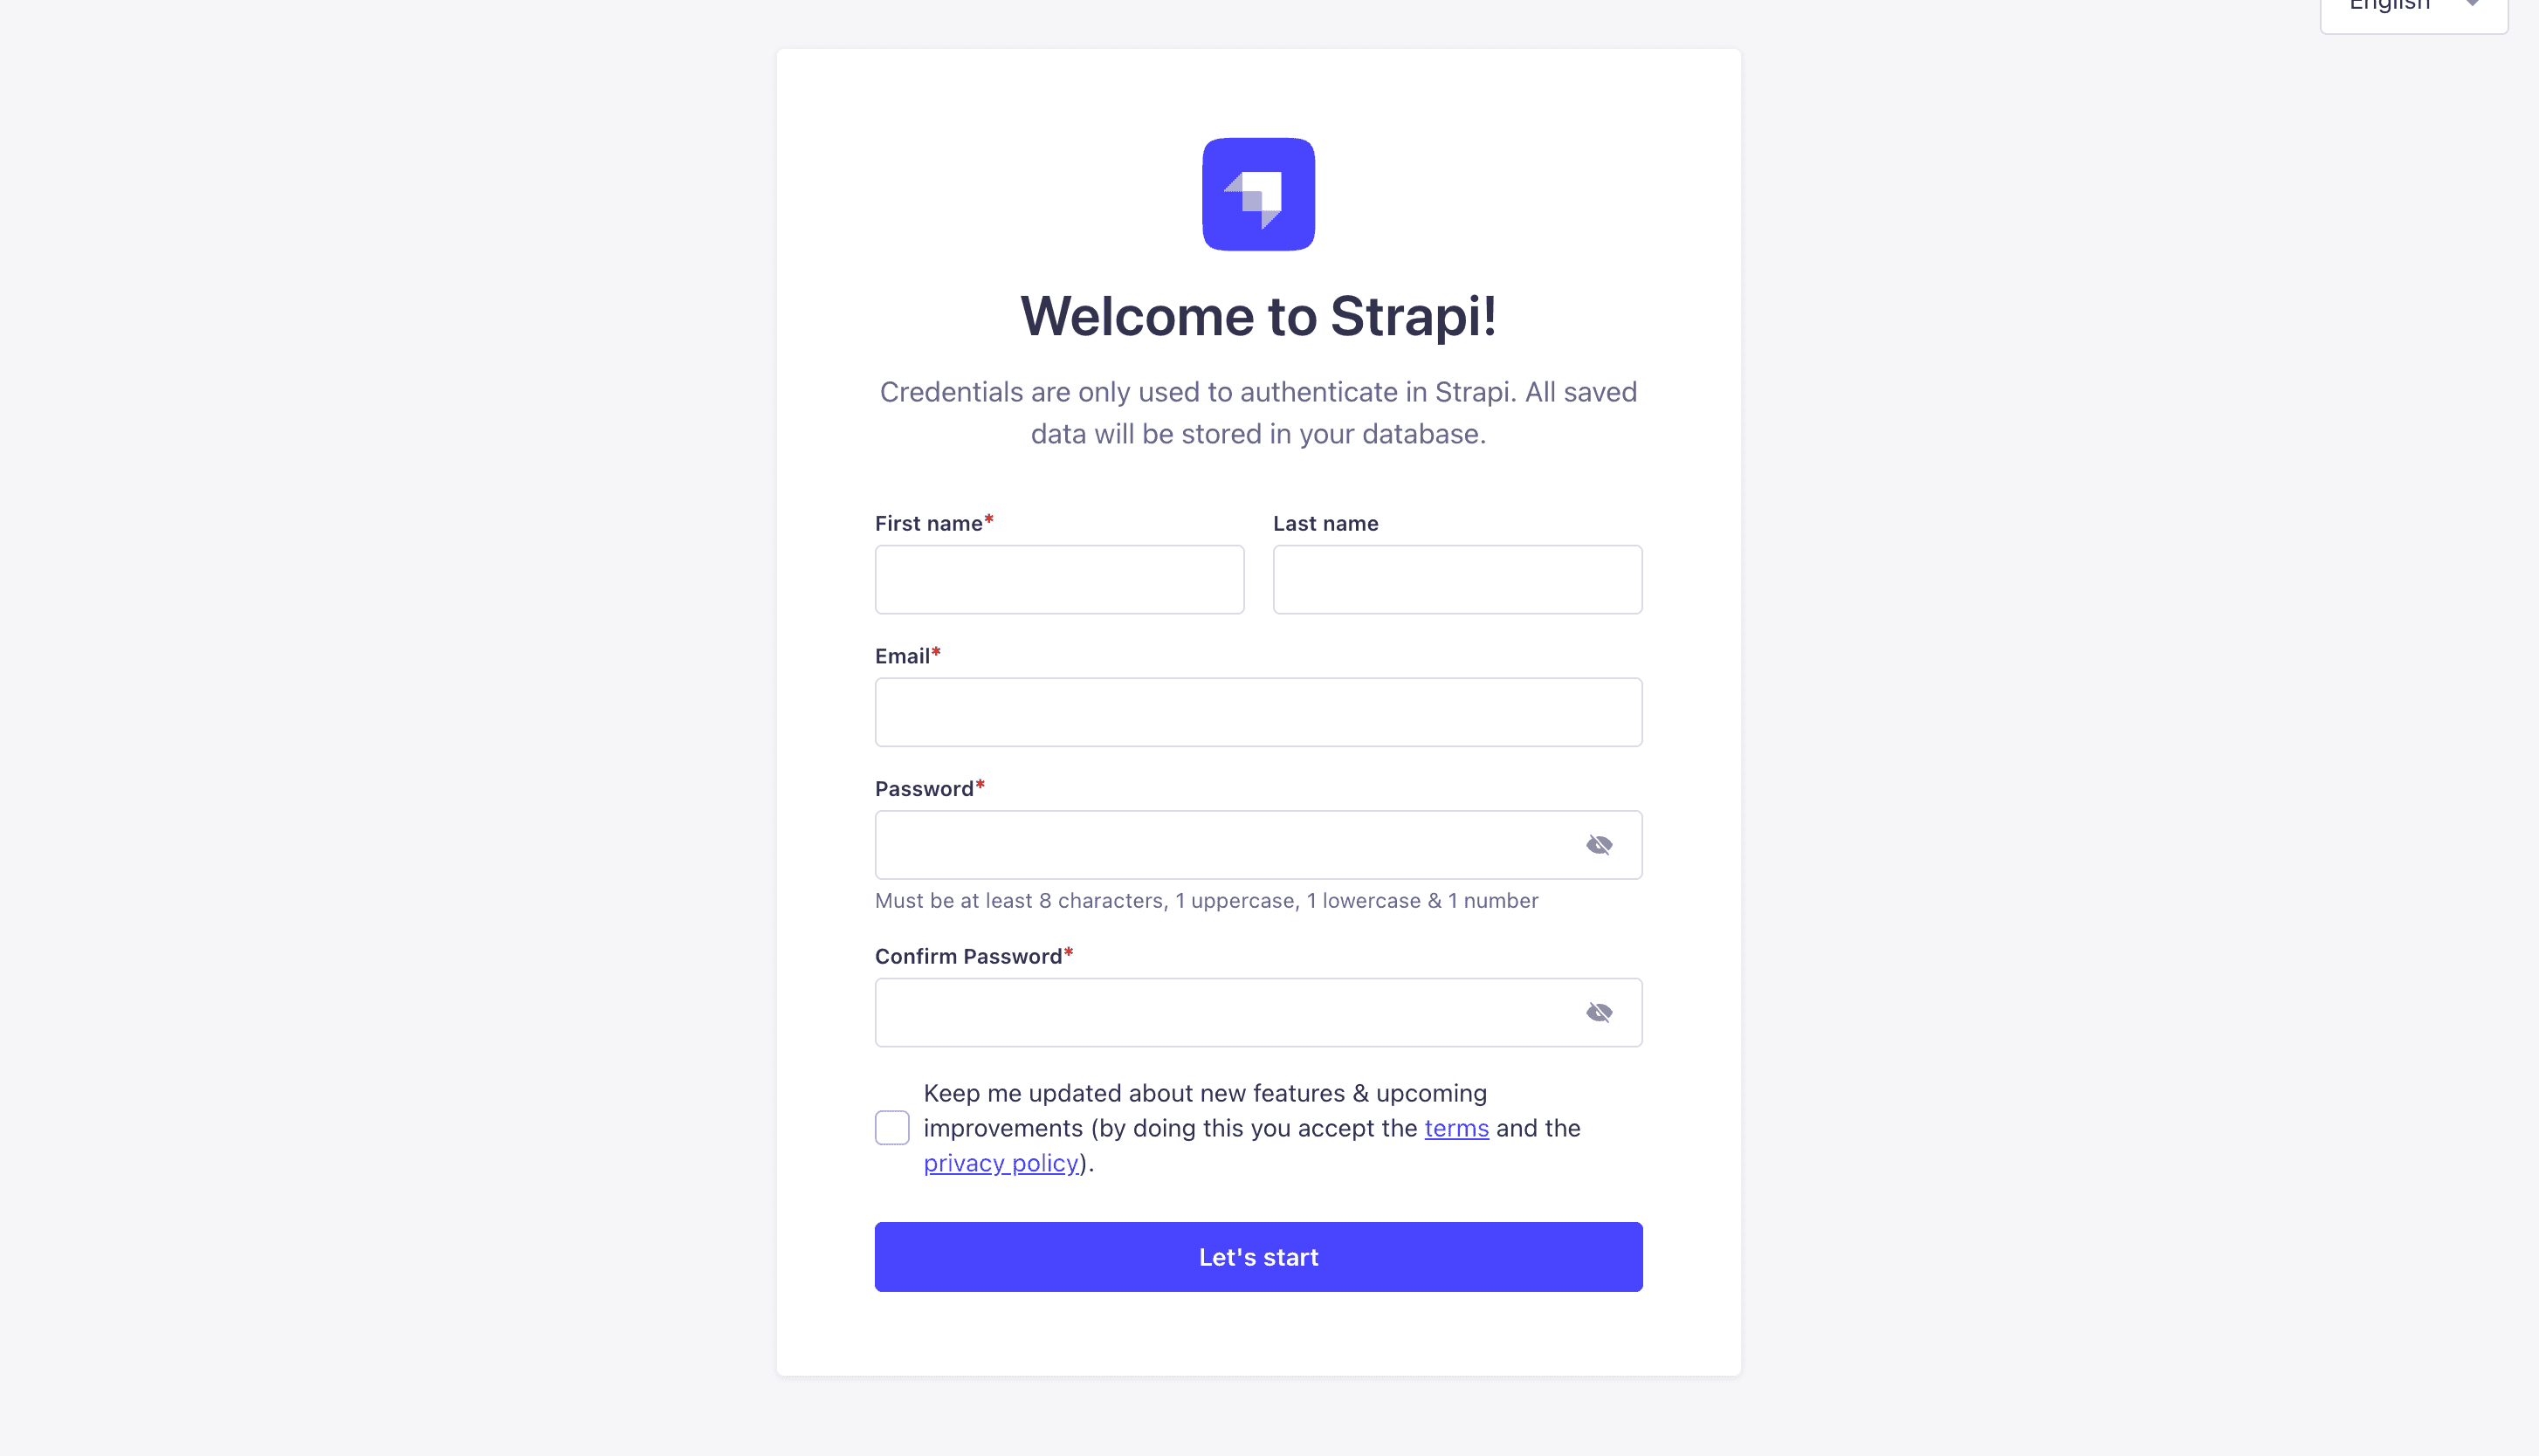
Go ahead and create your first Strapi admin user. All of this is local, so you can use whatever you want.
Once you have created your user, you will be redirected to the Strapi Dashboard screen.
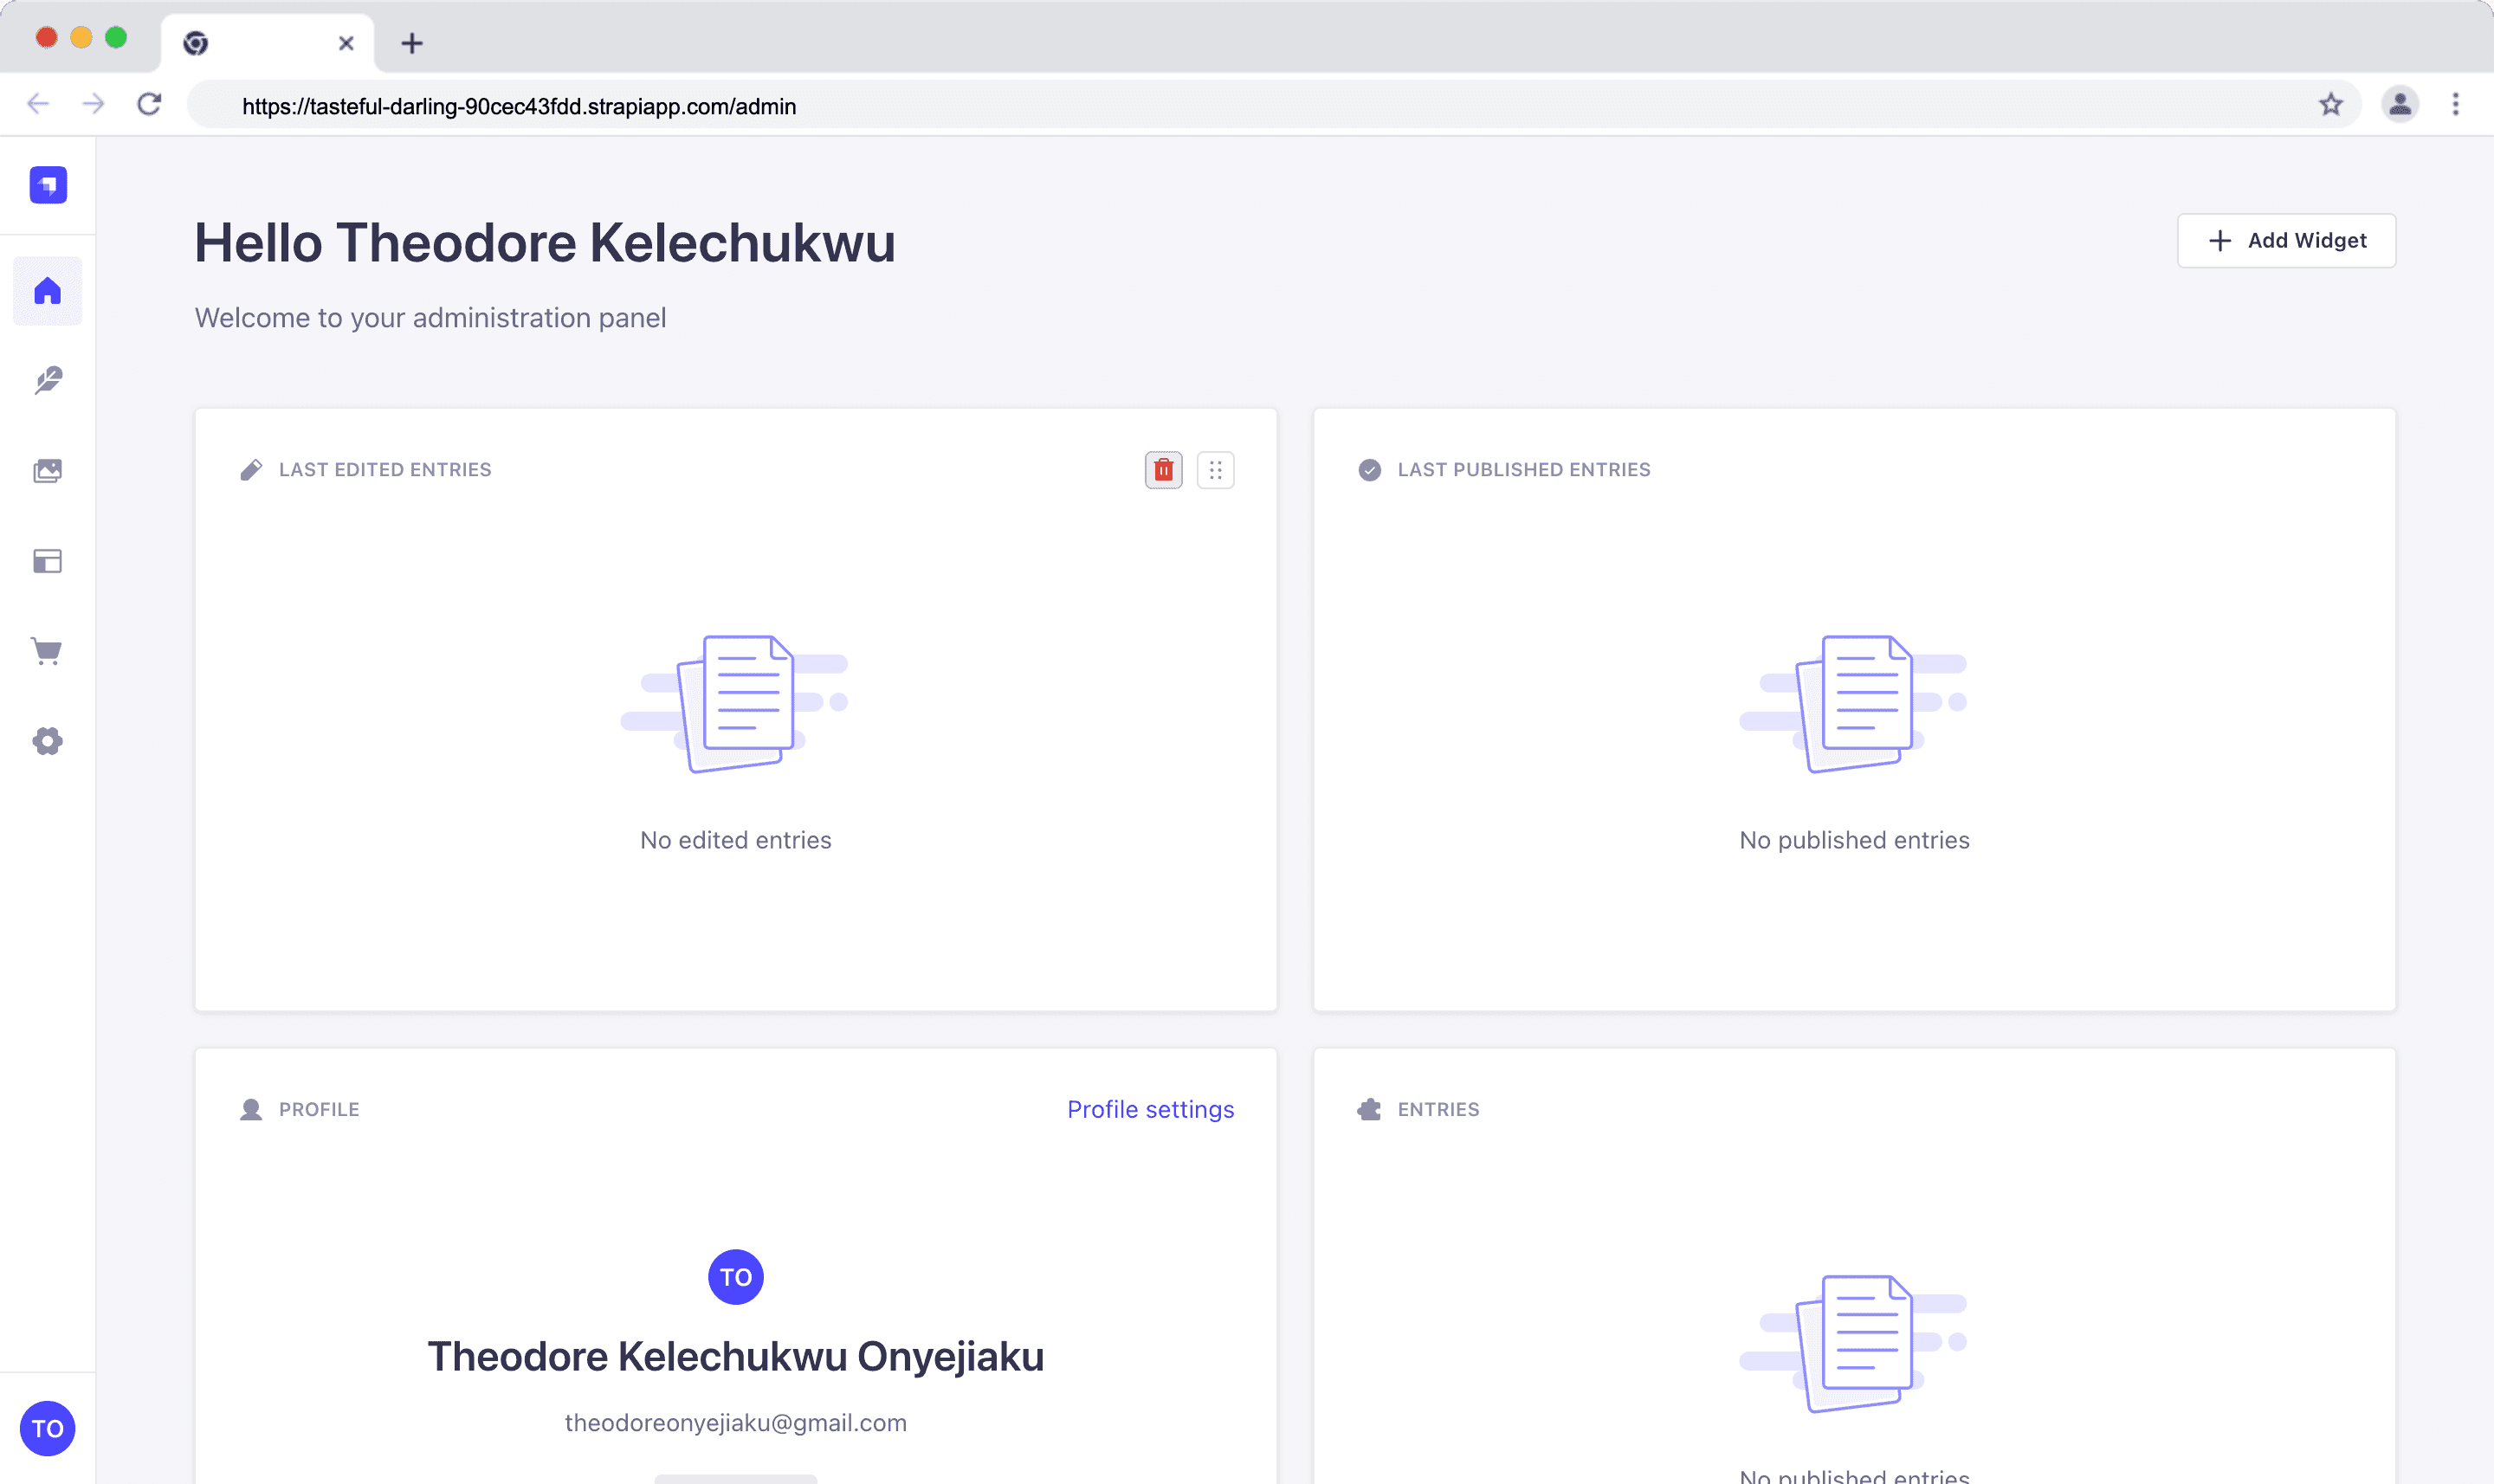
Deploy to Strapi Cloud Optional: Deploy to Strapi Cloud for production use. Check out the Strapi cloud documentation page.
Here is a project deployed to the Strapi cloud.
Prepare n8n Environment
You can set up n8n in many ways, depending on how you intend to use it:
- Cloud account. Sign up to start automating: https://app.n8n.cloud/register
- Docker
- Locally using Node.js (npm)
Ensure your n8n instance is running, either self-hosted (e.g., via Docker, Node, or as a desktop app) or on the hosted n8n Cloud service.
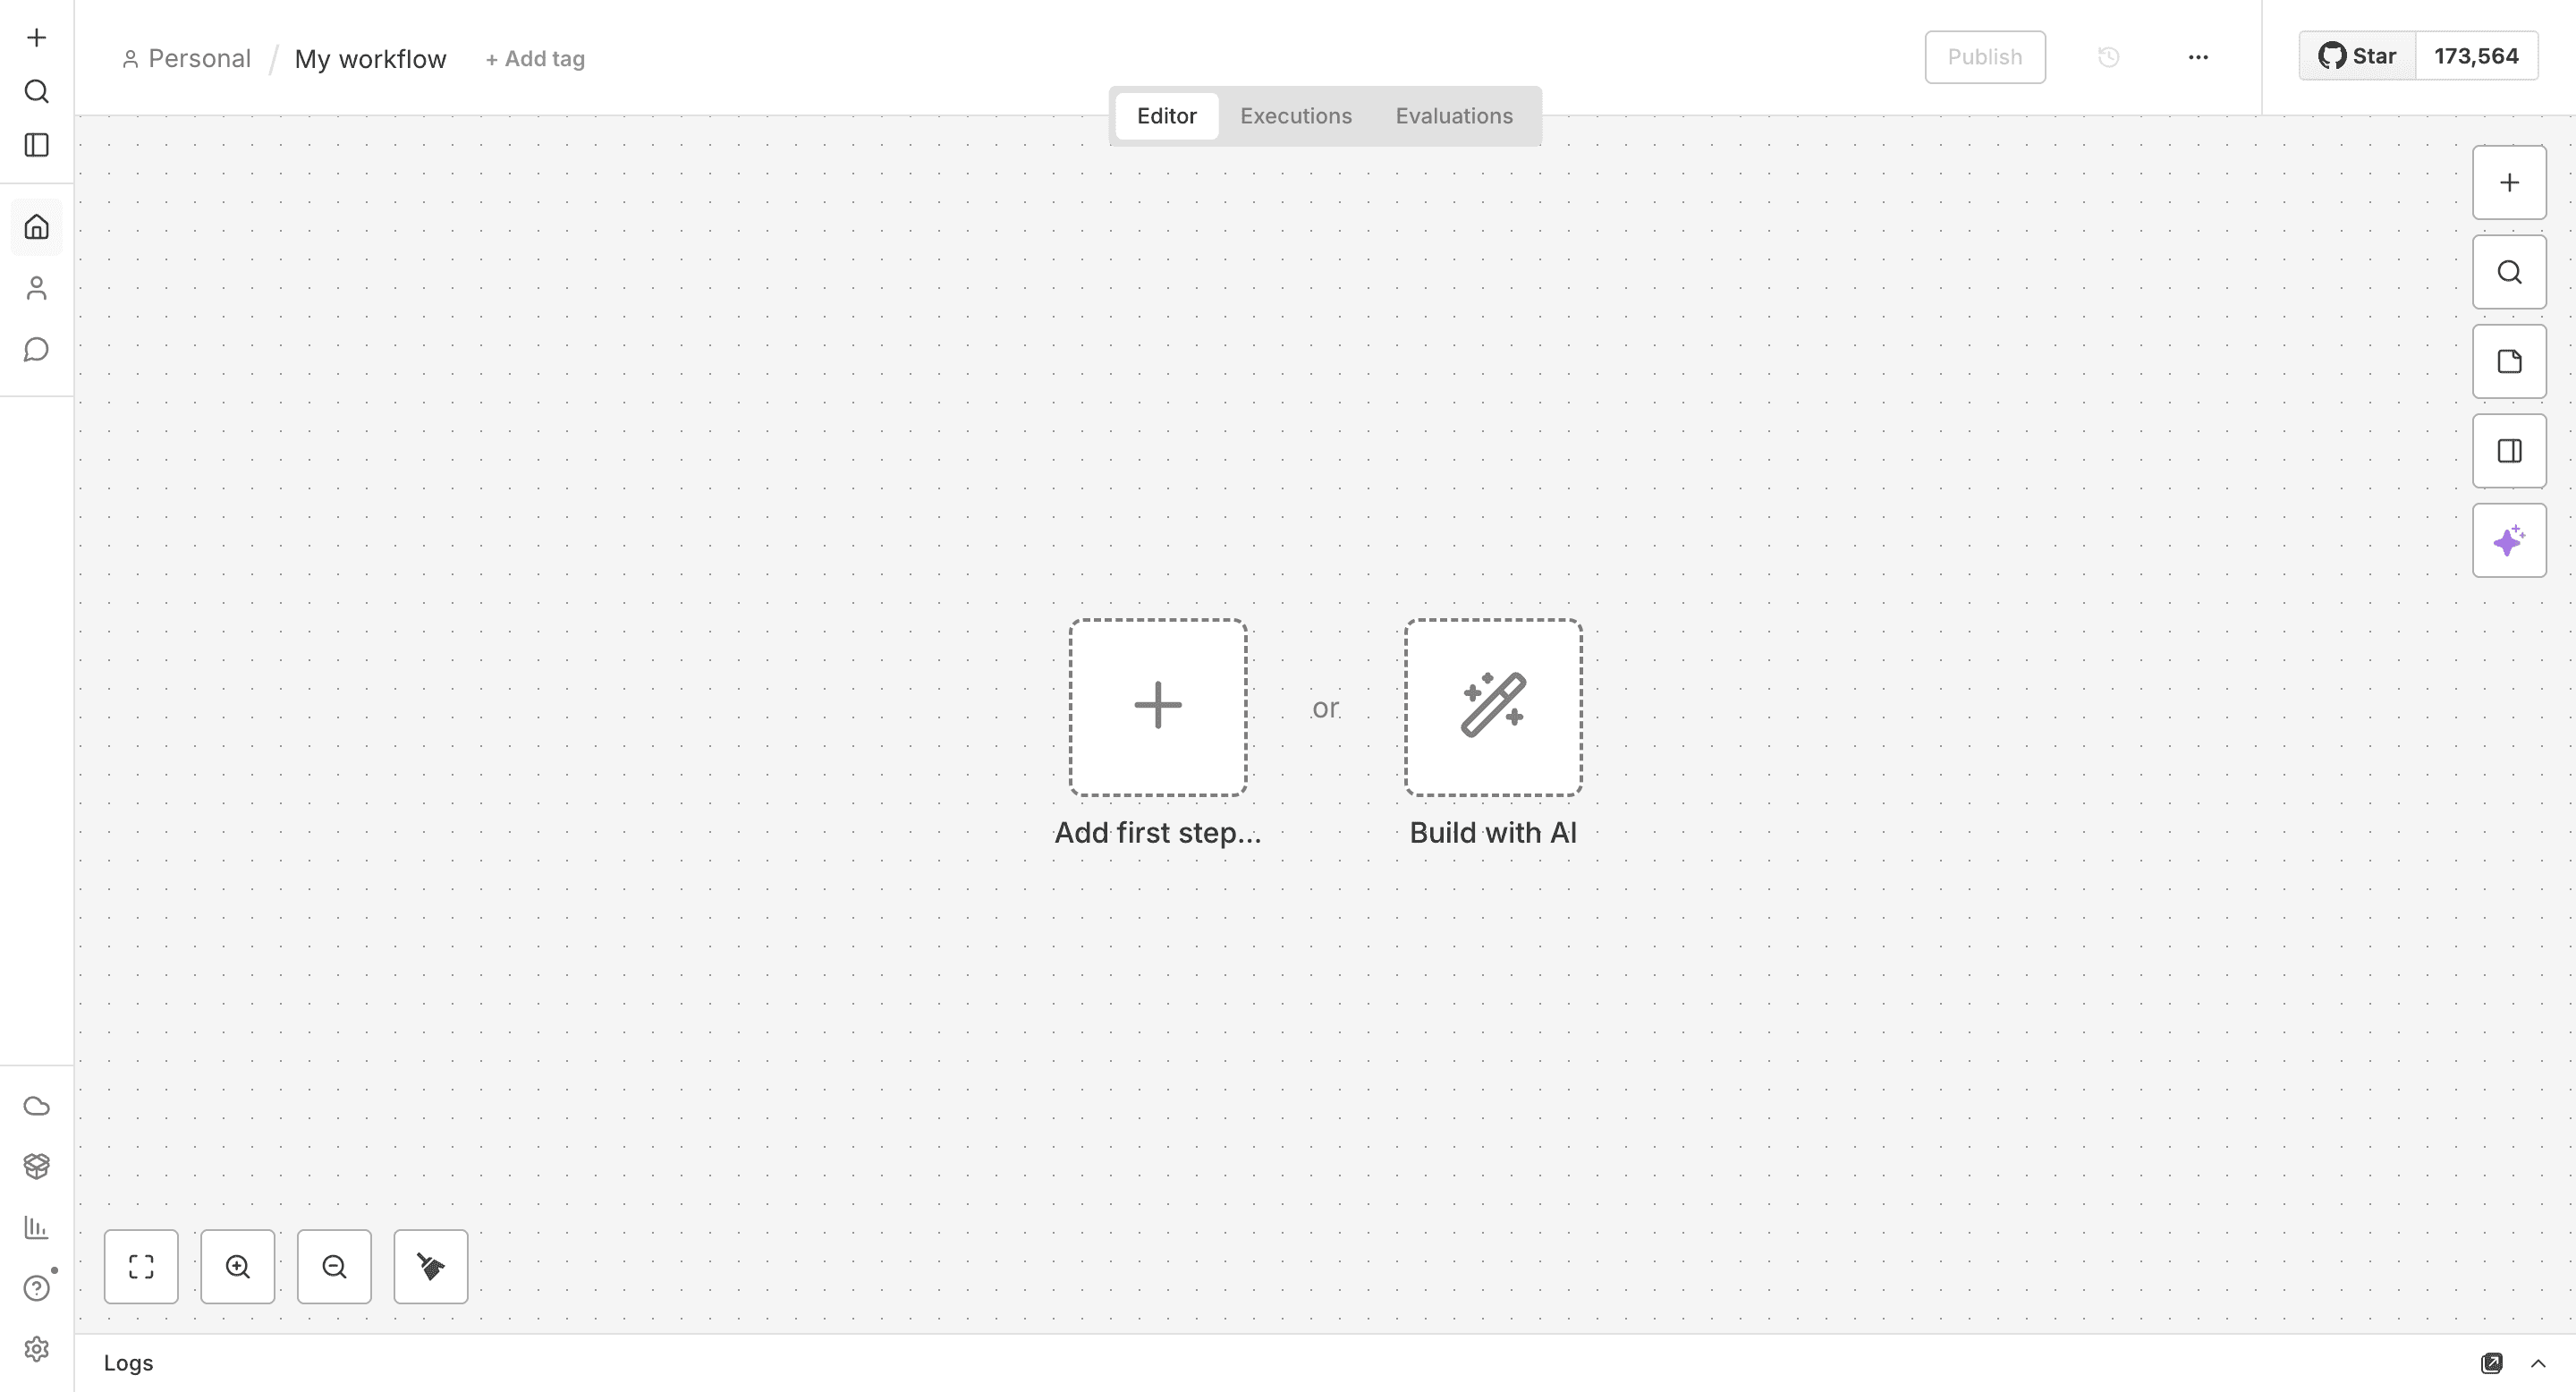
Strapi and n8n Authentication
When setting up credentials for the Strapi API in n8n, you have two primary methods to authenticate:
-
API User Account (email and password authentication): This method involves creating a user account within Strapi that has a defined role and specific permissions. You authenticate using a username (or email) and password tied to a user account.
-
API Token (token): API Tokens are generated within Strapi and can be used for authentication without tying the access to a specific user account. You authenticate using the token itself.
Choose the method that best fits your scenario. If you need detailed permissions control with user accounts, then use the API User Account or straightforward access with tokens using the API Token.
For this integration, we will use API tokens.
Generate a Strapi API Token
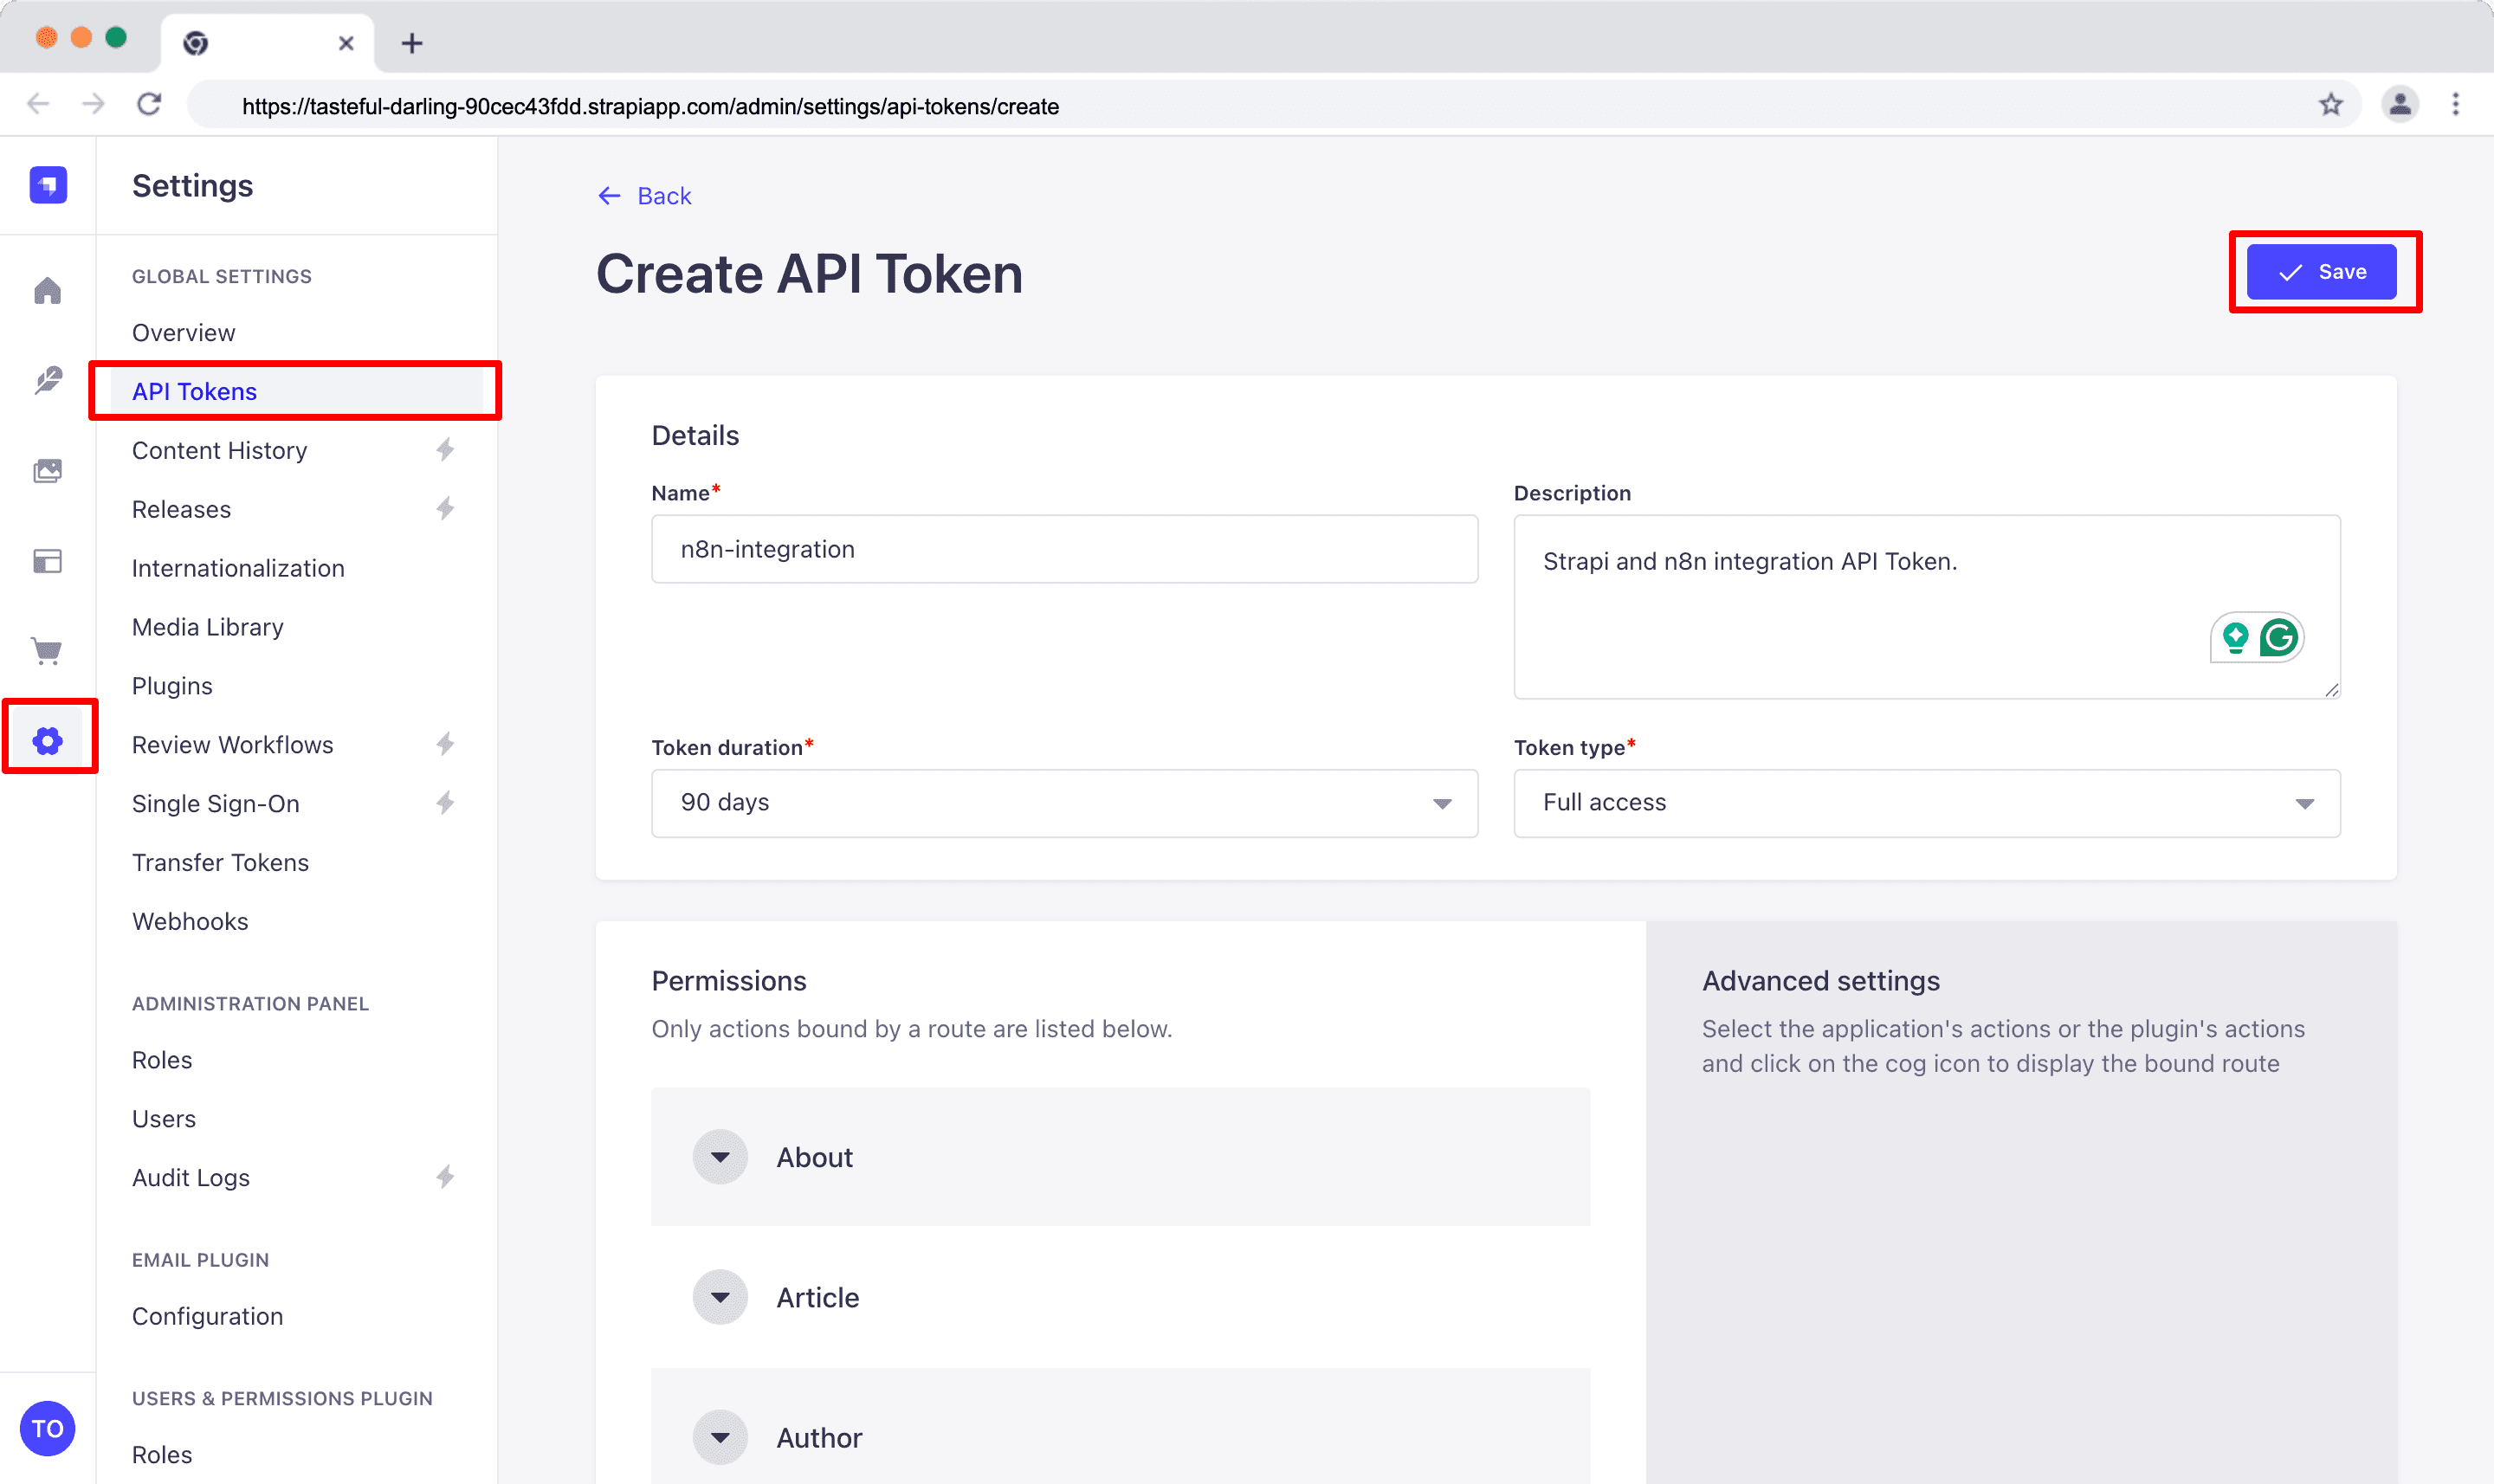
- Log in to your Strapi admin panel and navigate to Settings → Global Settings → API Tokens.
- Click “Create new API Token” and give it a descriptive name (for example,
n8n-integration). - Select an appropriate role or set of permissions for this token: Read-Only, a Full Access, or a Custom token with fine-grained permissions per content type.
- Click the "Save" button.
Add Strapi Credentials in n8n
After creating your Strapi API token, the next step is to create a new credential in your n8n dashboard.
- Go to your n8n dashboard.
- At the top-right of the dashboard, click the "Plus" button. At the top-right > Credential > Personal
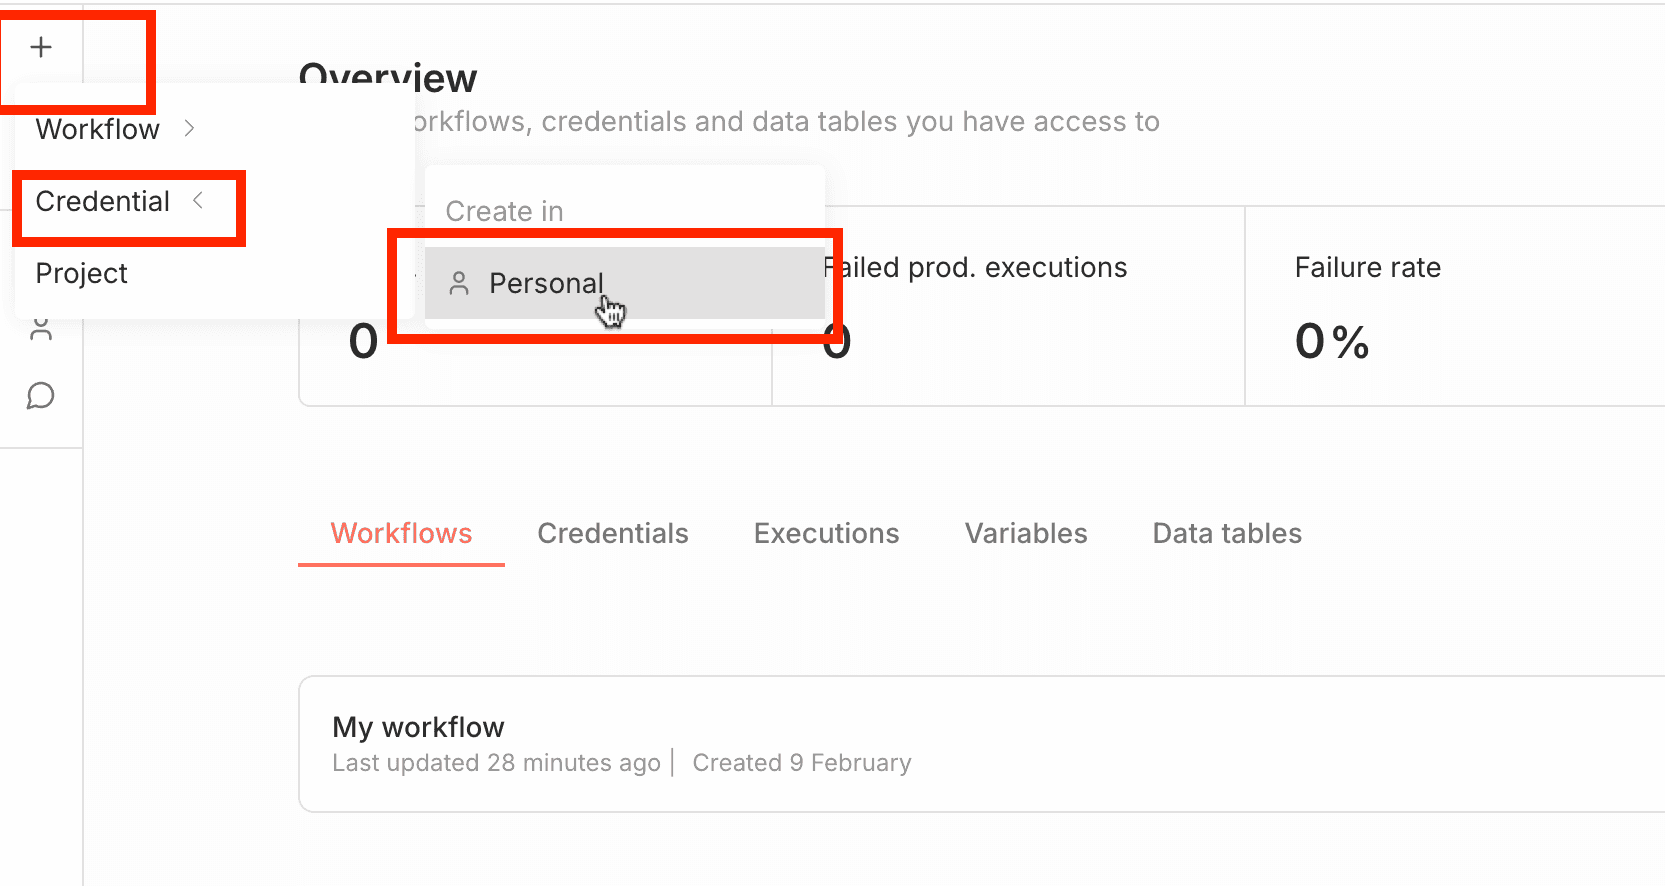
- A search bar will appear. Type in Strapi. You will see options "Strapi API" and "Strapi API Token".
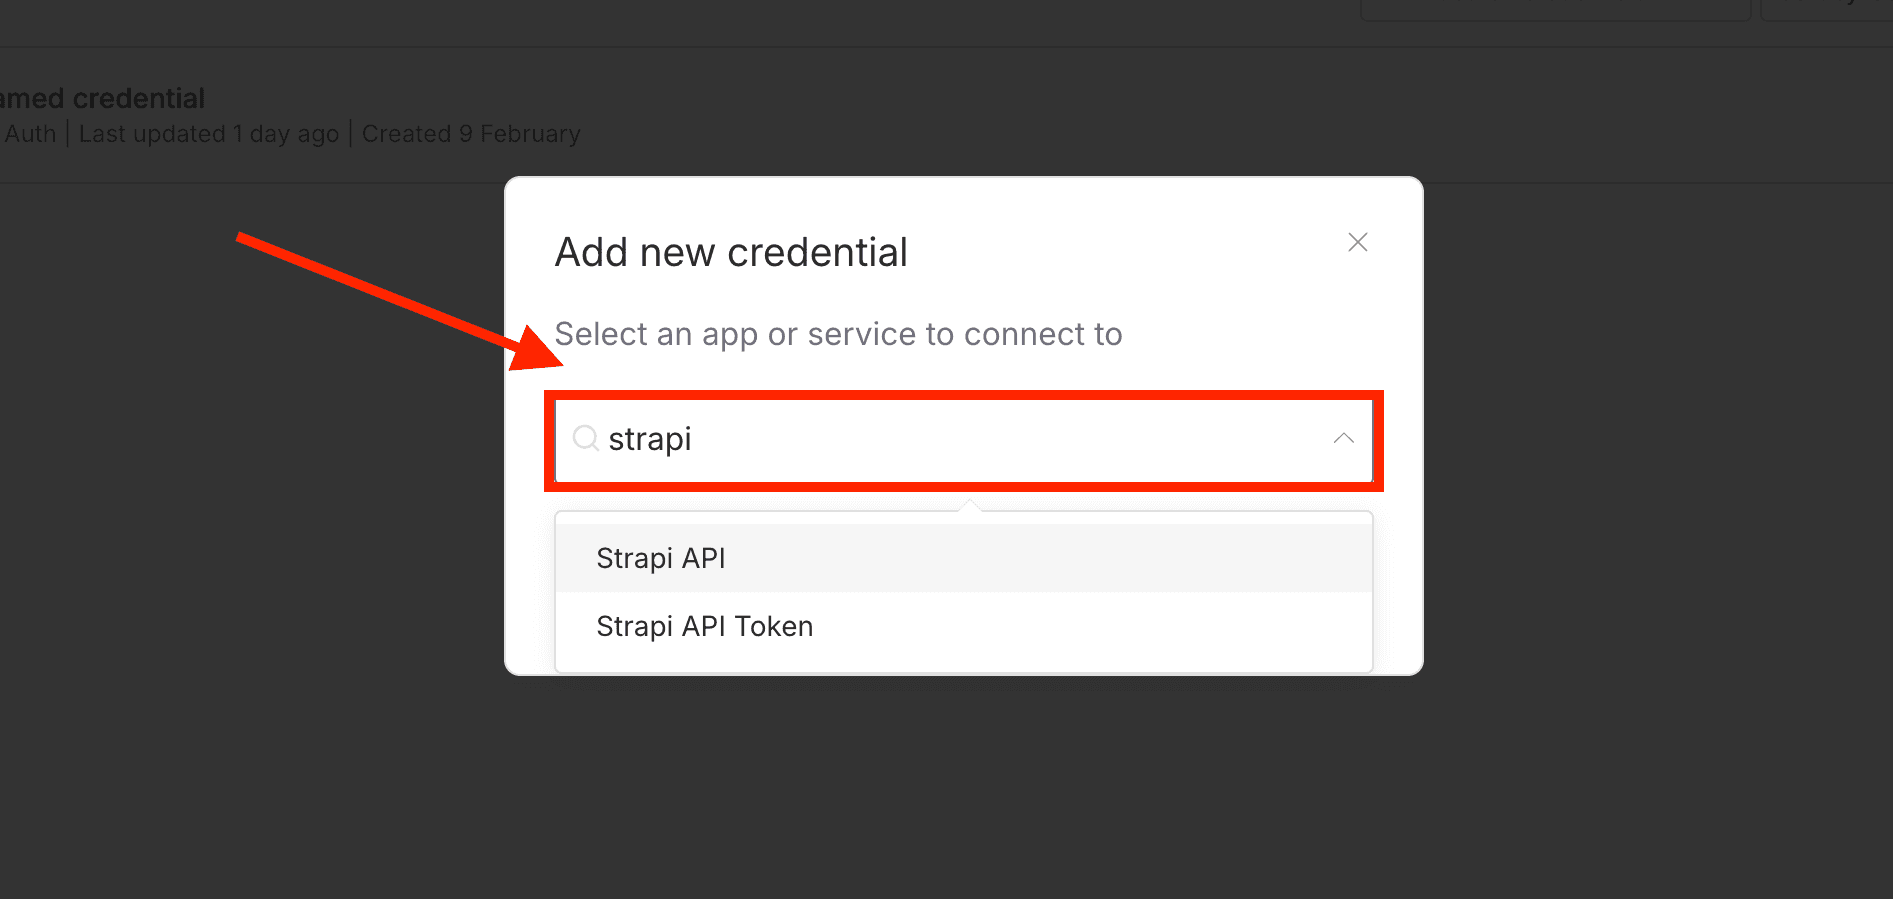
- Select "Strapi API" token, add the token you created in your Strapi admin. Add your Strapi URL and your Strapi version as shown below:
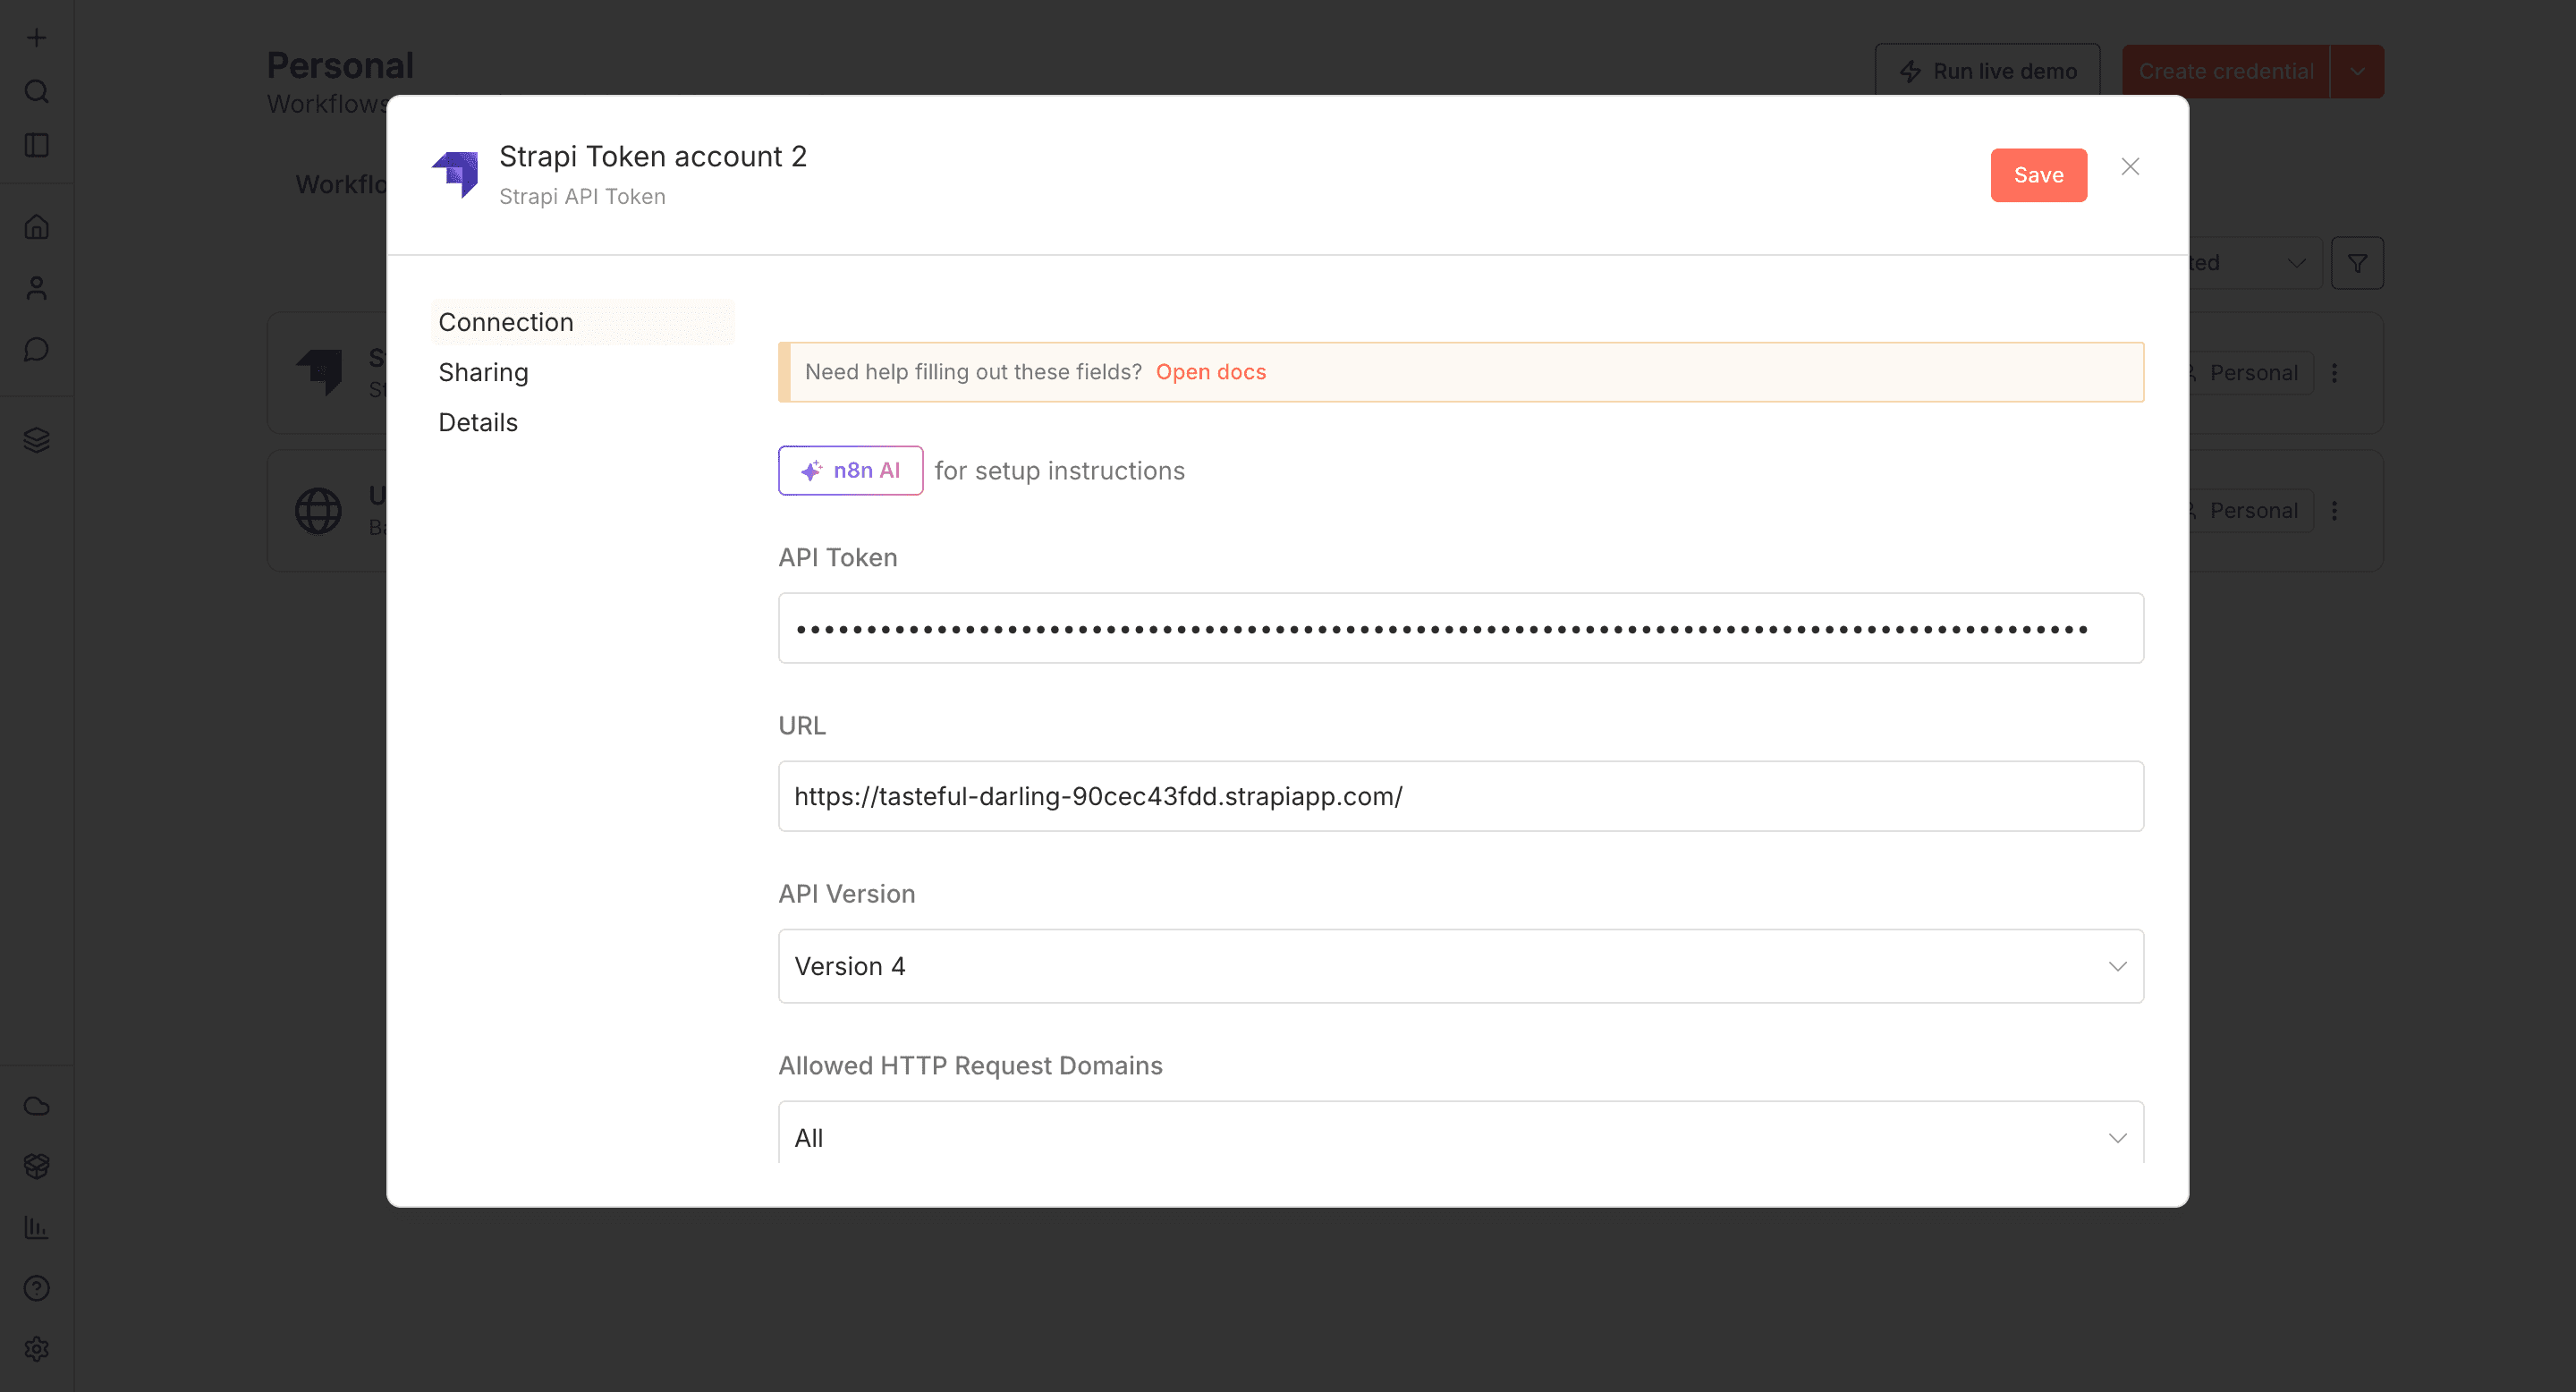
- Click the "Save" button.
Next, let's look at how to capture events in Strapi webhooks using n8n
Capture Events in Strapi
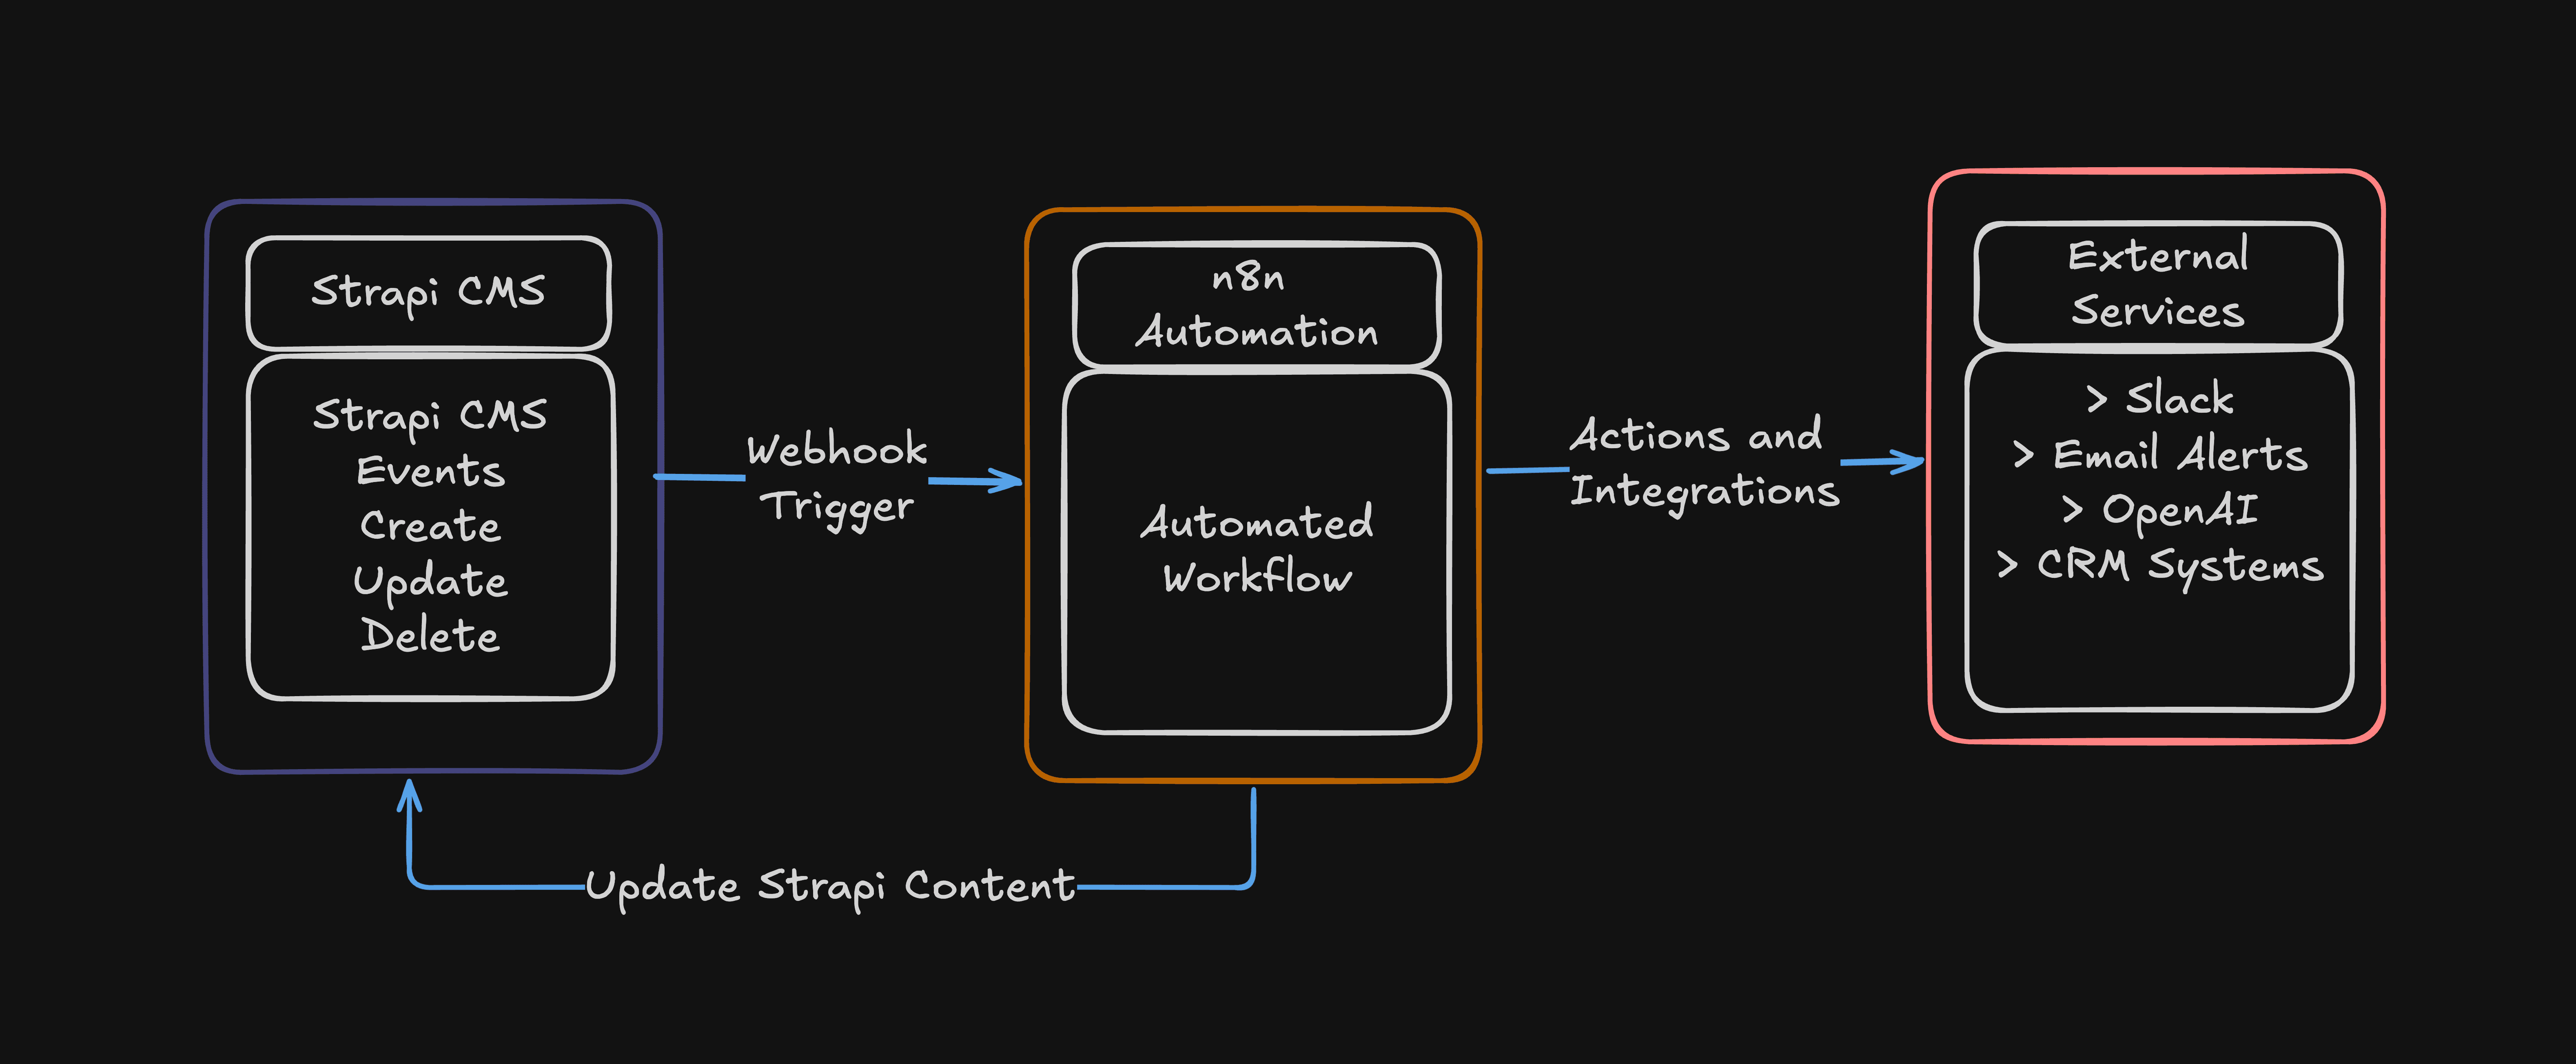
Strapi makes it easy to broadcast what’s happening inside your content system, and n8n makes it easy to respond. This is done via webhooks.
How It Works
- Strapi emits an event (e.g., entry created, updated, deleted, published).
- Strapi’s webhook system sends a POST request to your n8n webhook URL.
- n8n receives the event and runs a workflow based on the payload.
Set Up Webhook in Strapi
In Strapi:
- Go to Settings > Webhooks
- Click “Create new webhook.”
- Give the webhook a name (e.g.,
n8n integration) - Set the URL to any value at the moment. In the next section, this will be your n8n webhook trigger (e.g., https://n8n.mycompany.com/webhook/strapi-article).
- Select the events to listen for (e.g.,
entry.publish,entry.create,entry.update, etc.)
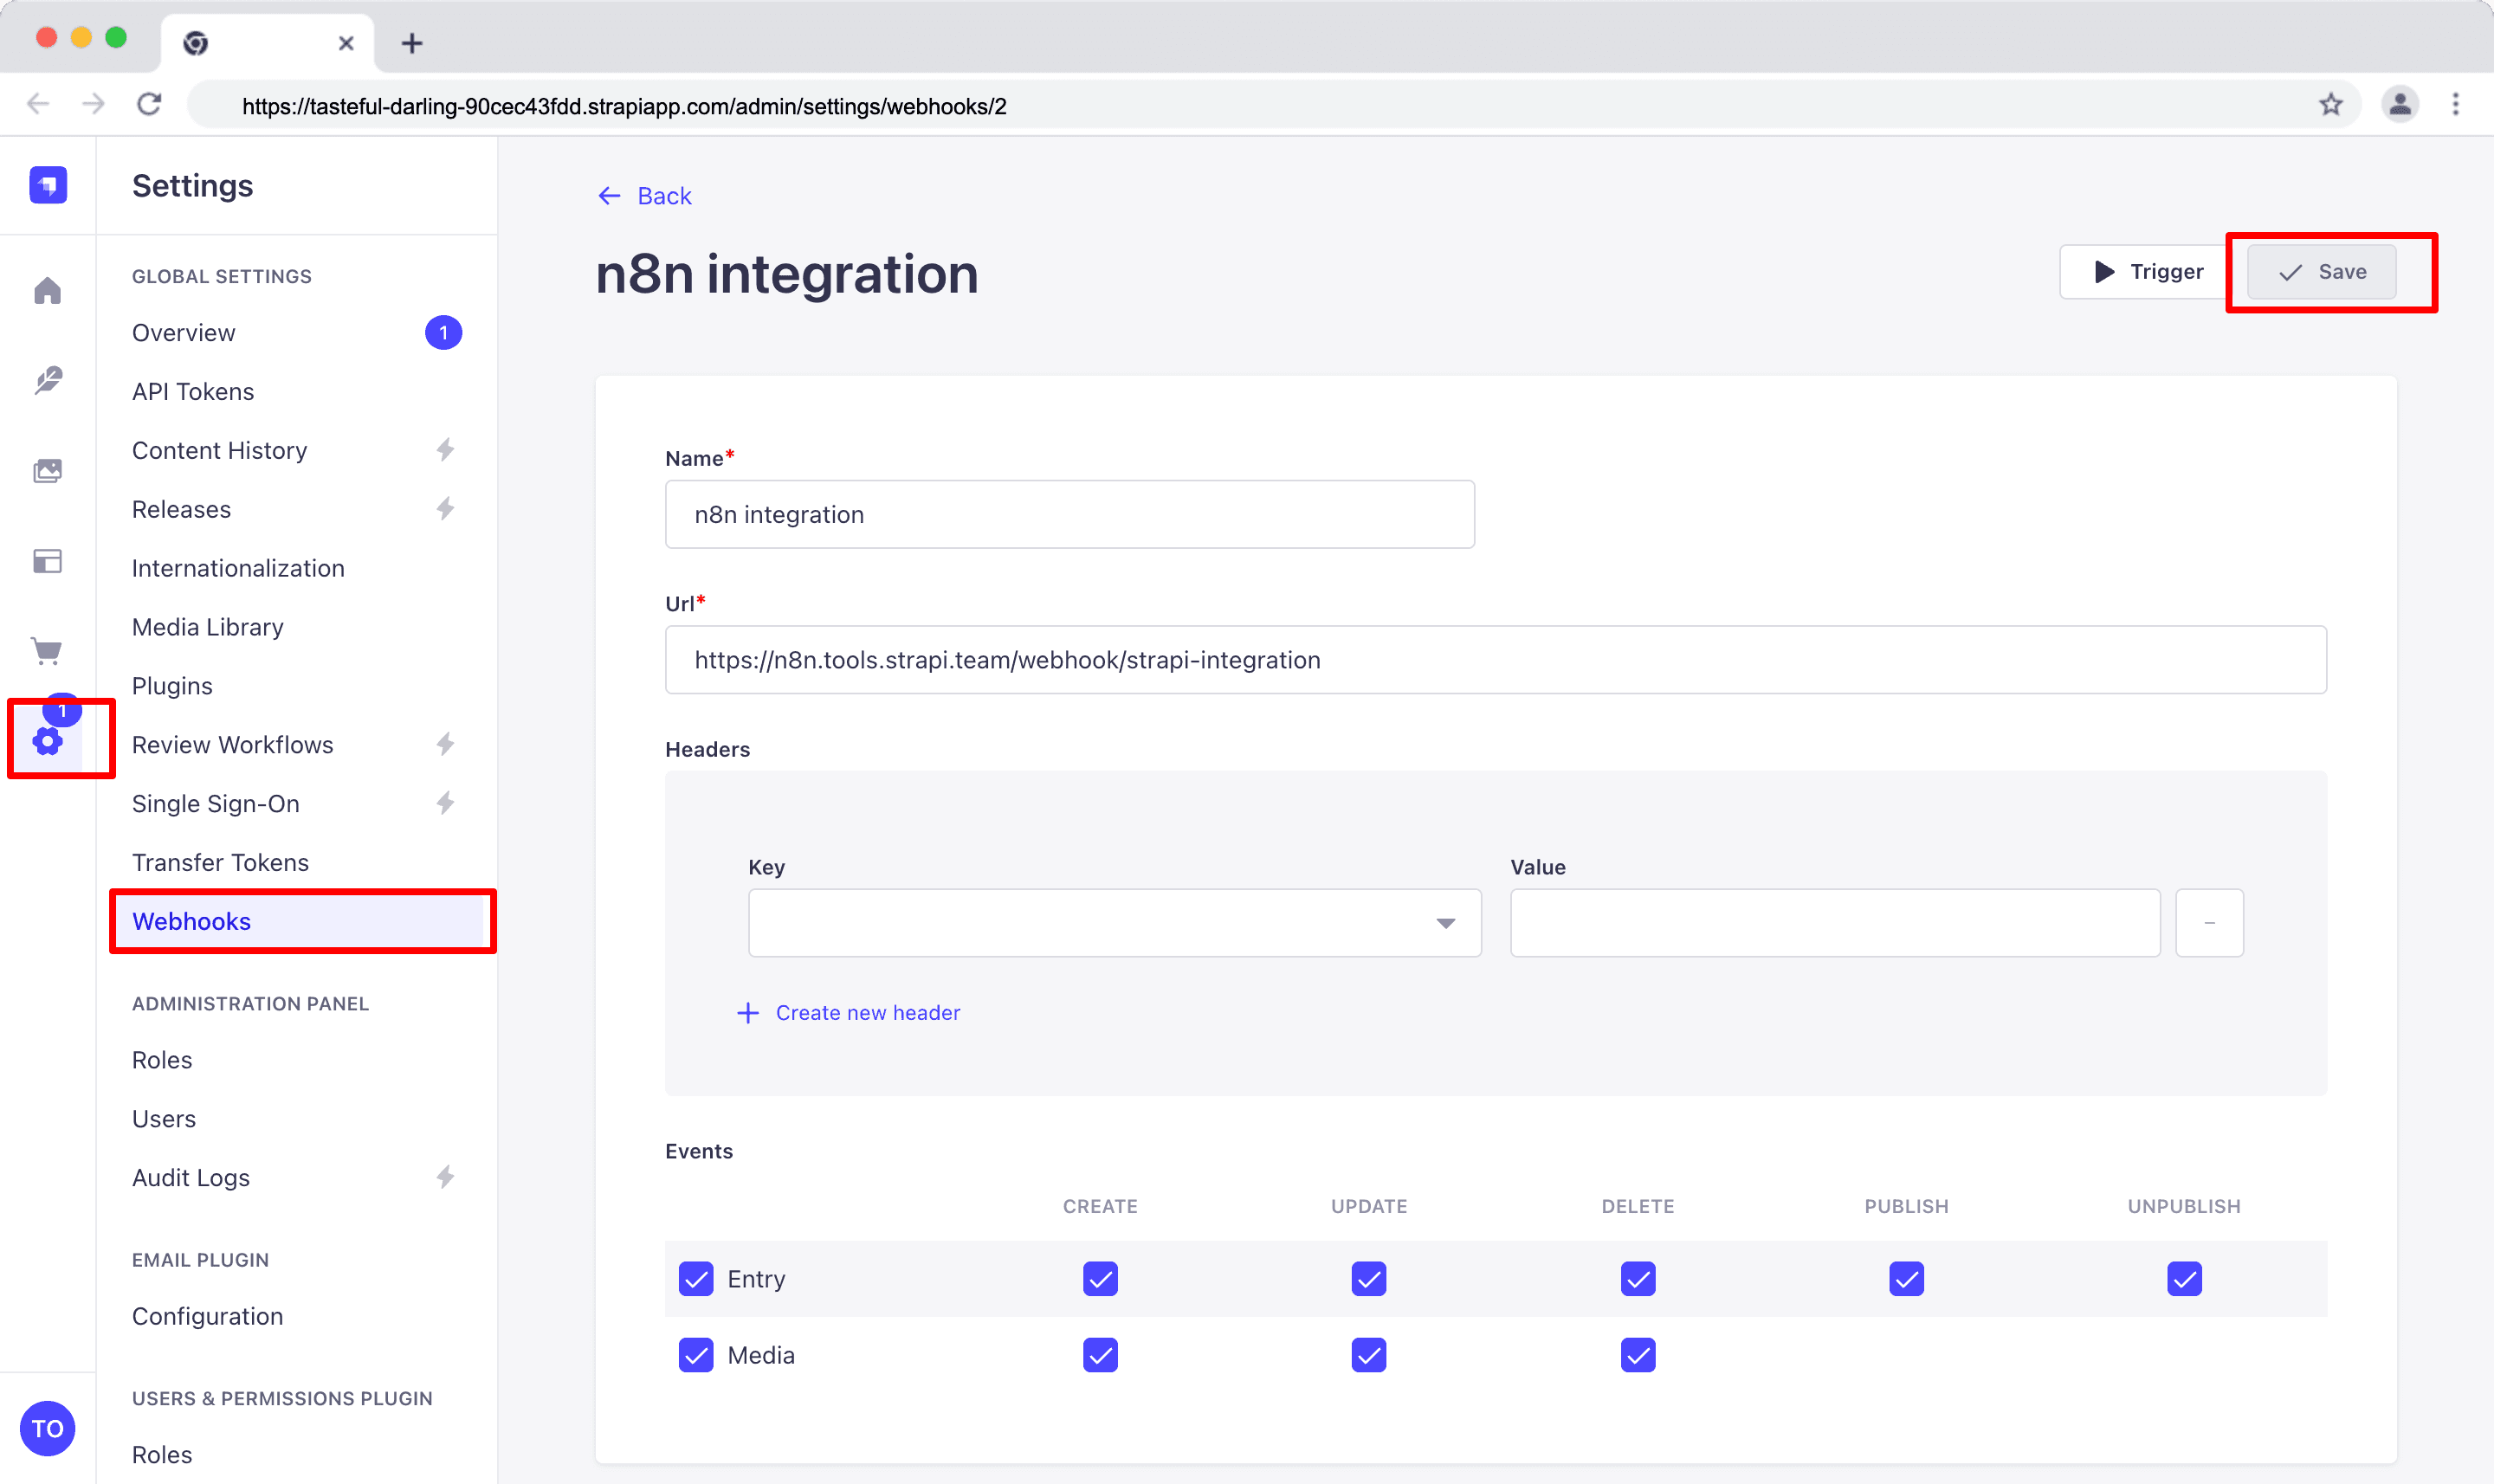
Notice that we checked all the boxes for Entry and Media events. This means that you want this webhook to trigger whenever you create, update, delete, publish, or unpublish an entry or media.
🖐️ NOTE (Recommended): Add a secret header for security (e.g., Authorization: Bearer YOUR_SECRET_TOKEN)
Set up Webhook in n8n
In n8n:
- Create a new workflow
- Add a Webhook Trigger node
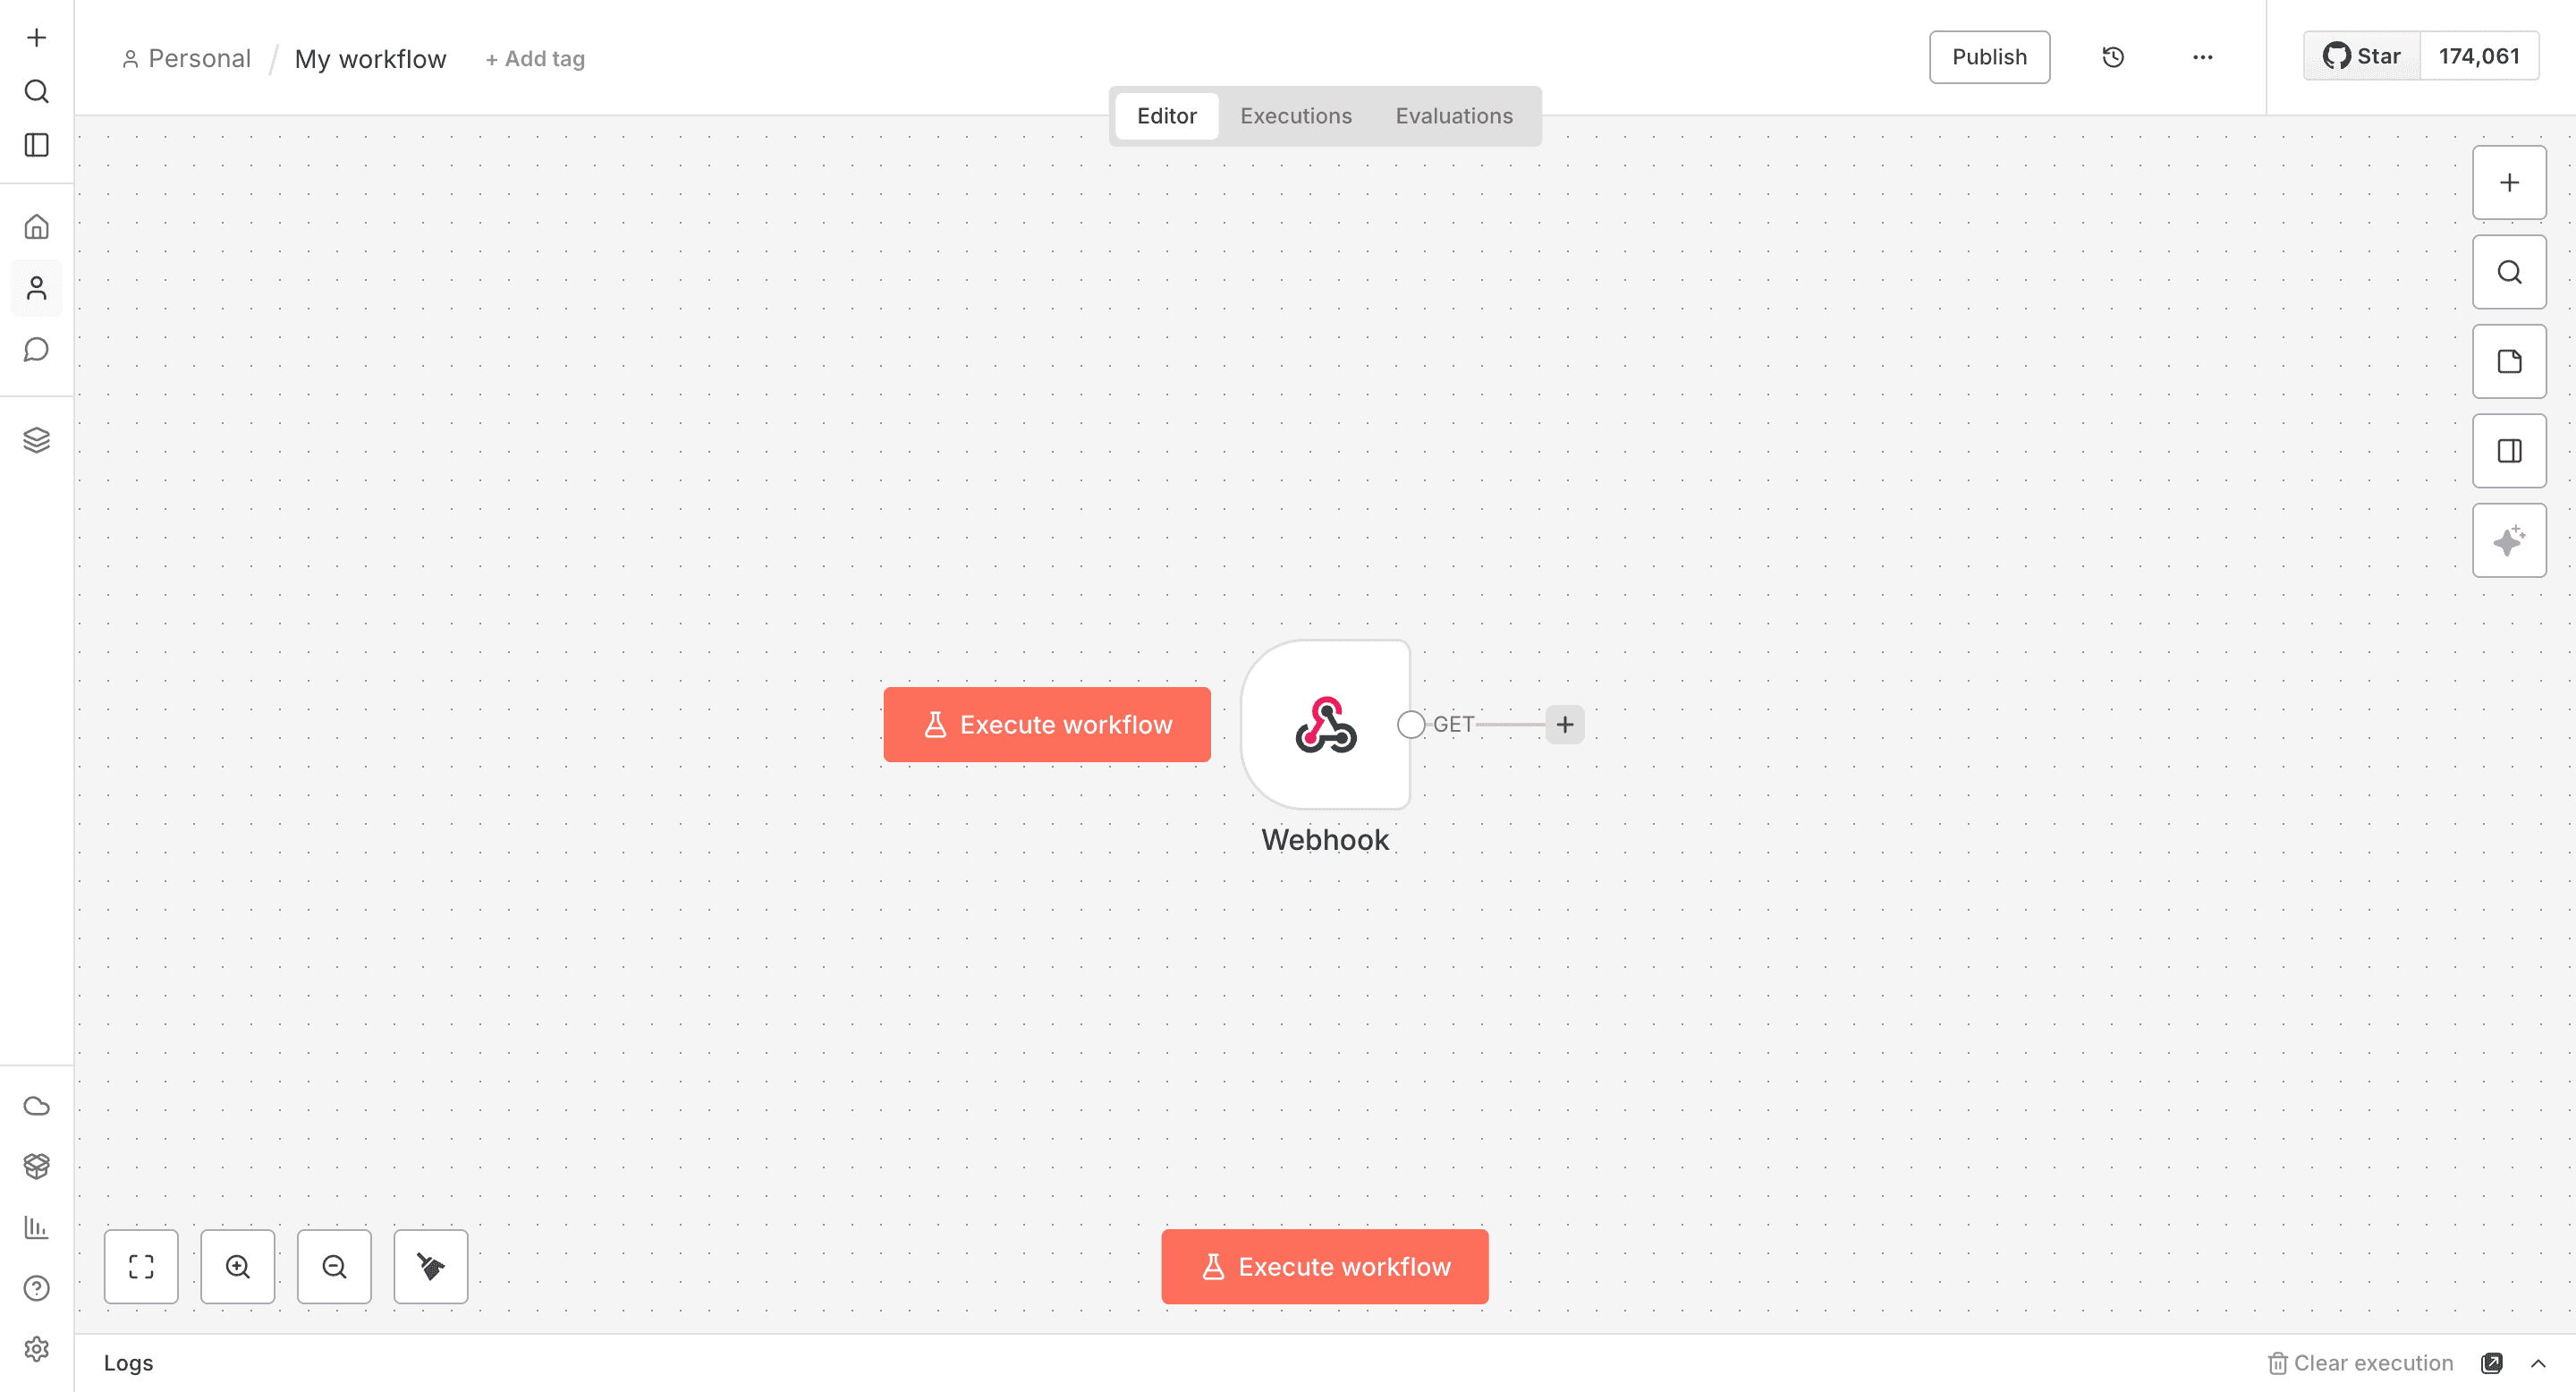
- Double-click the Webhook node to configure the Parameters and Settings.
- In the "Parameters" tab, set the "Http Method" to
POST, the "Path" value tostrapi-integration, and theRespondvalue toImmediately. - In the Settings tab, check the box "Always Output Data."
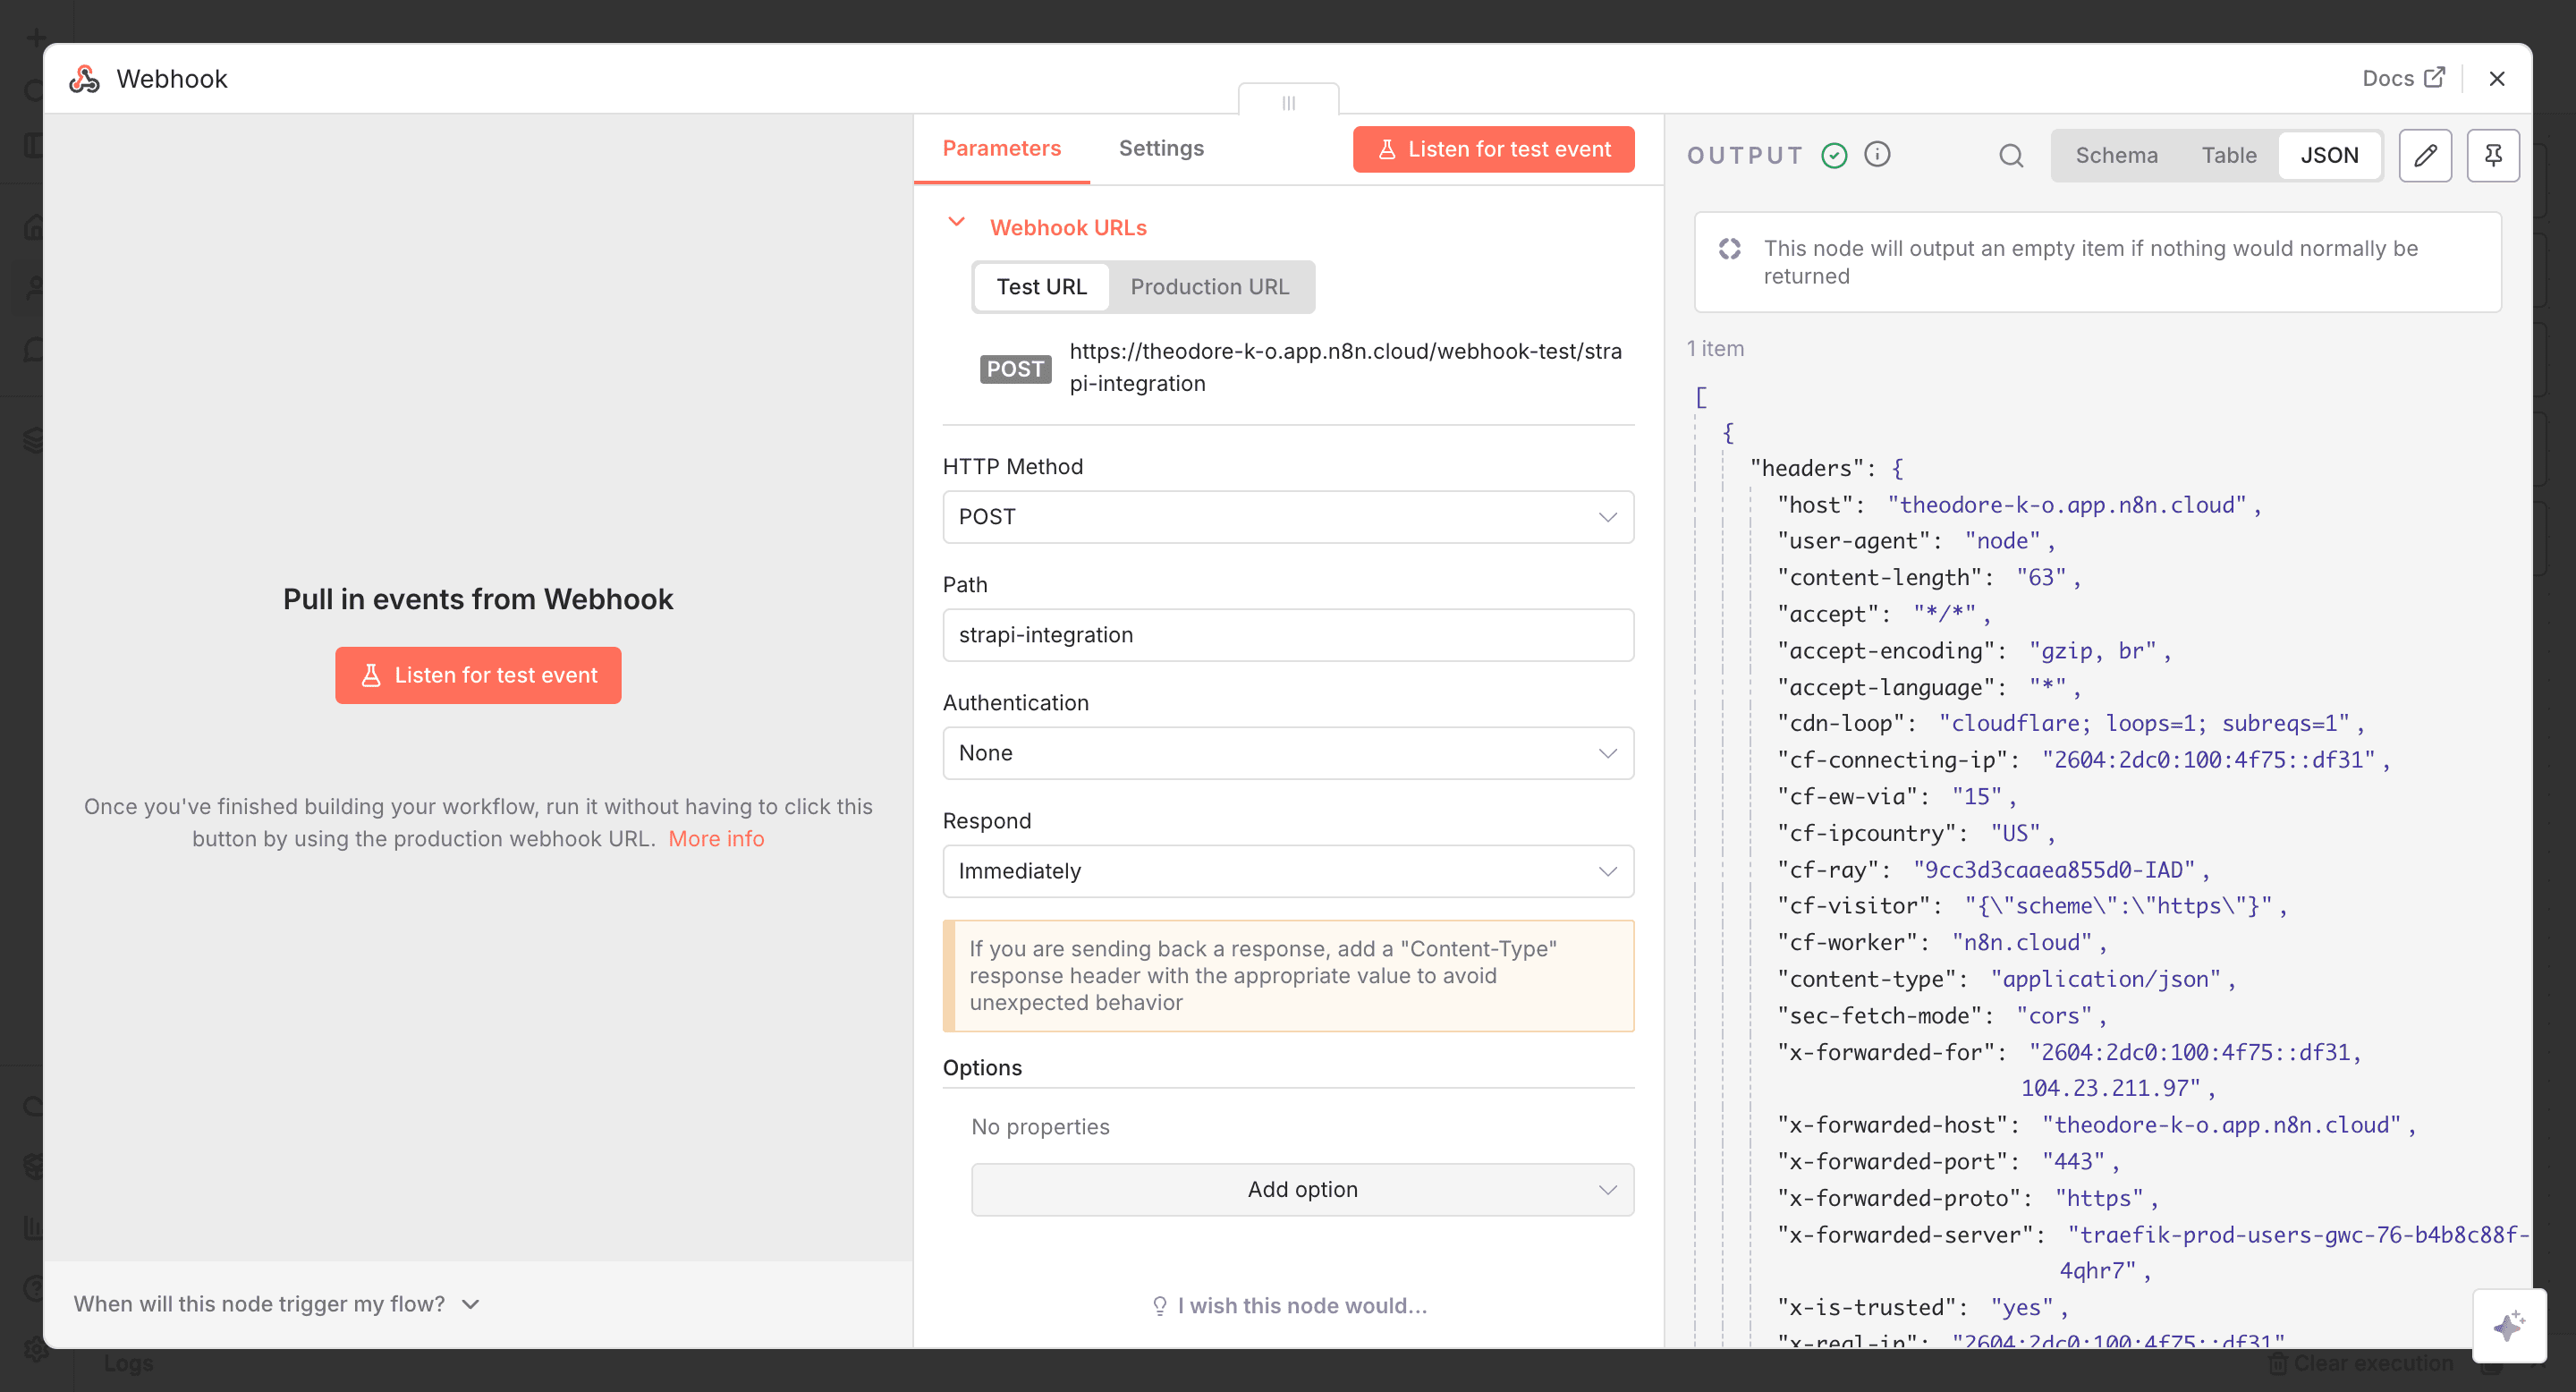
- Test the webhook by clicking the "Listen for test event" and clicking the "Trigger" button in Strapi.
✋ NOTE: If security is a concern (it should be in production), set Authentication to Header.
If successfully configured, you should see a trigger success in your Strapi backend as shown below.
For more authentication purposes, you can add authentication for your webhook.
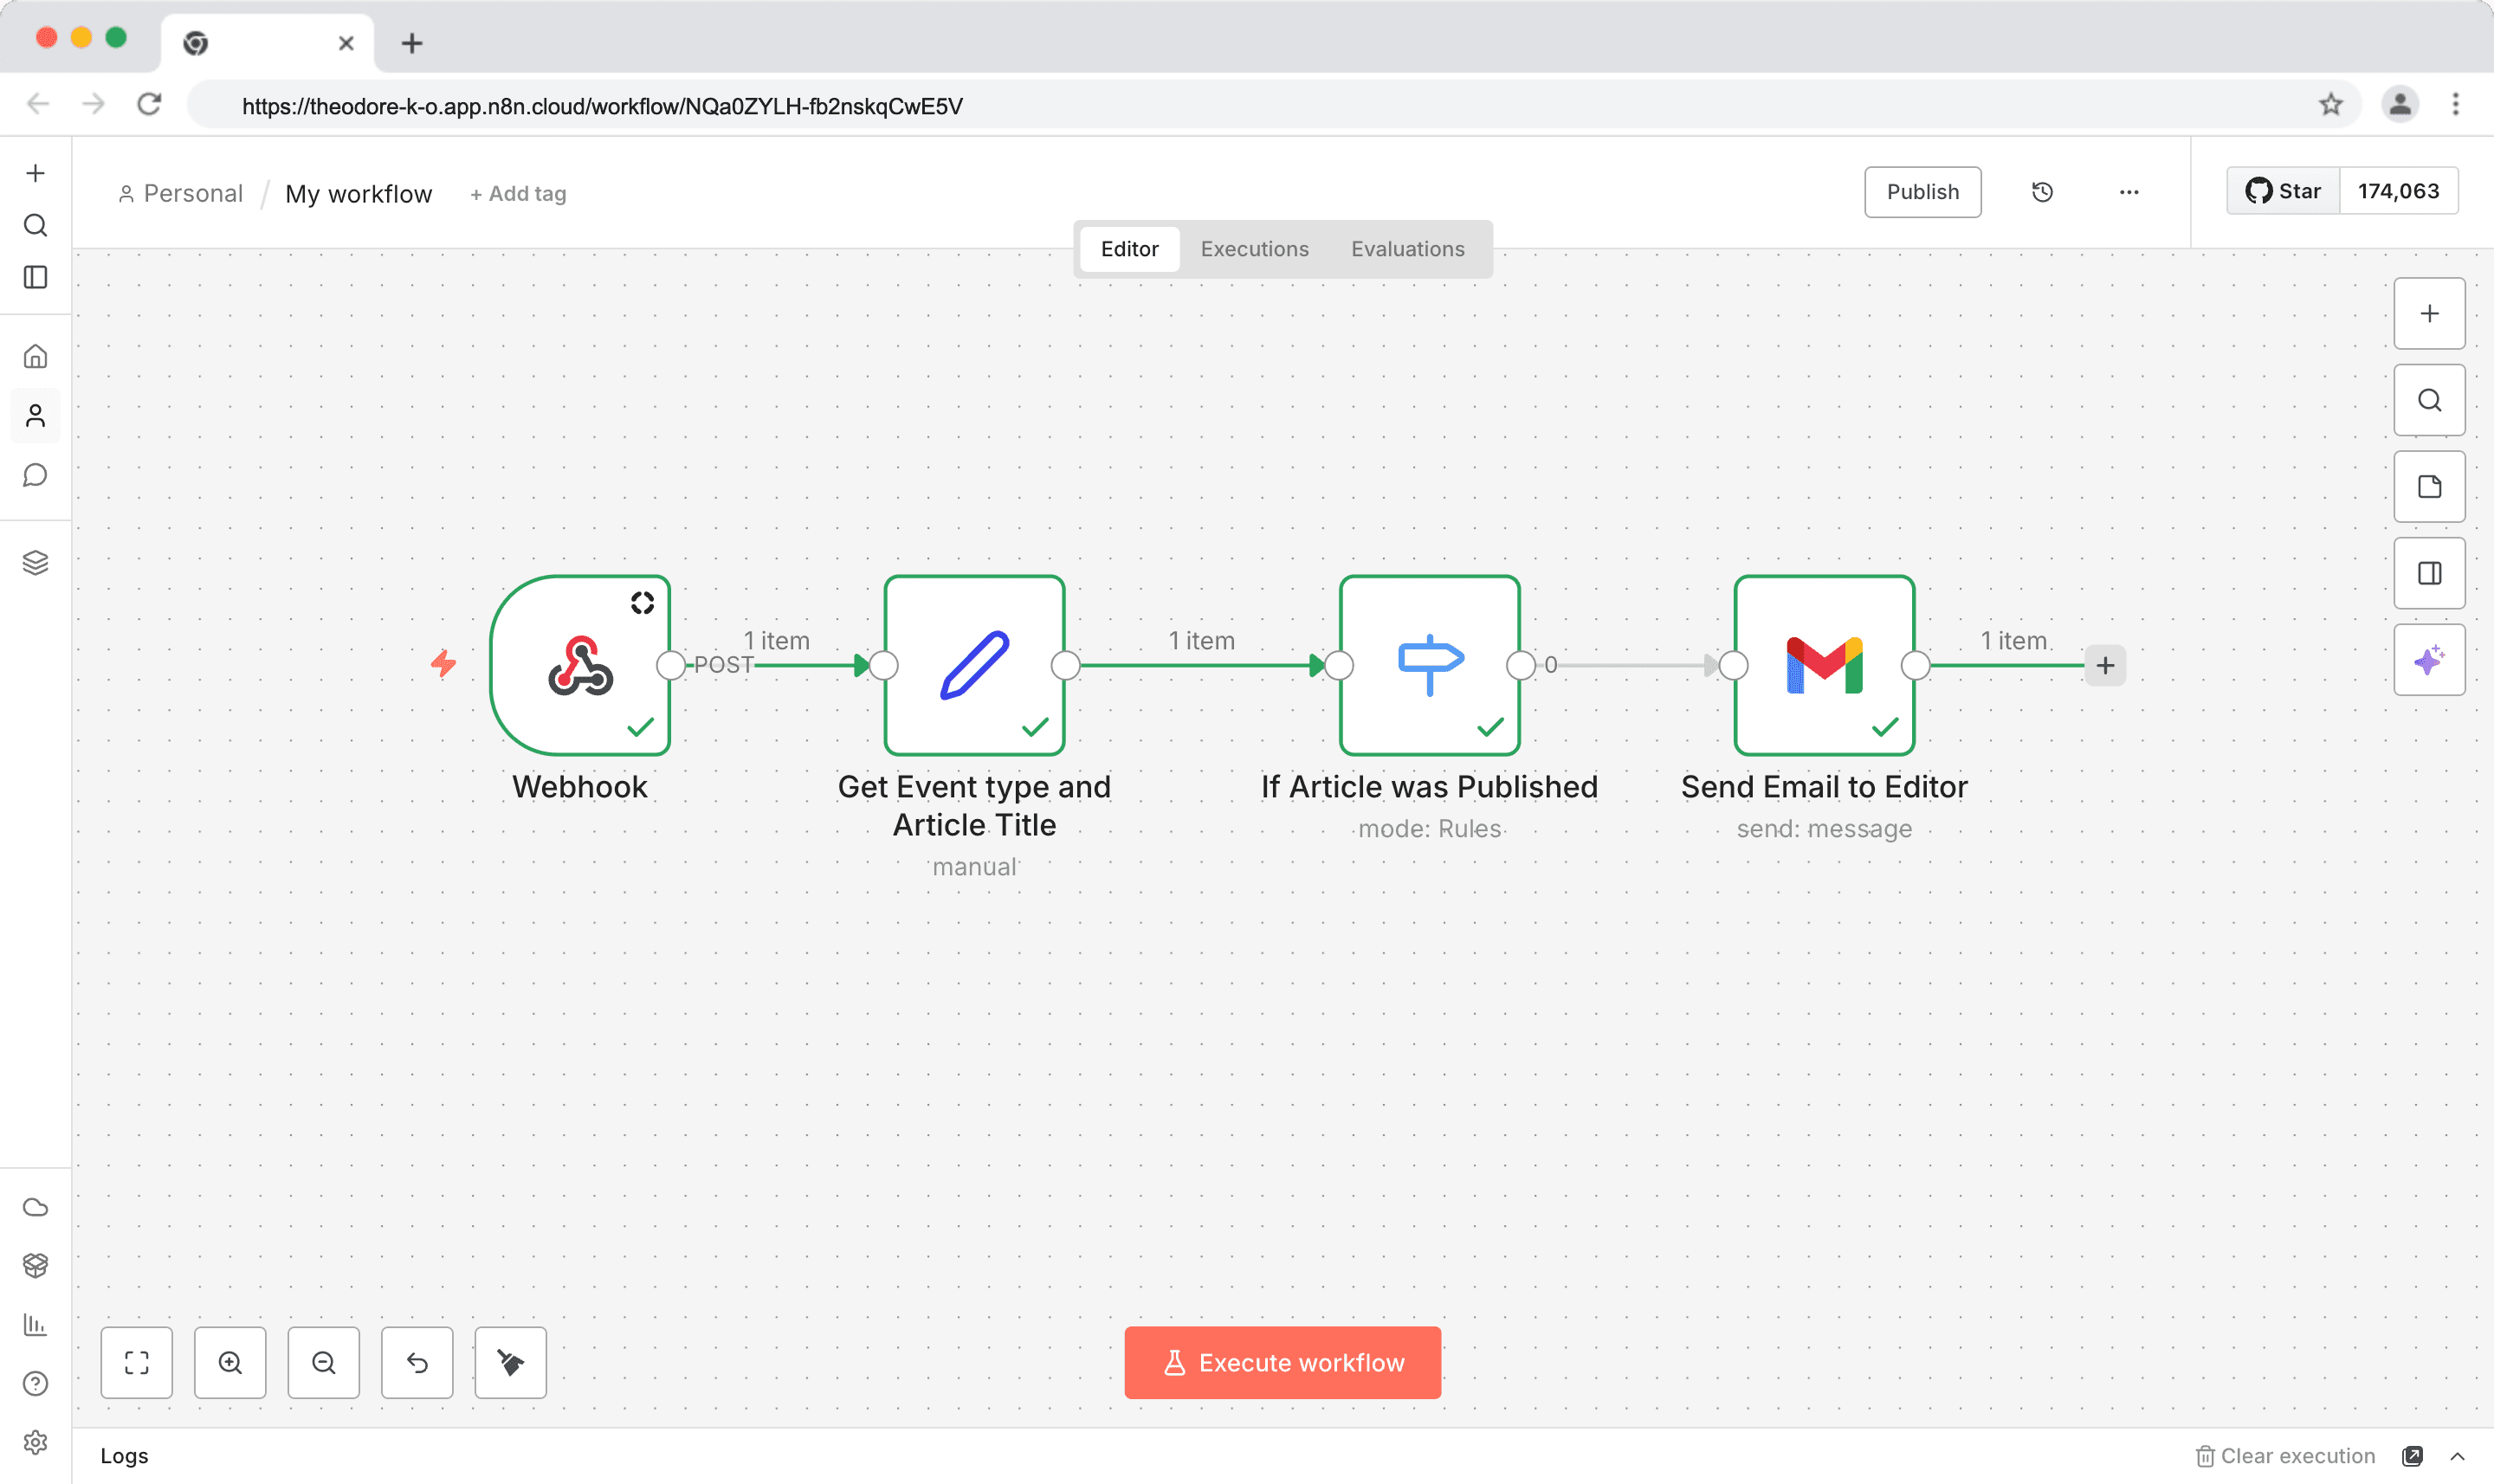
Now, every time your chosen event happens in Strapi, n8n gets a real-time payload, and you can do whatever you want with the captured event.
For example, in the workflow below, an email is sent to the editor when an article is published.
Perform Actions on Strapi Content (CRUD)
Once n8n can capture events from Strapi, the next step of integration is knowing how to take actions on your Strapi content.
This means reading content, creating new entries, updating records, or deleting what’s no longer needed in your Strapi project from n8n. That’s where CRUD operations come in (Create, Read, Update, Delete).
This can be done in two ways:
In this integration, we will use both of them.
✋ NOTE: You can use the HTTP Request node to make a custom API call. n8n will take care of the Strapi authentication for you.
Prerequisites
Ensure you have added a credential for your running Strapi app, as shown in the "Prepare Strapi and n8n Environment".
Get Many Entries with Strapi Node
With n8n’s built-in Strapi node, you can perform these operations securely and visually with no code required.
Next, let's add the Strapi node to get many entries. We will get the article entries in our Strapi project.
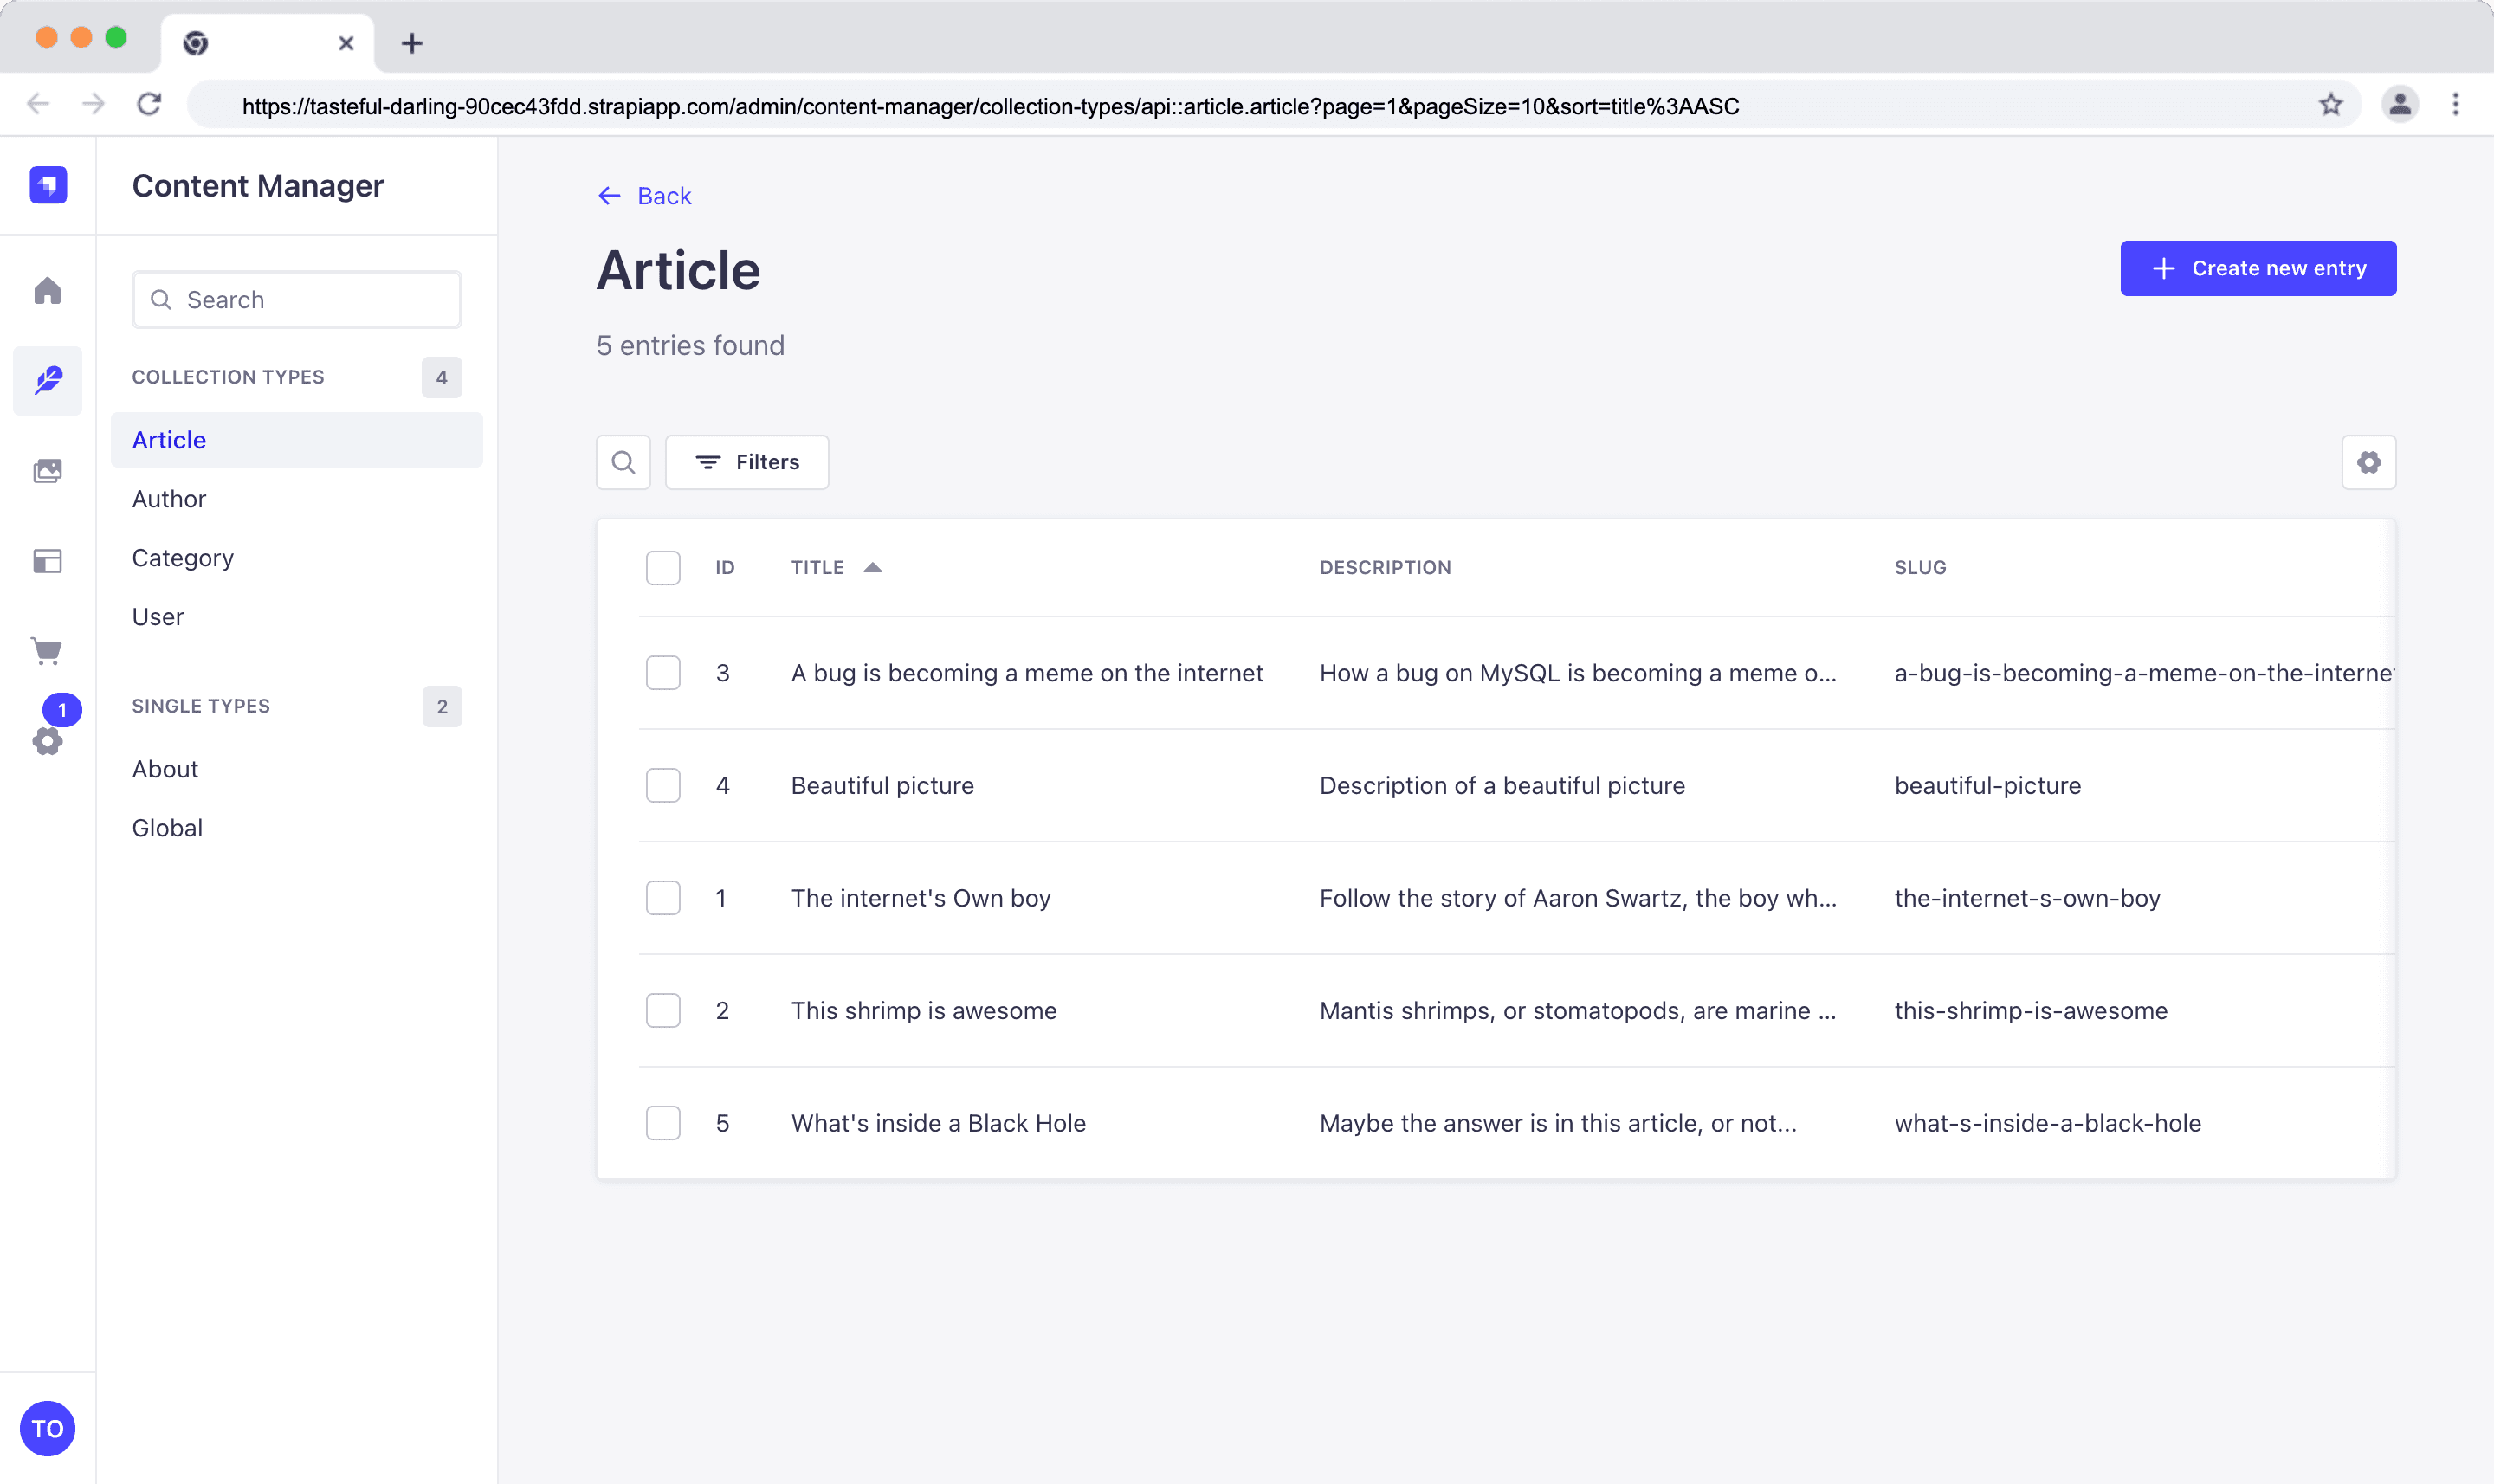
- Click the "Add first step" button.
- Select the "Trigger manually" node. This time, we don't need a webhook since all we want to do is perform CRUD operations.
- Click the Plus button and add the Strapi node.
- Select "Get many entries."
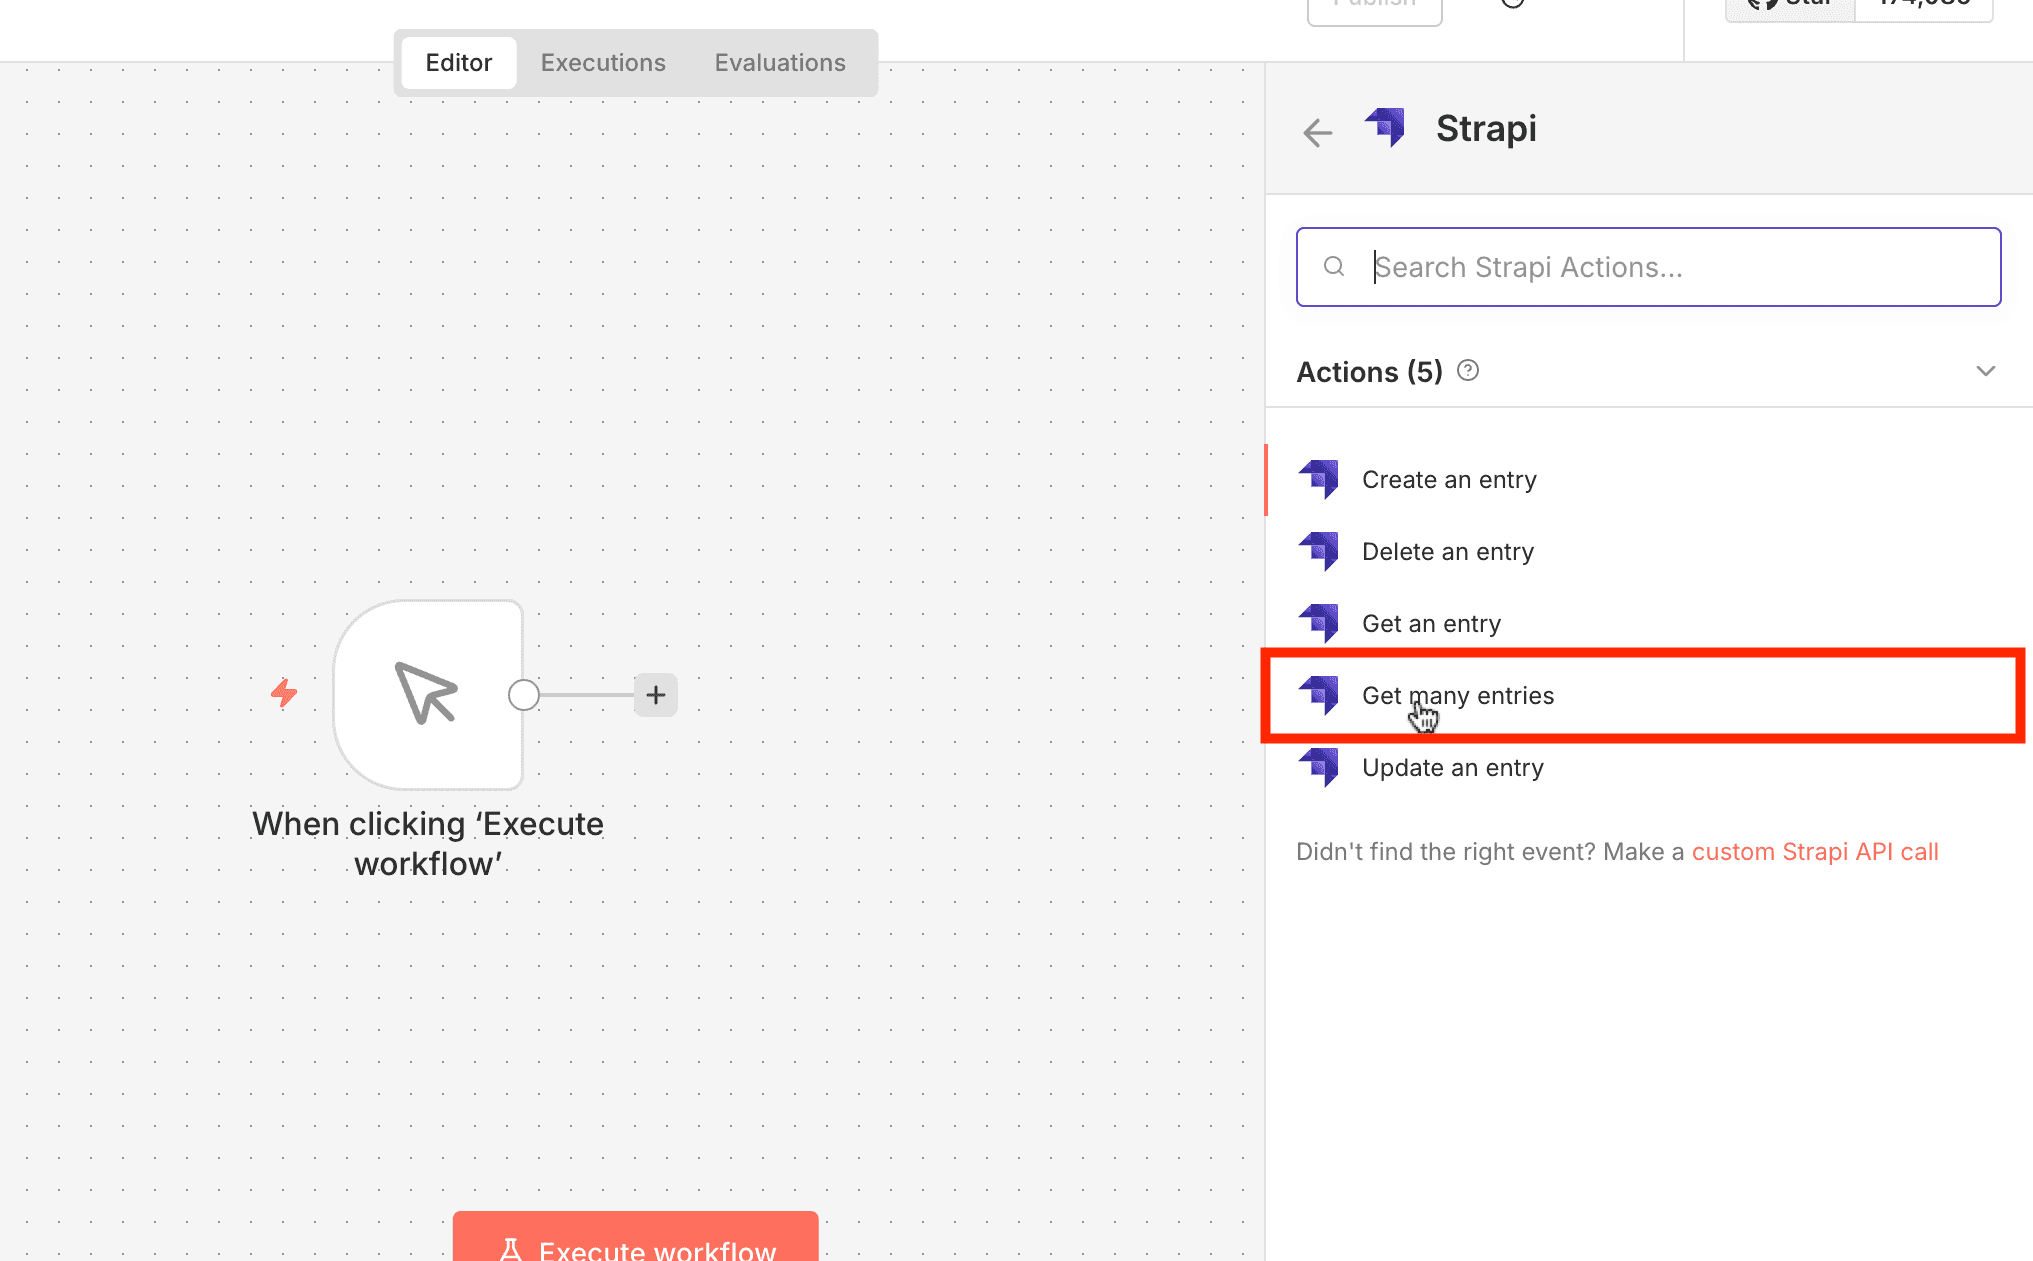
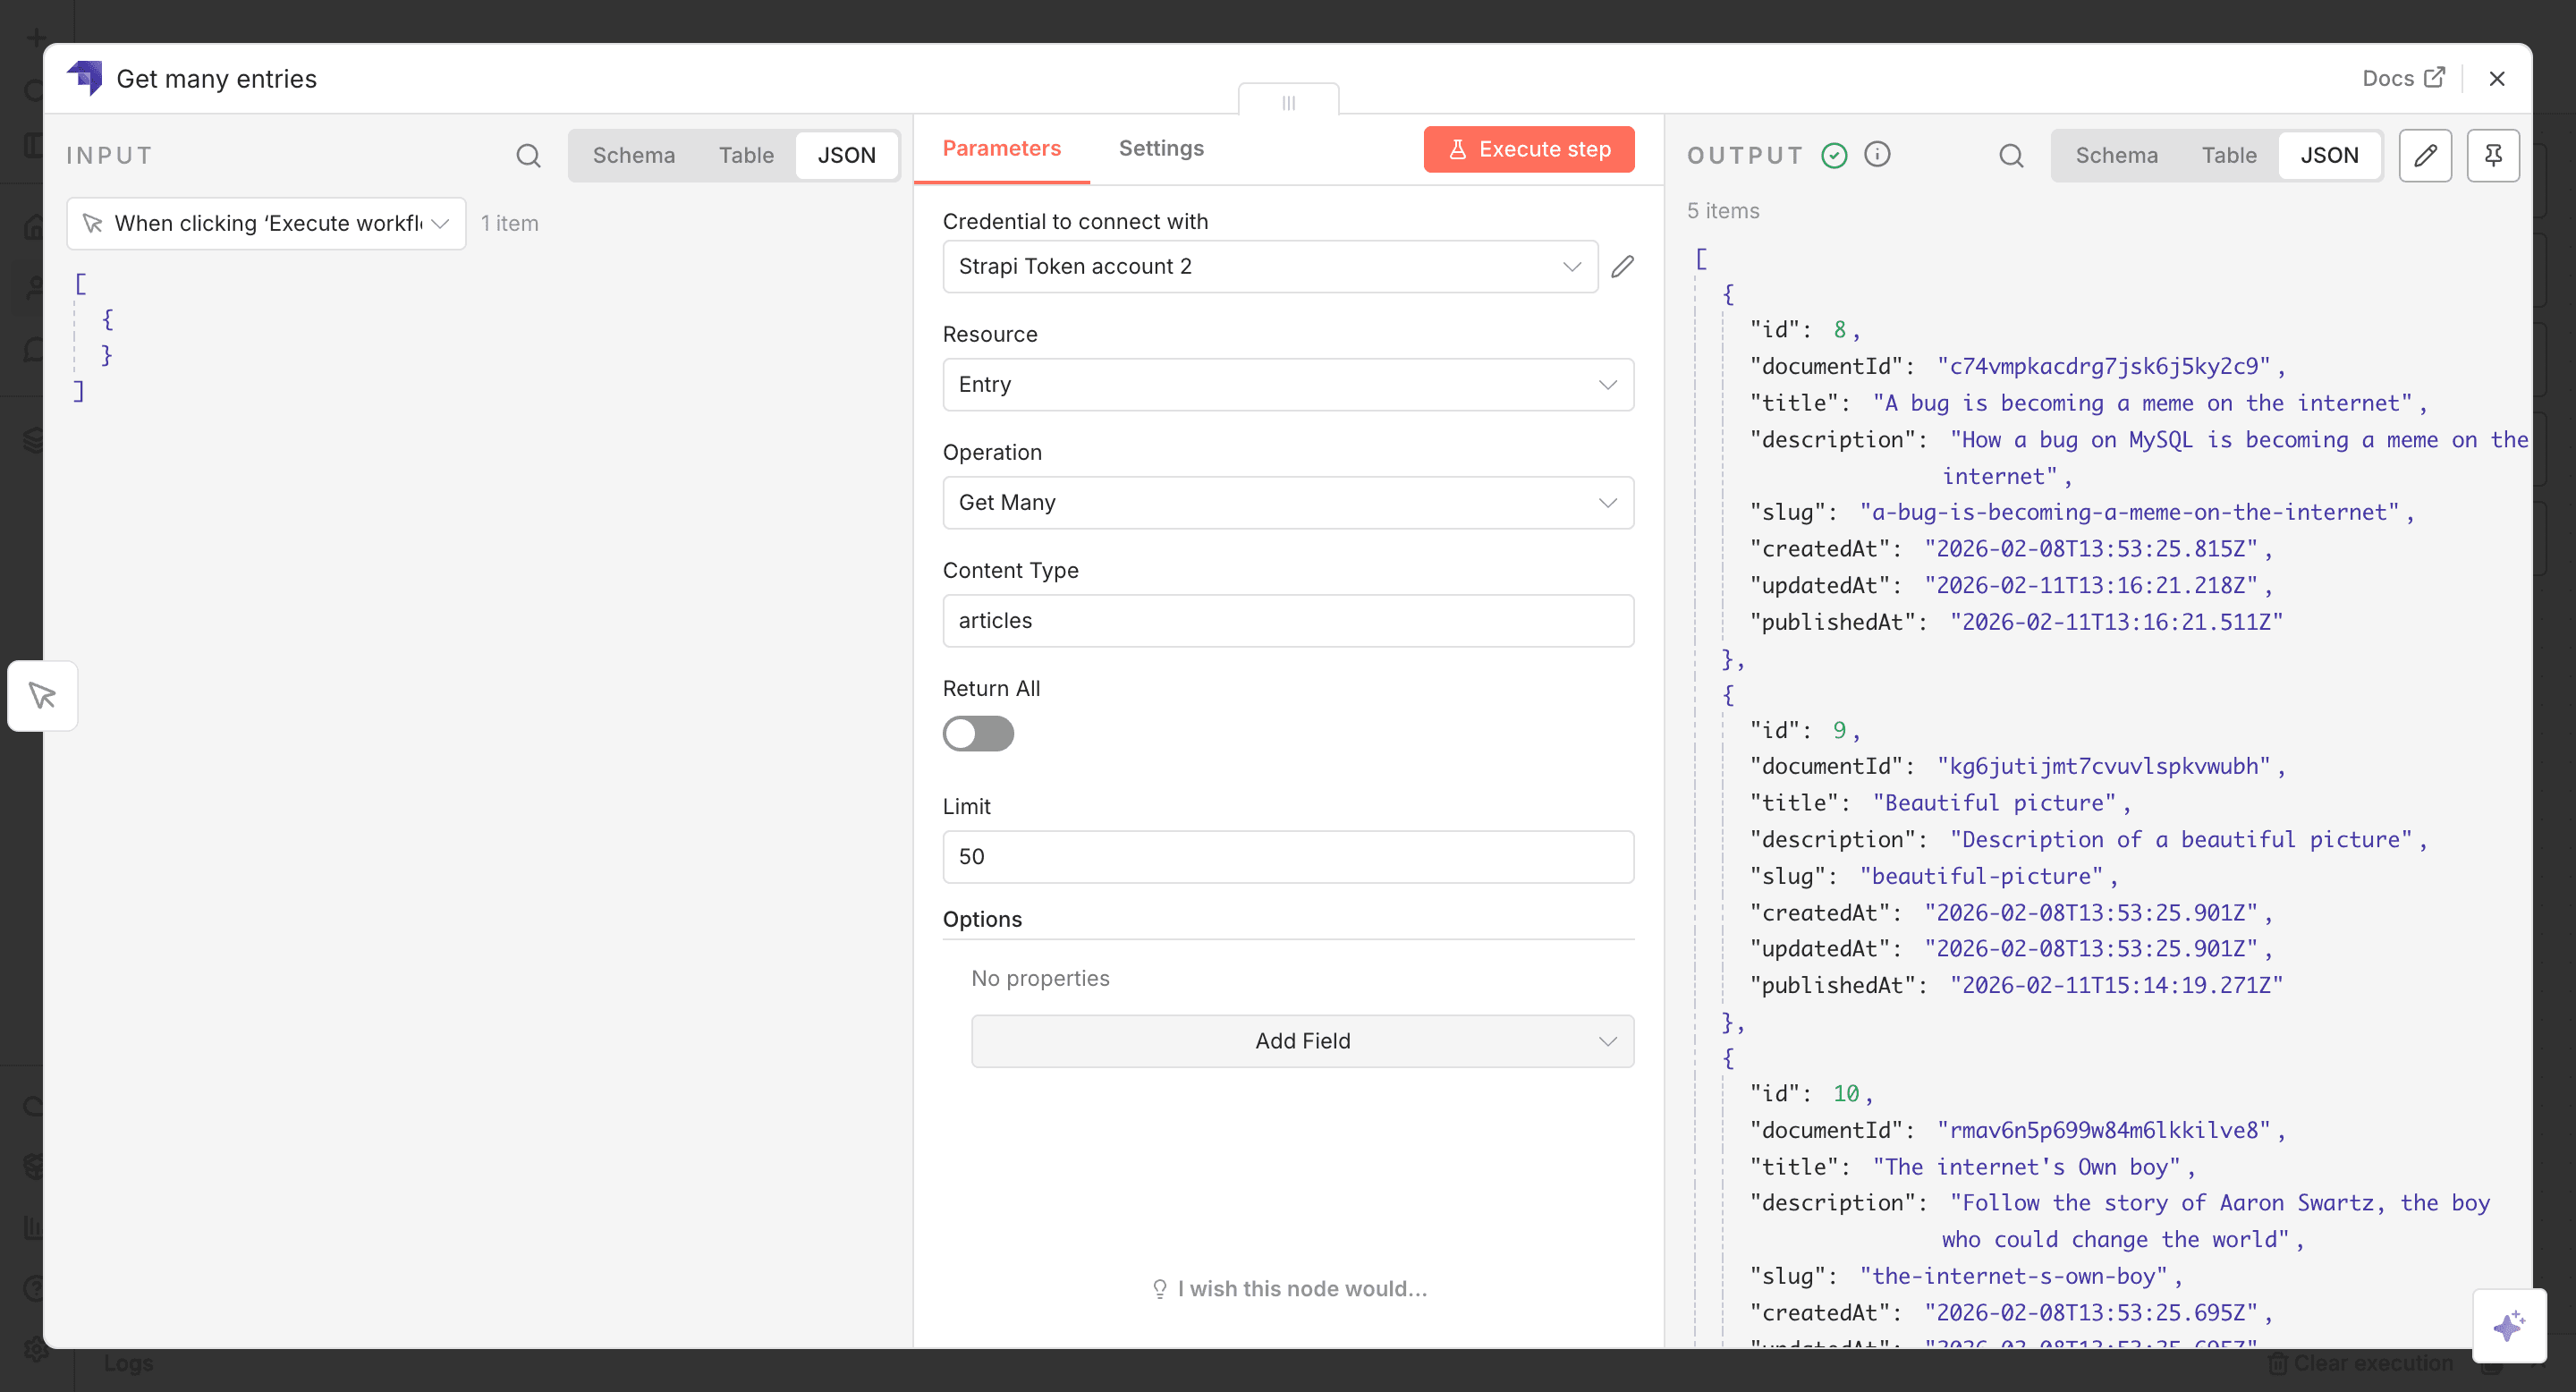
- For "Credential to connect with", select the one you created in the "Prepare Your Strapi Environment".
- For "Resource", select
Entry. - For "Operation", leave as default, i.e.,
Get Many. - For Content Type, the value should be
articlessince we want to fetch article entries. - Leave the "Limit" value as default, i.e., 50.
- Click the "Execute workflow" button to test if your workflow works.
You should have a similar response with your articles at the output section of your workflow, as shown below:
✋ NOTE: As at writing this integration, using the Strapi node which supports Strapi v3 and Strapi v4 might not work on Strapi v5. Using the HTTP Request node should be the best option.
Update an Entry using the HTTP Node
Let's update an entry using the HTTP Node.
- Click the "Add first step" button.
- Select the "Trigger manually" node.
- Click the plus button of the Trigger node to select the HTTP request node.
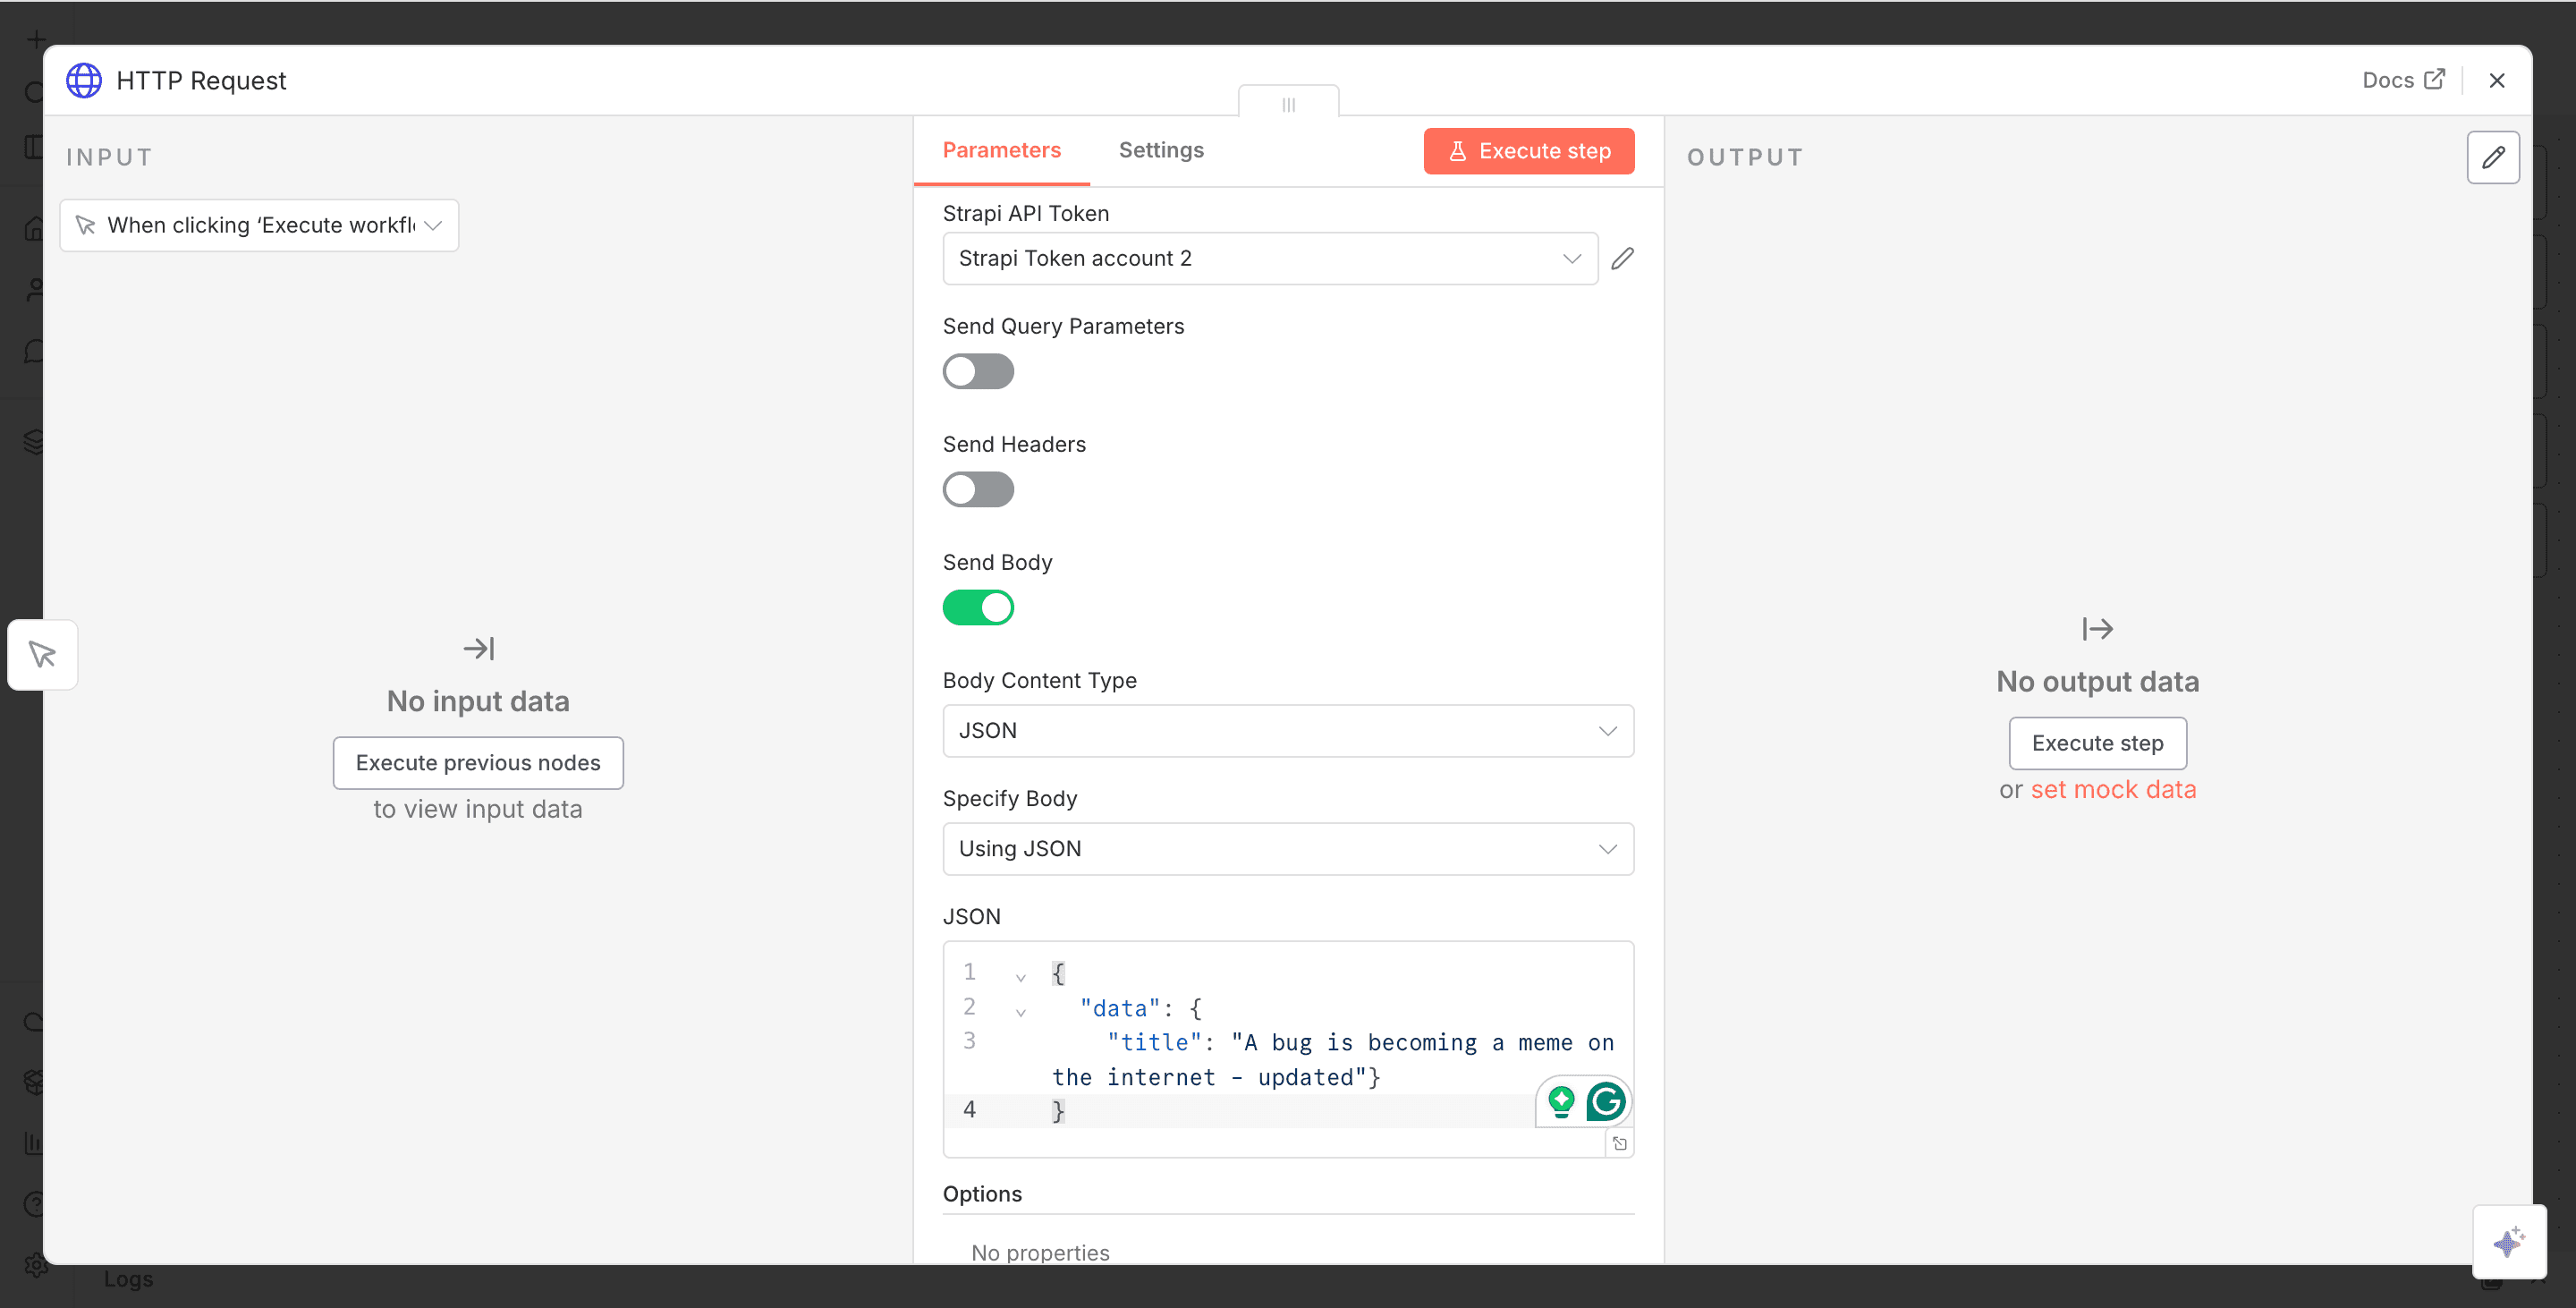
- Set the "Method" to
PUT. - Set the URL to the URL of the entry you want to update. E.g.:
YOUR_STRAPI_URL/api/articles/DOCUMENT_ID=>https://tasteful-darling-90cec43fdd.strapiapp.com/api/articles/c74vmpkacdrg7jsk6j5ky2c9 - Select
Predefined Credential Typefor "Authentication". - Select
Strapi APItoken for "Credential Type" field. - Select the API token you created above for the "Strapi API Token" field
- Check the "Send Body" box and select
JSONas the "Body Content Type."
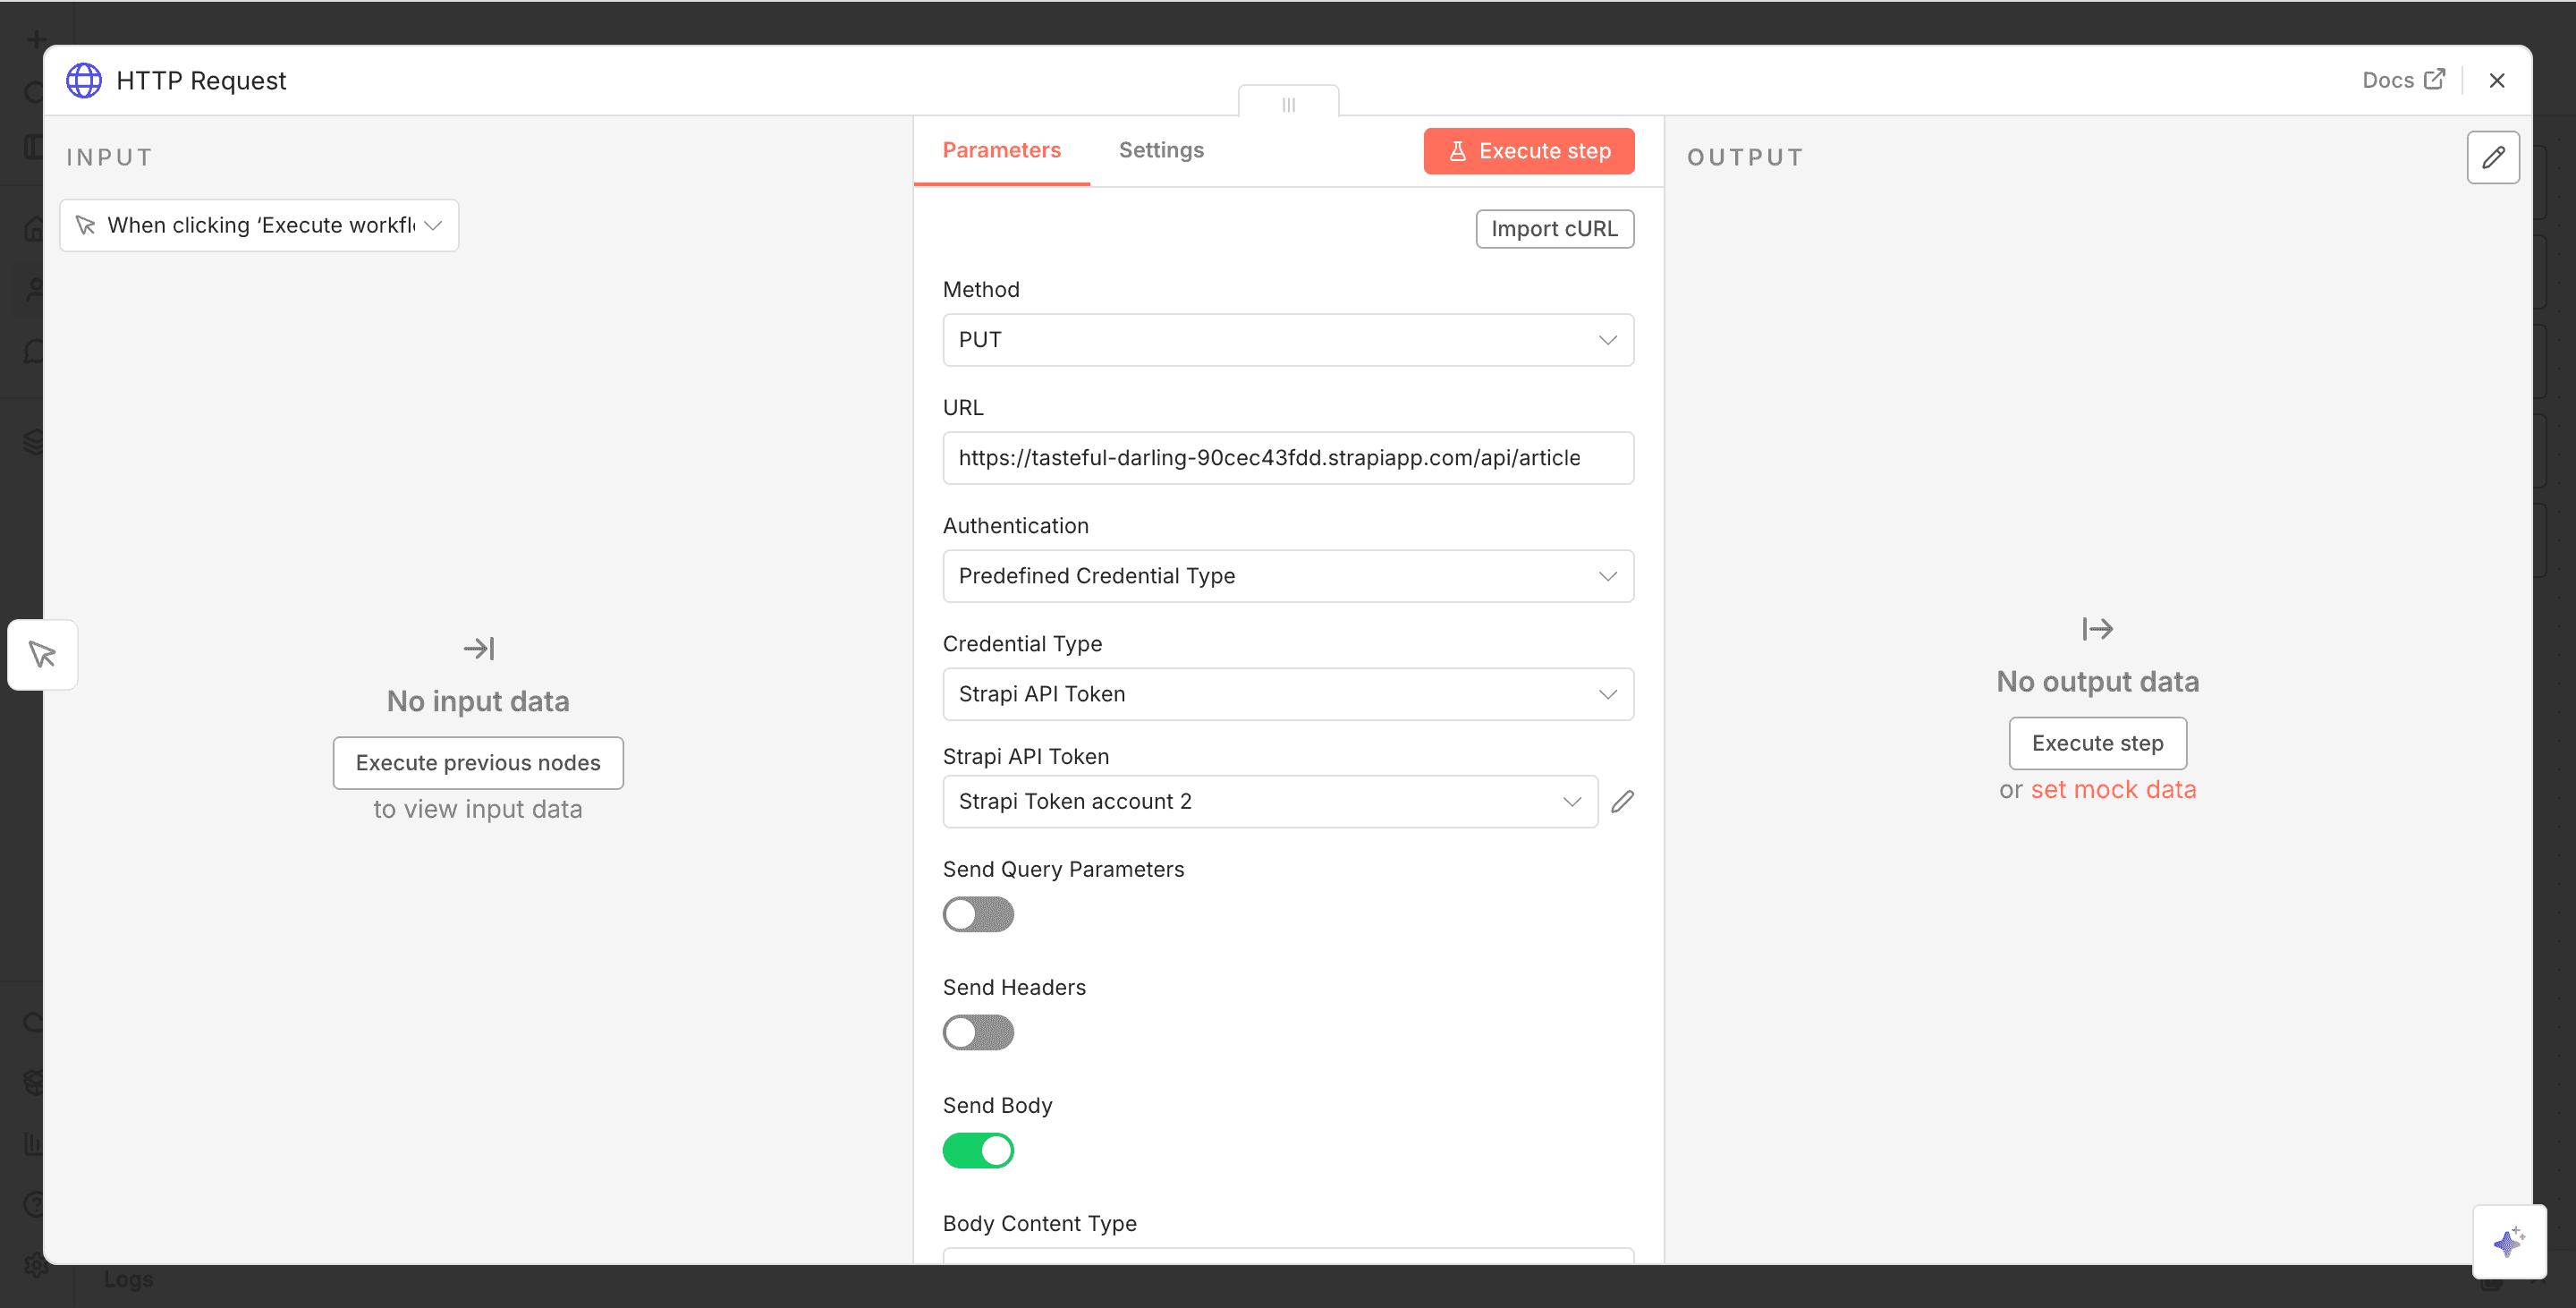
- Set the "Specify Body" as
Using JSON. - Provide the body of the JSON in the "JSON" field. In this case, let's update the title of an article. The JSON value would be:
{
  "data": {
    "title": "A bug is becoming a meme on the internet - updated"
  }
}
Trigger your HTTP Request node by clicking the "Execute step" button. Below is what you should see if your integration is successful.
To learn more about CRUD operations in Strapi, visit the REST API documentation page.
💡Advanced Tip
When building dynamic workflows with the Strapi node, you can use a Set node + {{ $json.keys().join(',') }} to auto-generate the fields list instead of hardcoding it. This way, you can use the fields in the node where it asks for the fields
When using the Strapi node for Create or Update operations, you can place a Set node before it to define the fields you want to send.
Instead of manually typing the field names in the “Fields” (or “Columns”) parameter of the Strapi node, use this expression: {{ $json.keys().join(',') }}
This dynamically generates the comma-separated list of field names based on the keys coming from the Set node, making your workflow easier to maintain when fields change.
n8n Media/File upload to Strapi
You can upload files/images to Strapi with n8n, depending on which way you prefer.
Because the Strapi node doesn't currently have support for file uploads, we will use the n8n Form and HTTP Request nodes to do this.
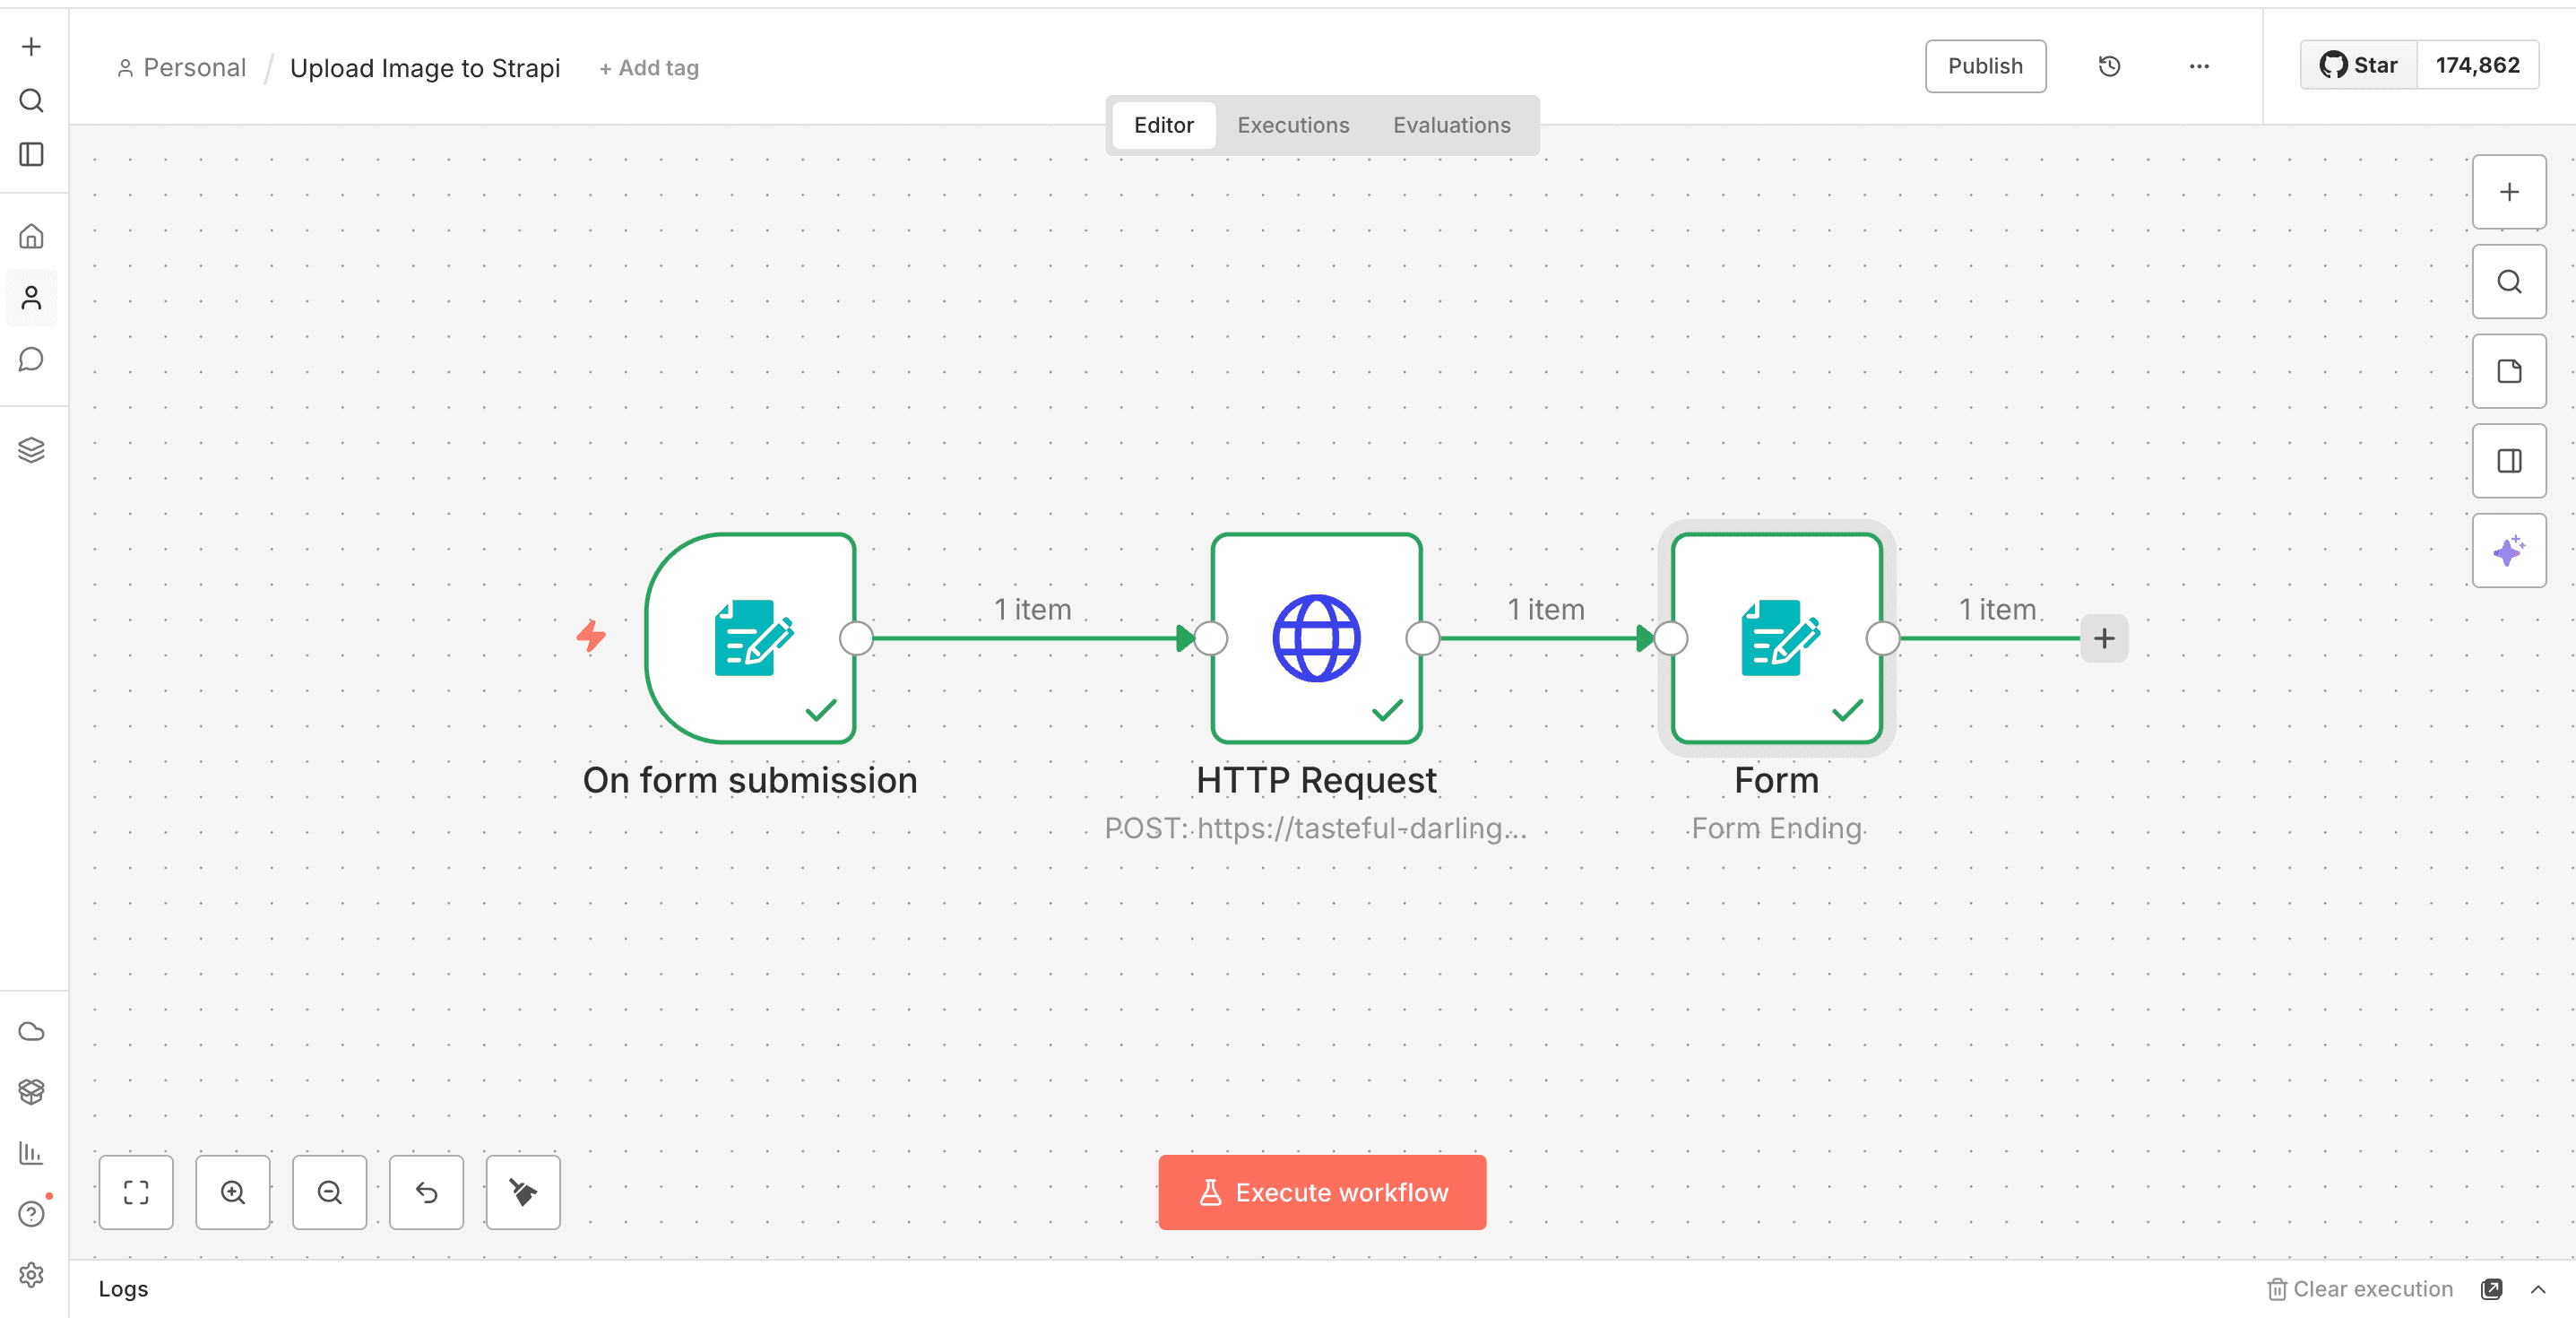
Step 1: Add n8n Form Node
-
Click the "Add first step" button.
-
Select the "n8n Form" node and choose the "On new n8n form event" trigger.
-
Set the "Form Title" to any title of your choice, and include a description. My title will be "Image Upload to Strapi," and the description: "Upload an image to Strapi".
-
Add a "Form Element", select the element type of "File", and add a label of "Image".
-
You can add attributes such as "Custom Field Name", "Multiple Files", "Accepted File Types", and "Required Field". But I will use the "Required Field" attribute.
-
Leave other fields as default.
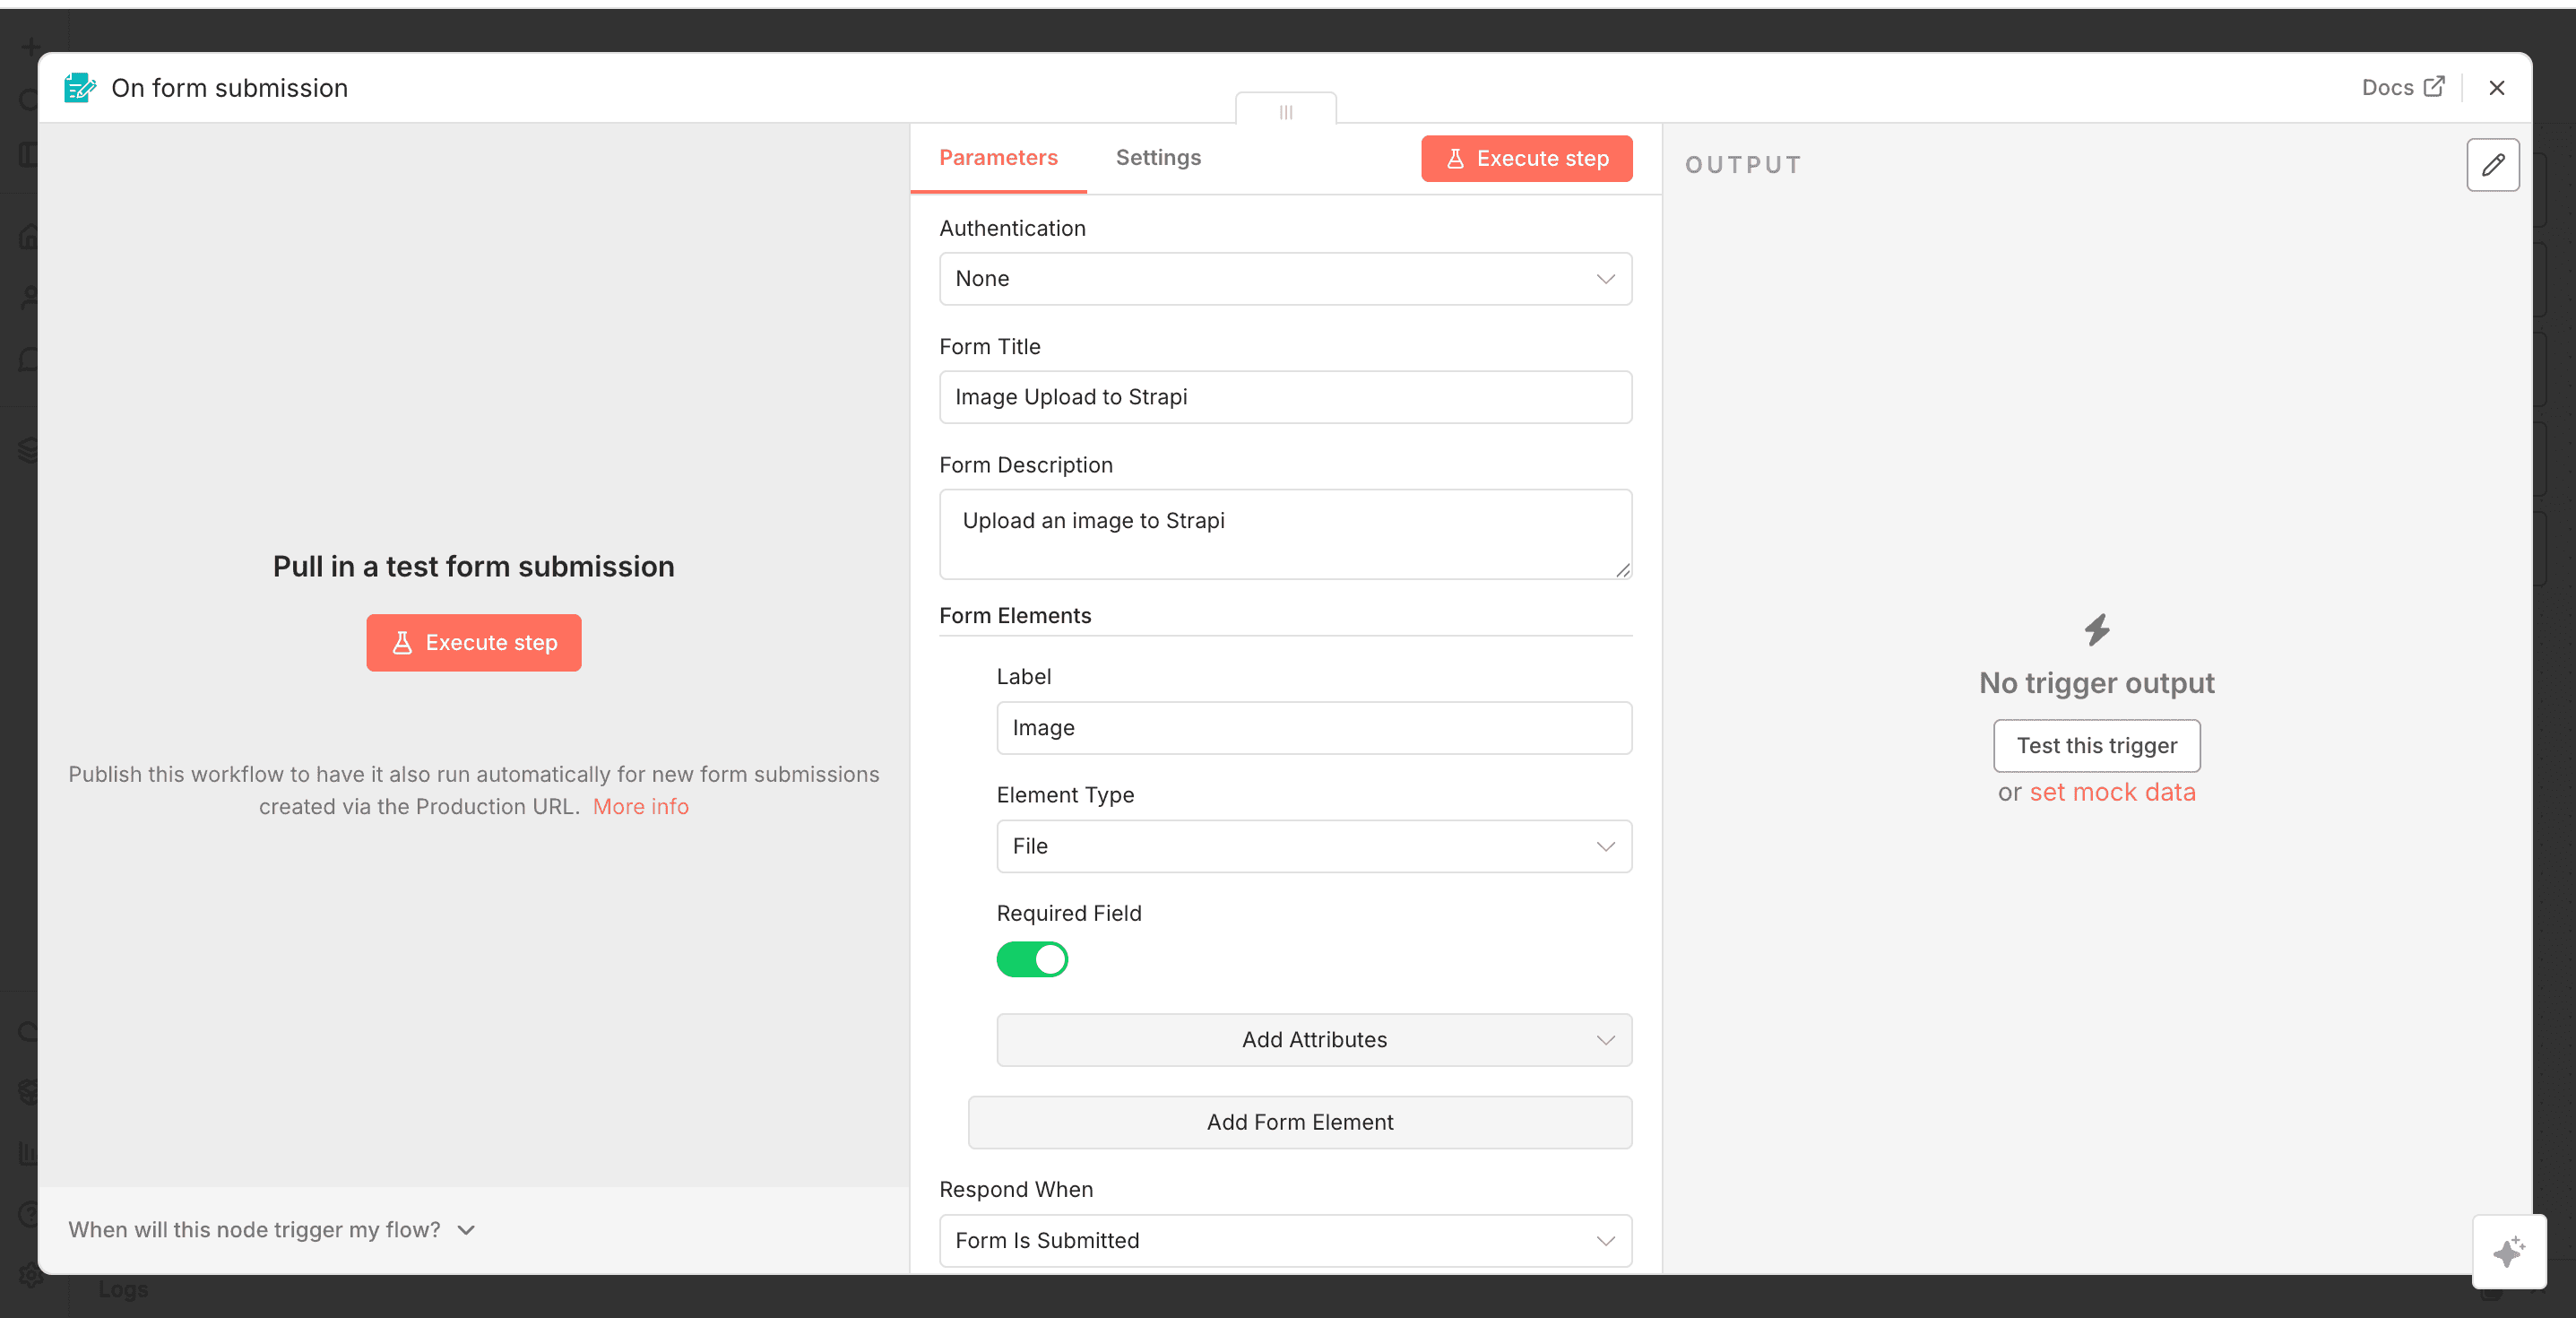
-
Test your n8n form.
Notice we get an Image as the output data. We will need the output data in the next Step.
Step 2: Add HTTP Request Node
-
Click the Plus button and add the "HTTP Request" node.
-
Select the
POSTmethod. -
Strapi allows you to upload files using the
/api/uploadendpoint. So, add the URL of your Strapi API with the upload endpoint. Eg.:https://tasteful-darling-90cec43fdd.strapiapp.com/api/upload -
Select the
Predefined Credential Typefor "Authentication" and choose theStrapi API Tokenas the "Credential Type". This automatically selects the API token you created at the beginning of this integration. -
Check the "Send Body" form options and select
Form Dataas the "Body Content Type". -
Add a Body field with "Type" as n8n Binary File.
-
The "Name" of the field should be
files. This is the field required by Strapi. -
The "Input Data Field Name" should be
Imagesince this is the output data of the form response.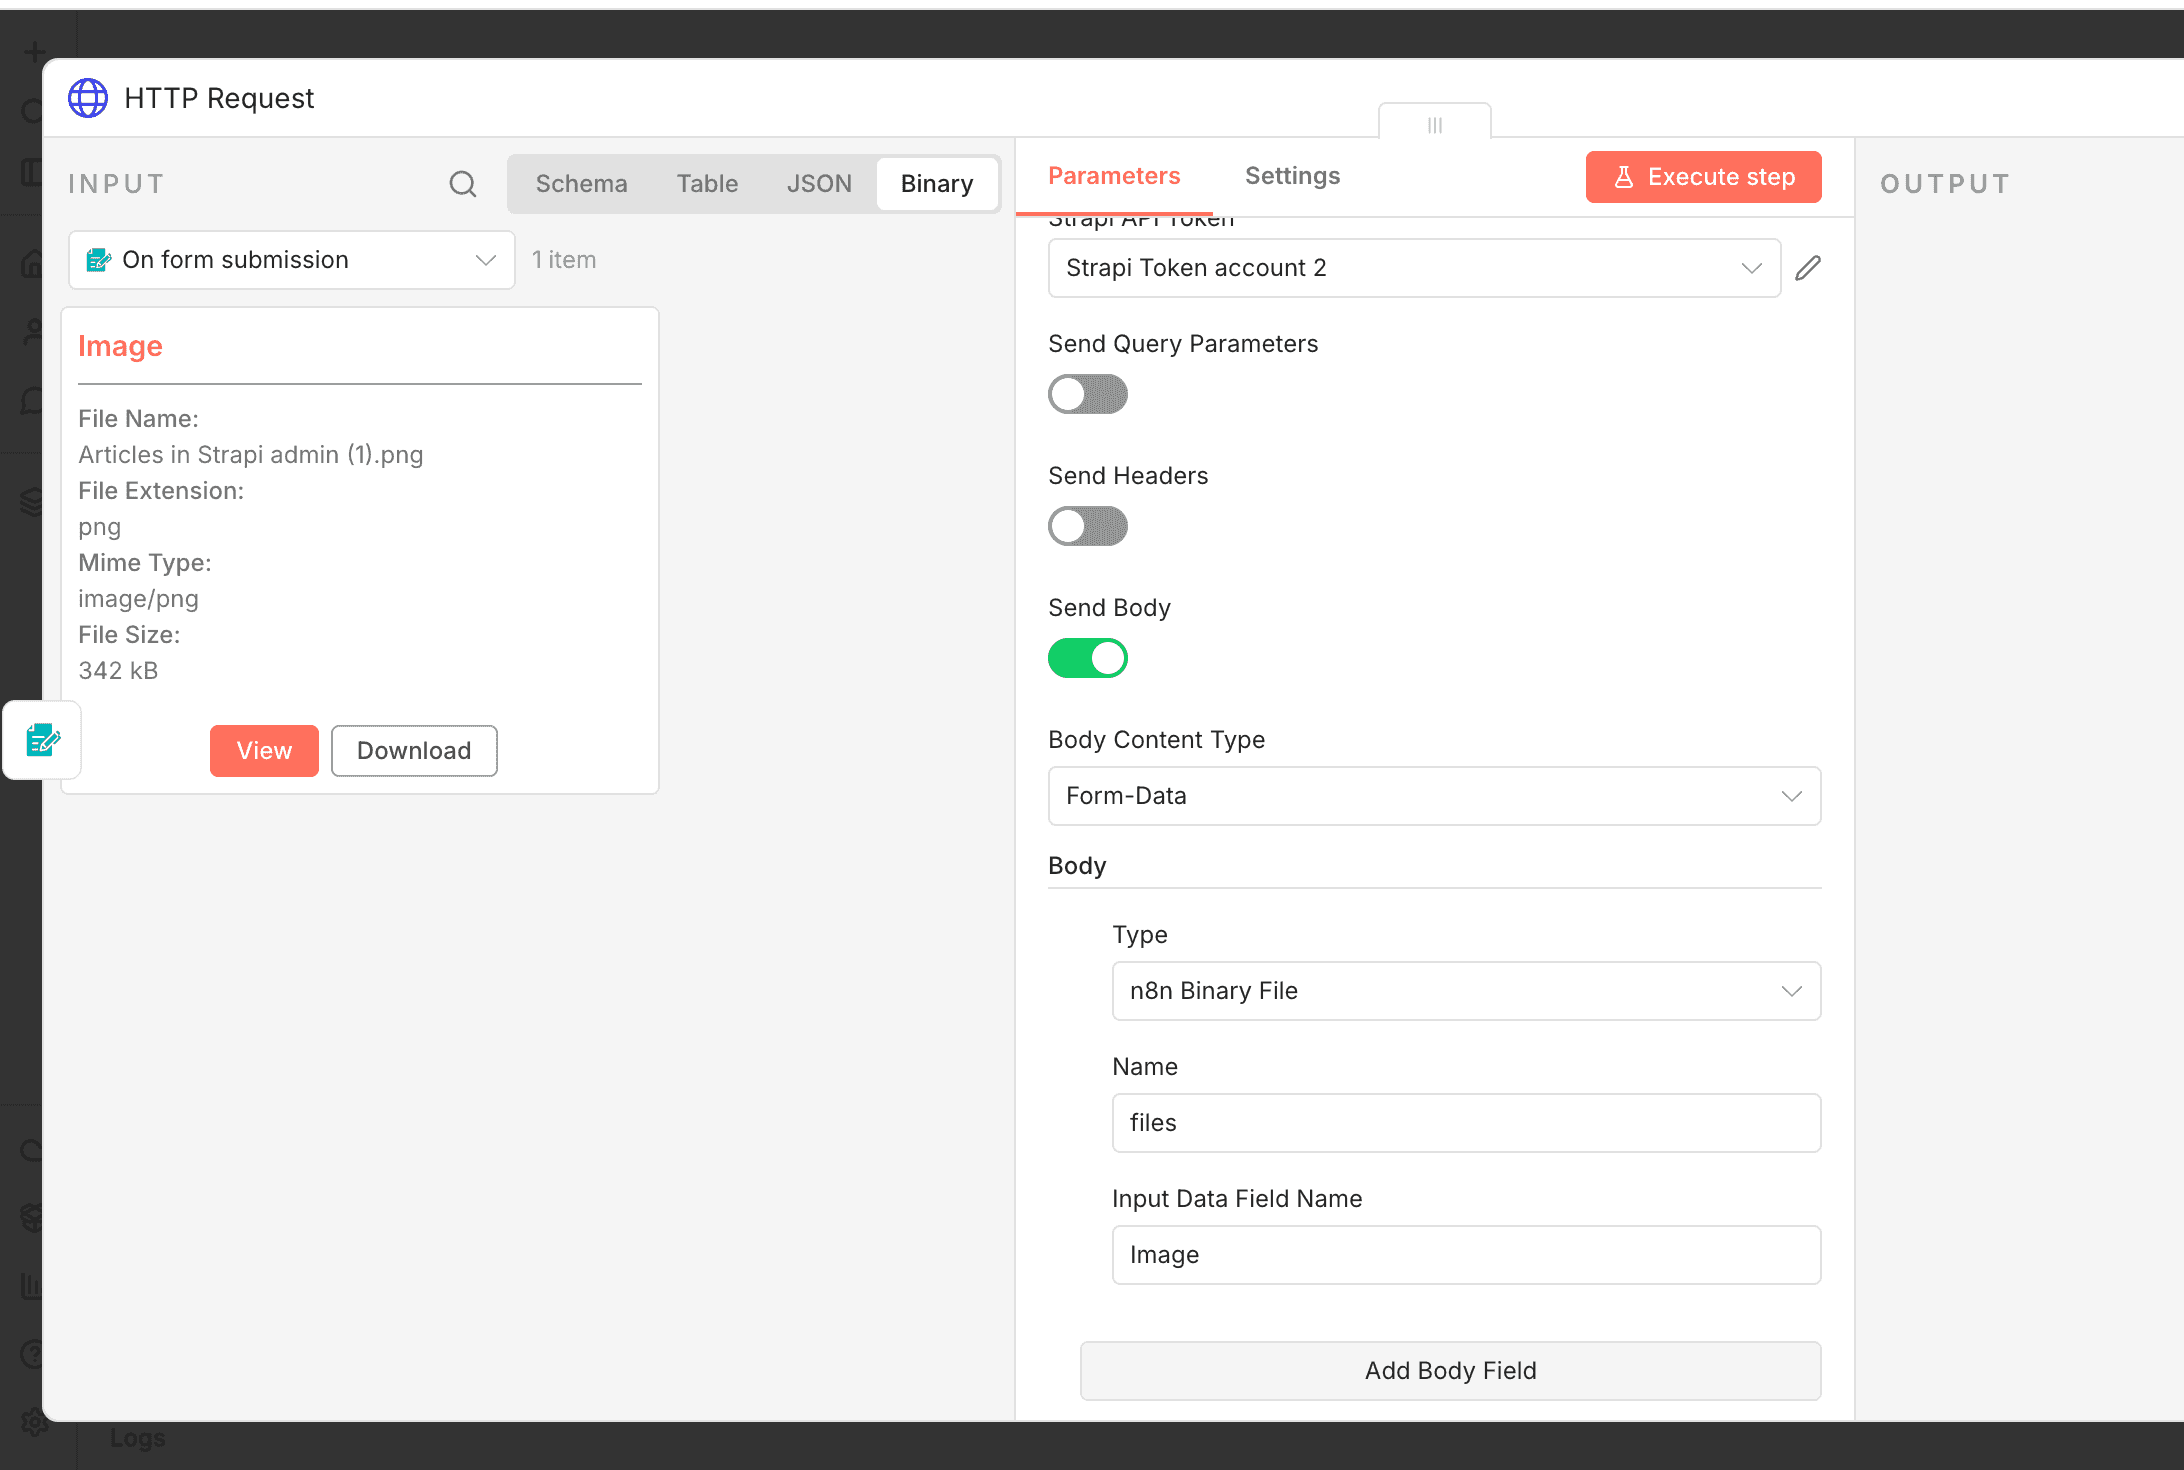
-
Execute the HTTP request node to get the output result as shown below.
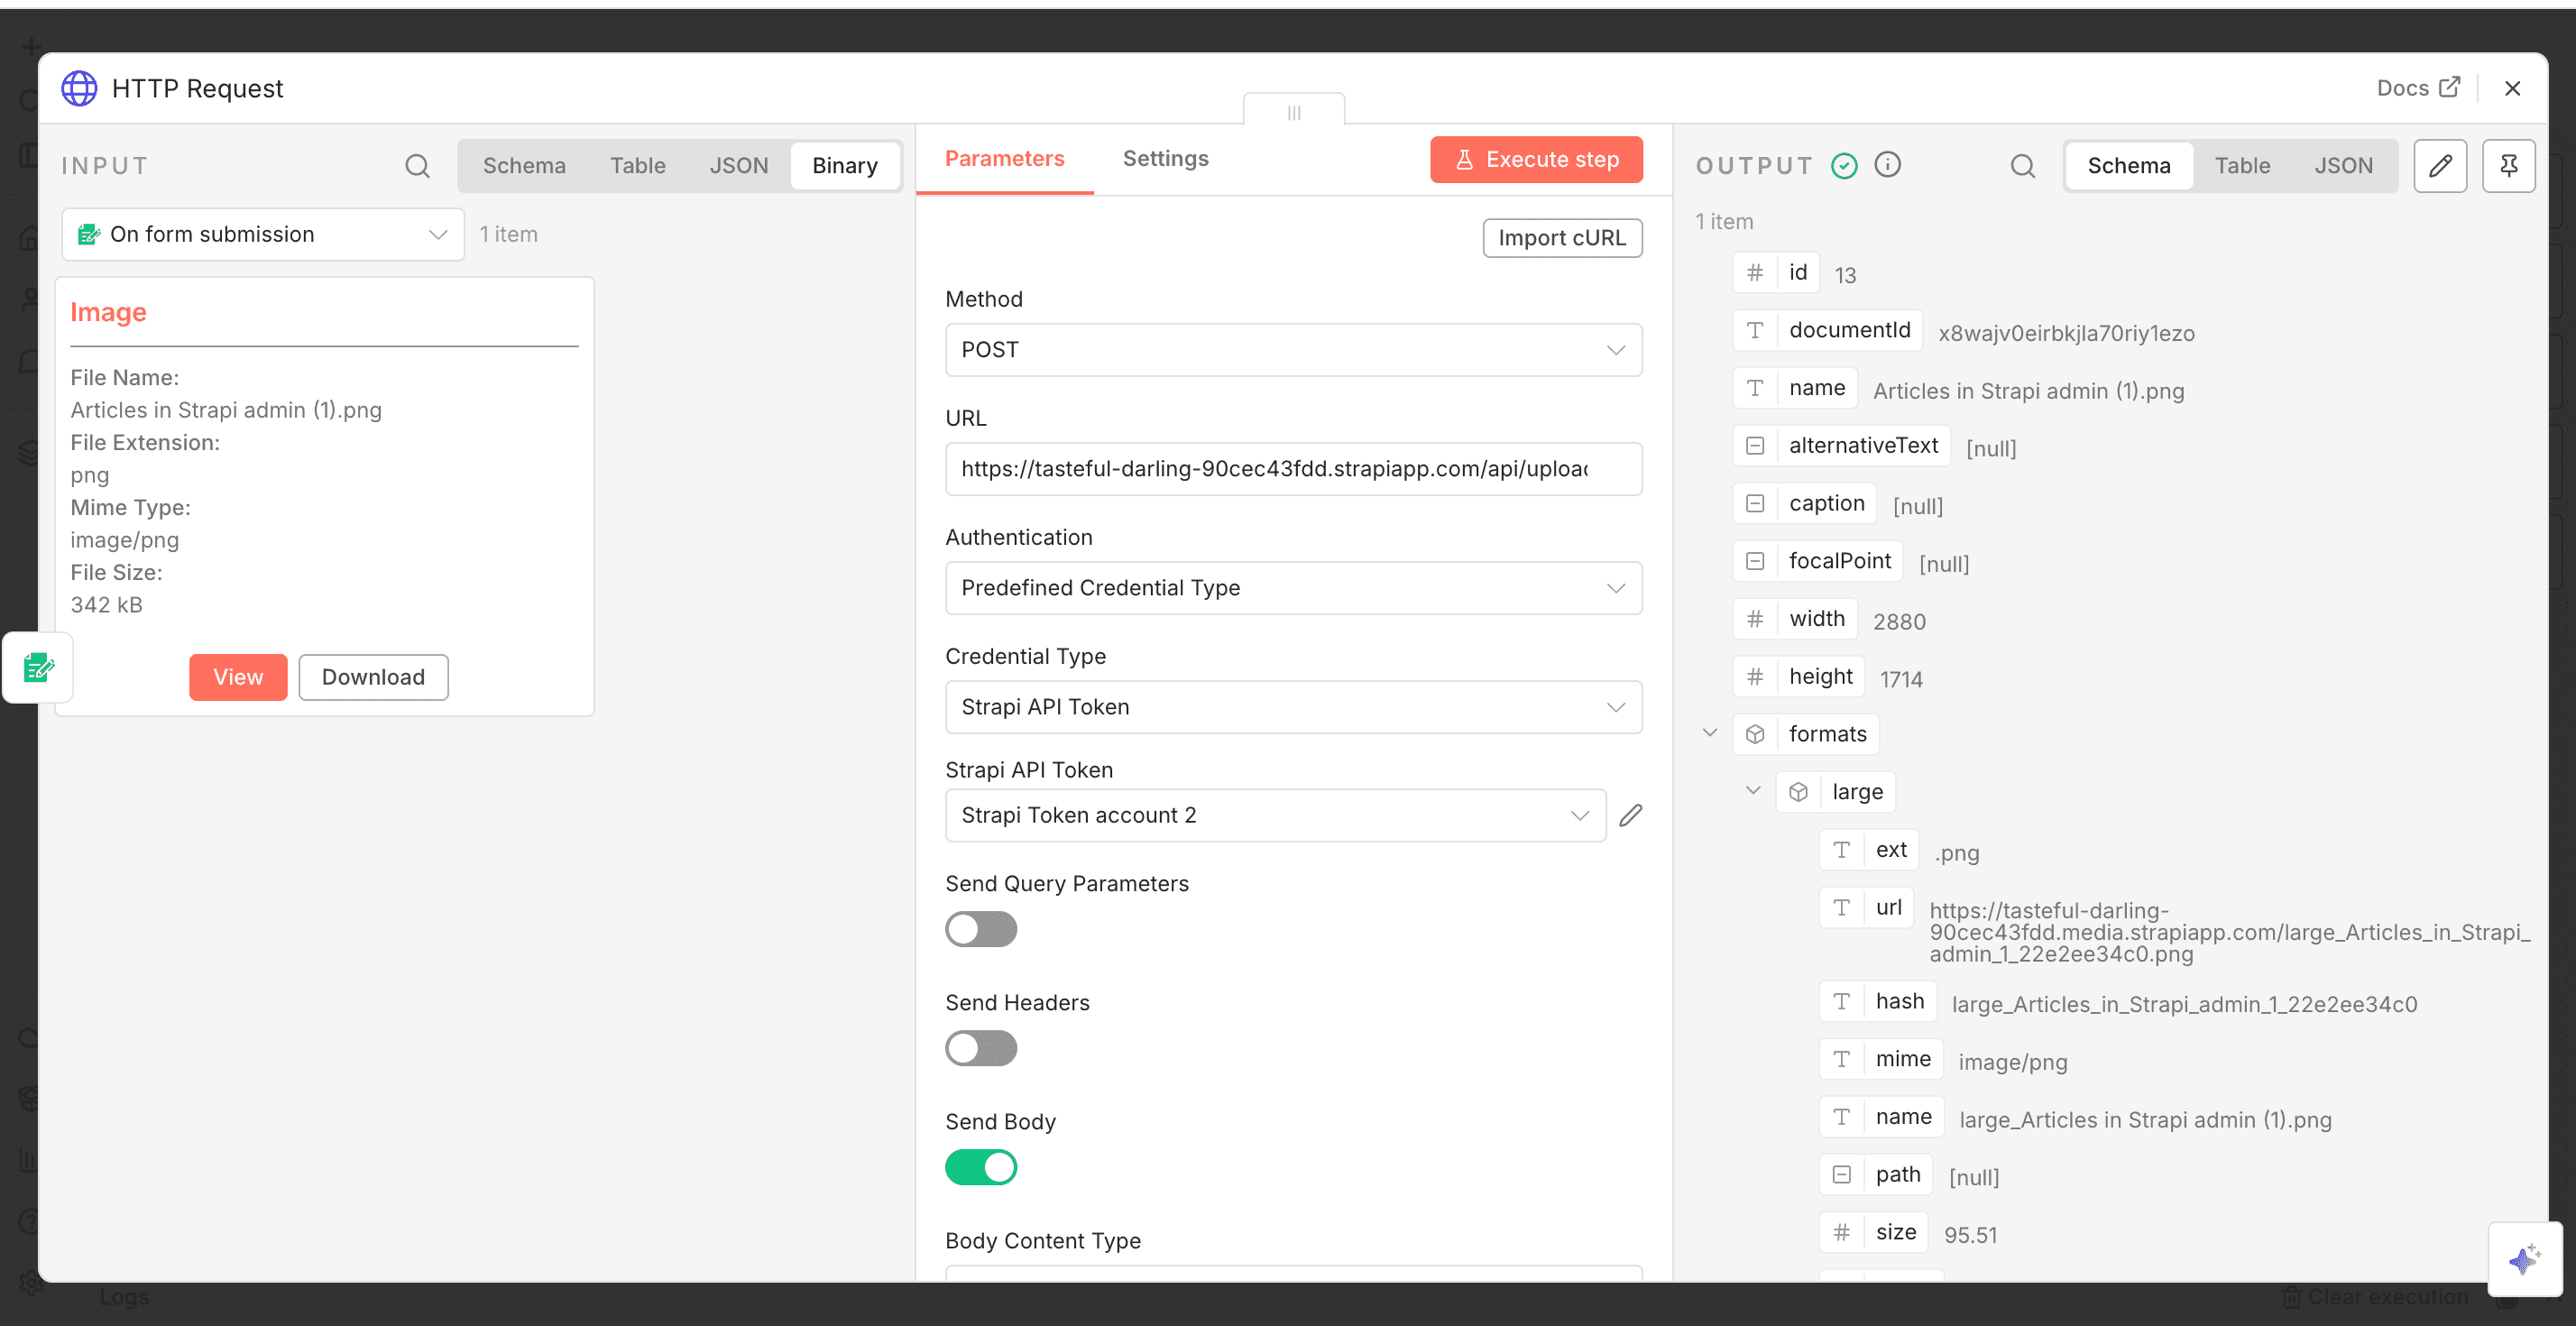
If the execution above is successful, proceed with the next step of adding a Form Ending trigger of the n8n Form node. This will return the URL of the uploaded image.
Step 3: Add a Form Ending Trigger
- Click the Plus button to add the "n8n Form" node and select the "Form Ending" action.
- Set the "Completion Title" to
Image Upload Successful. This could be any value of your choice. - Set the Completion Message as the returned Image URL. You can just add
{{json.url}}, but I would like to add some HTML and CSS.
<p>
  Link to Image:<br/>
  <a href="{{ $json.url }}" target="_blank">
    View Uploaded Image
  </a>
</p>
This will return the uploaded image URL to the user after execution, as shown below:
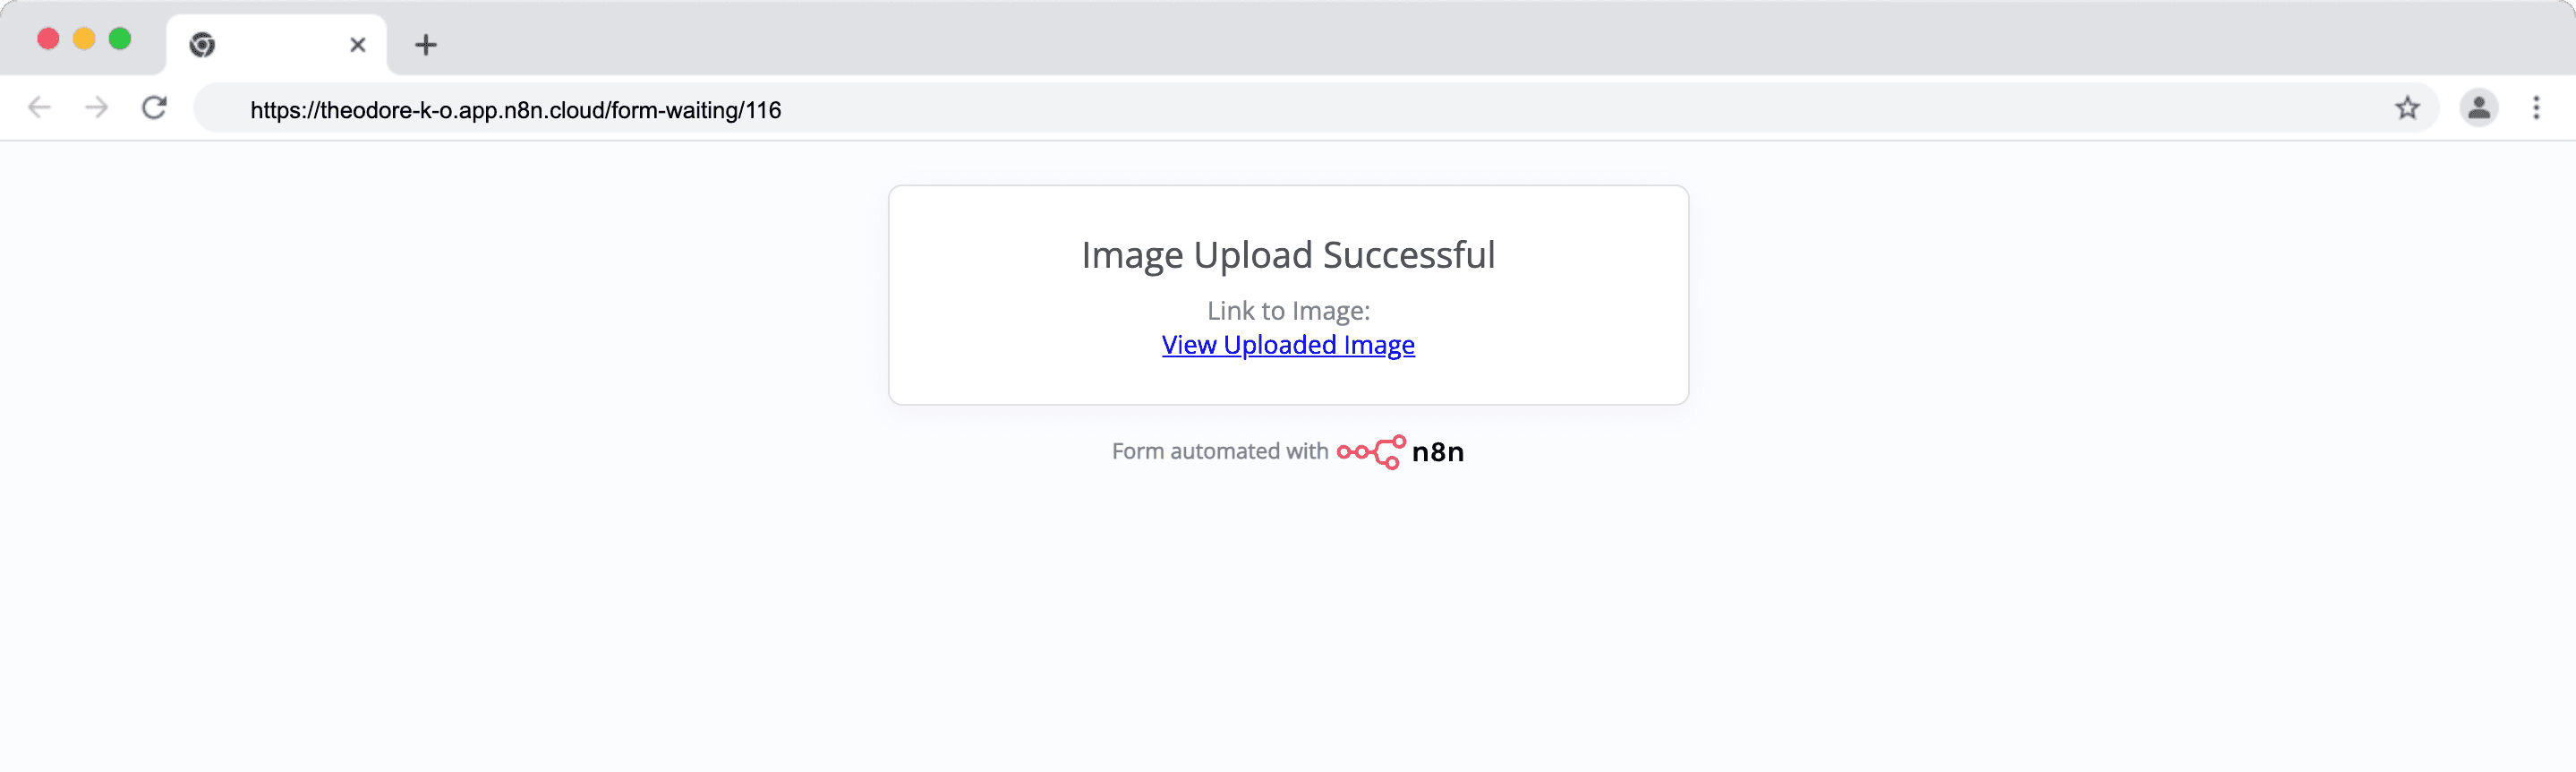
To learn more about uploading files to Strapi, check out the Image Upload to Strapi via REST API with Next.js and Postman tutorial.
Publishing your Workflow
For a workflow to be published, it must have a Trigger node.
- At the top-right corner of your workflow editor, click the "Publish" button. This will open up a form modal for you to enter your Workflow name and description.
- Fill the form modal and click the "Publish" button.
NOTE: Ensure you have updated the Webhook URL in your Strapi settings from Test URL to the Production URL
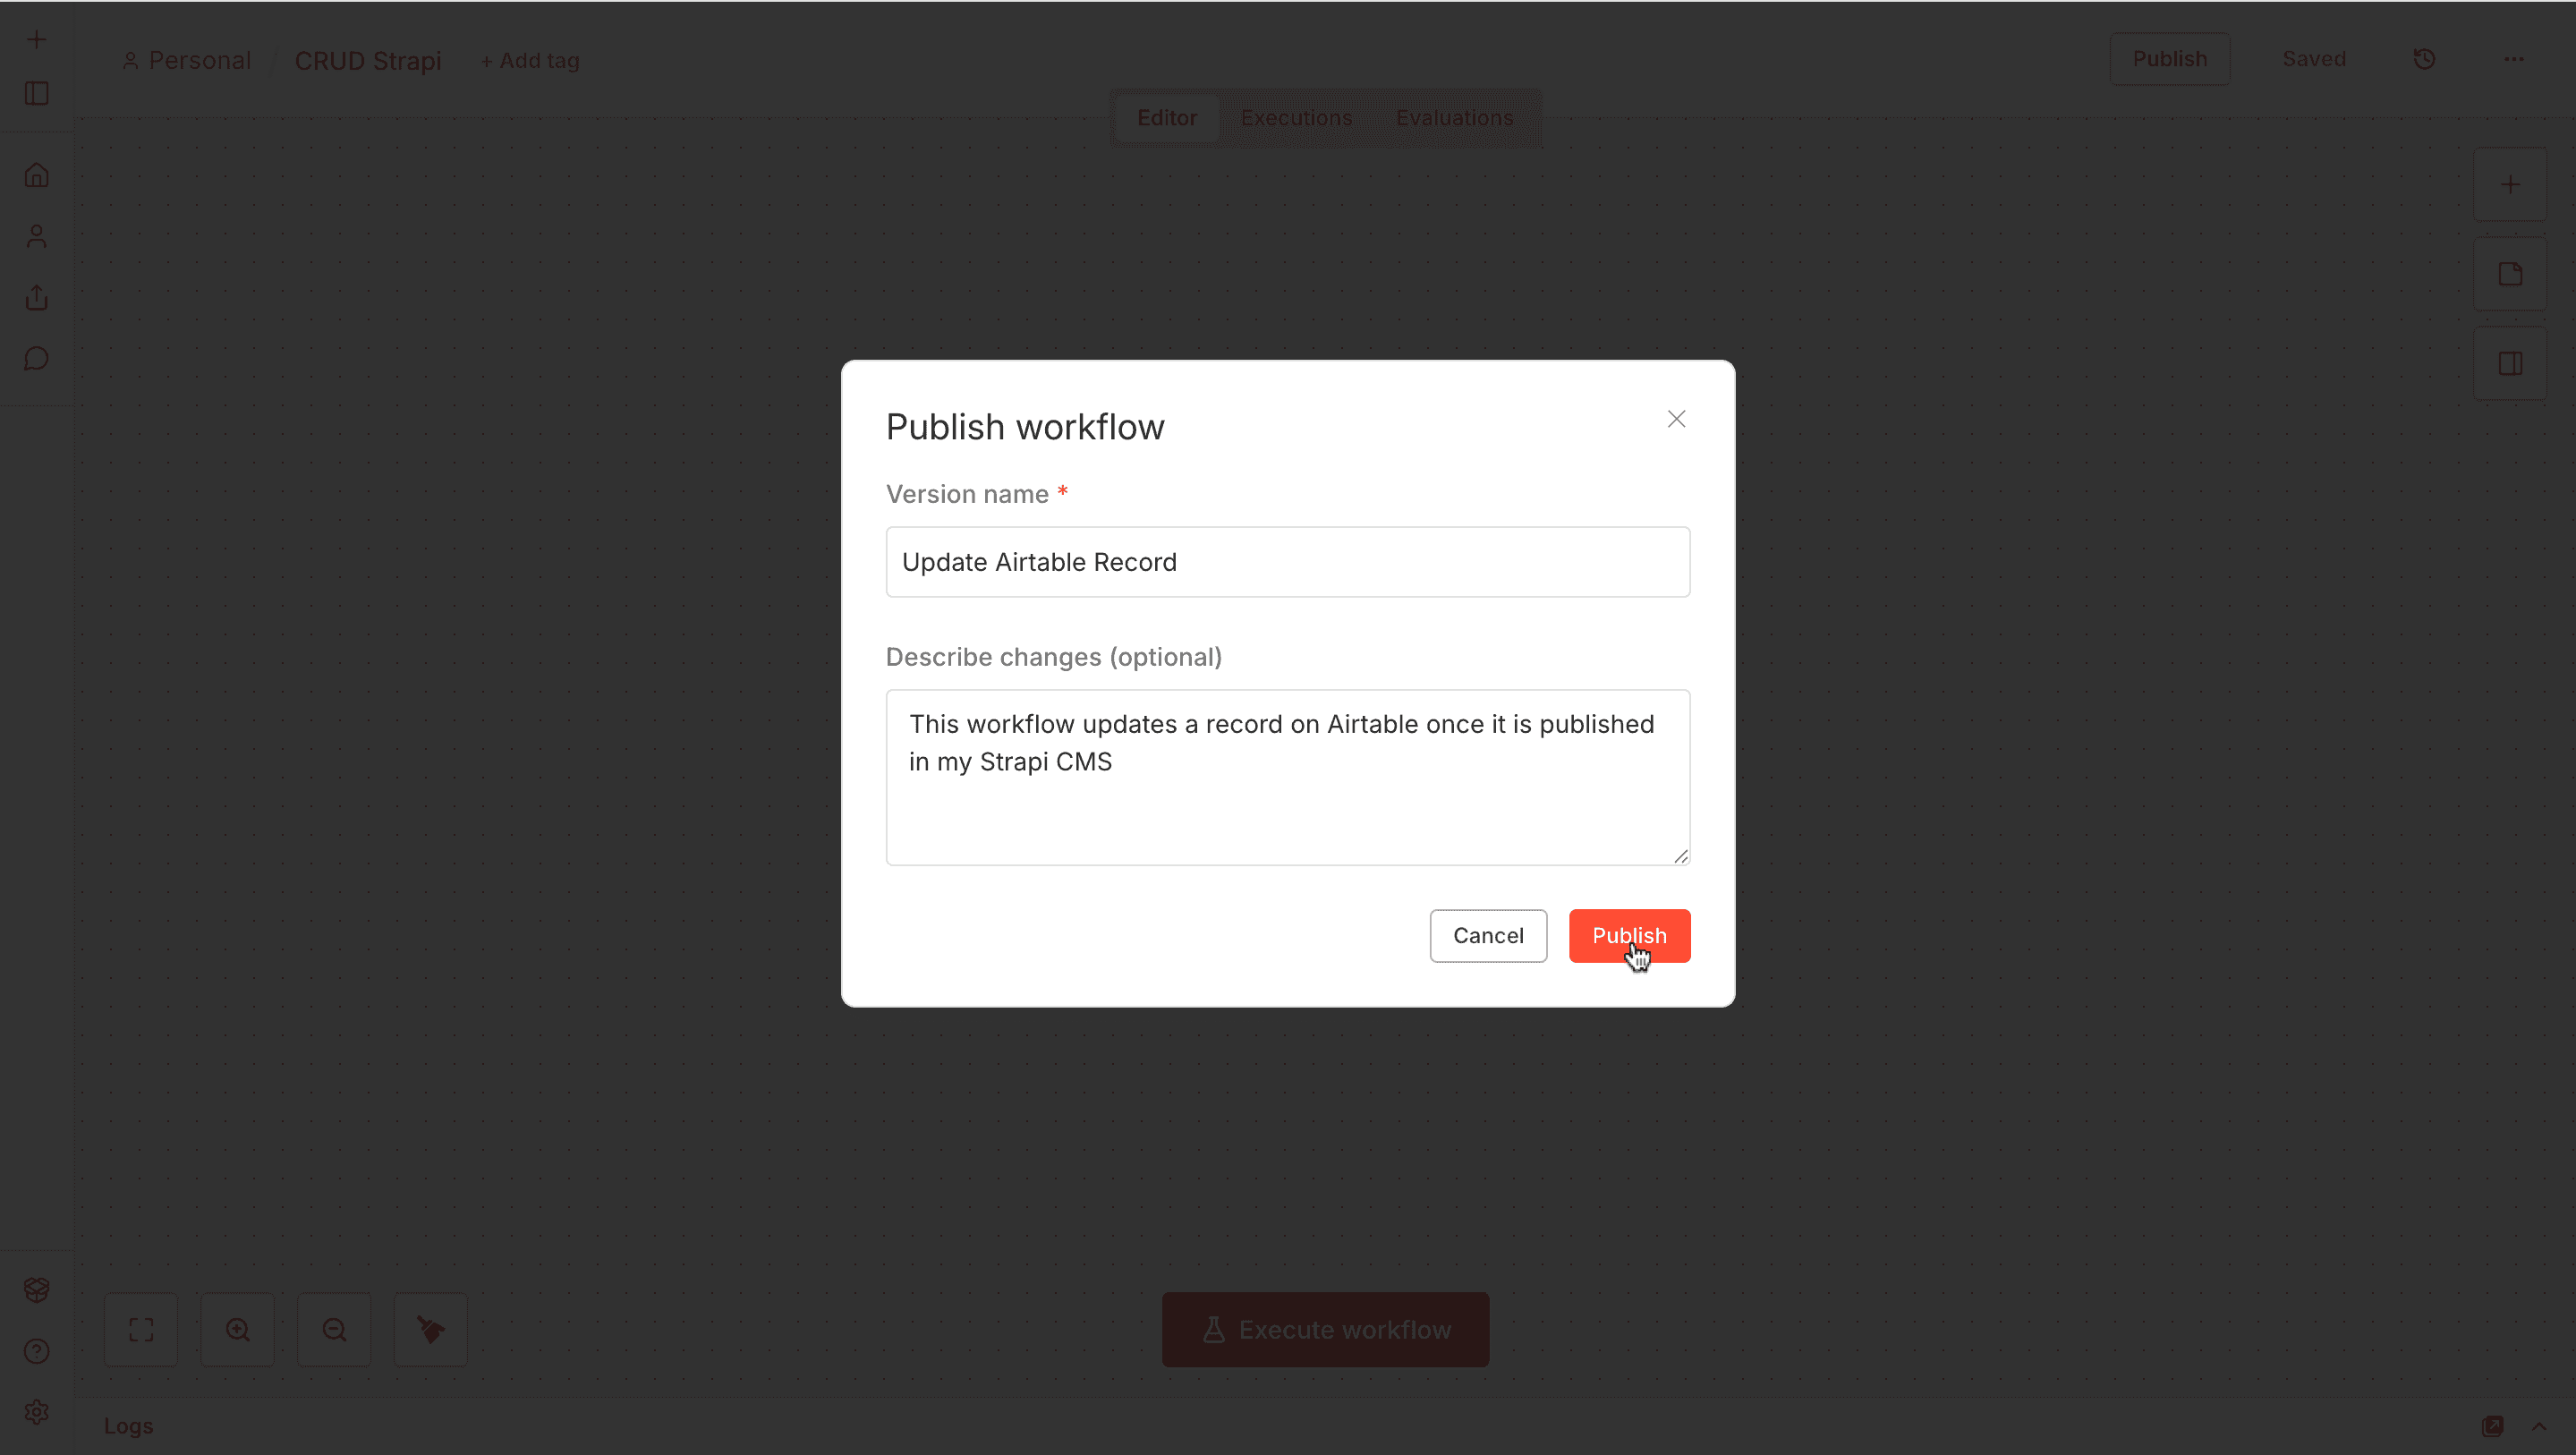
If successful, you can make calls to your workflow URL
Logic & Orchestration with n8n and Strapi
Once n8n captures a Strapi event and connects to your content, the next question is: What should happen, and under what conditions?
That’s where n8n’s logic layer comes in.
Using visual nodes like If, Switch, Set, Function, and loops, you can build dynamic workflows that make decisions, transform data, and coordinate actions across tools while staying low-code.
| Node | Purpose |
|---|---|
| IF | Run branches based on conditions (e.g. “Is status = published?”) |
| Switch | Multi-condition branching (e.g. content type = blog / podcast / product) |
| Set | Add or reshape fields before passing data forward |
| Function | Write custom JavaScript to transform or validate input |
| Merge | Combine data from two branches |
| Wait / Delay | Pause workflows based on timing or approval logic |
Example Scenarios
- Approve Before Publishing Catch a create event → send to Slack for approval → only publish if approved.
- Dynamic Content Routing If type = product, send to the inventory system. If type = blog, post to Twitter.
- Auto-Summarize Long Content On update, send content to OpenAI → get summary → update summary field in Strapi.
- Role-Based Logic If updated_by.role = 'Editor', trigger QA flow. If Admin, skip.
Strapi and n8n Templates and examples
If you want to dig deeper, here are some templates to start with:
- Enrich FAQ sections on your website pages at scale with AI
- Create, update, and get an entry in Strapi
- Automate testimonials in Strapi with n8n
Video Resource
Automate Your Content Workflow with n8n, Strapi, and Claude AI (Airtable + Slack)
Strapi Open Office Hours
If you have any questions about Strapi 5 or just would like to stop by and say hi, you can join us at Strapi's Discord Open Office Hours Monday through Friday at 12:30 pm - 1:30 pm CST: Strapi Discord Open Office Hours
For more details, visit the Strapi documentation and n8n documentation.
Frequently Asked Questions
The dedicated Strapi node simplifies standard CRUD operations with automatic authentication and payload wrapping. The HTTP Request node provides complete flexibility for custom endpoints, complex GraphQL queries, and media uploads with relationship linking. Most workflows use Strapi nodes for content operations and HTTP Request nodes for specialized cases.
Strapi v4+ requires wrapping POST and PUT request payloads in a data object. When using the dedicated Strapi node with Create Entry or Update Entry operations, the node handles this wrapper automatically. HTTP Request nodes require manual wrapping. Missing field names, invalid field types, or incorrect content type names also cause 400 errors.
Configure Strapi webhooks with retry logic and implement error queuing in your architecture. Set n8n webhooks to respond "Immediately" to acknowledge receipt before processing. For critical workflows, consider adding a message queue between Strapi and n8n to buffer events during downtime.
Yes, through HTTP Request nodes. GraphQL lets you fetch nested relationships in a single query, reducing API calls. The dedicated Strapi node only supports REST, so you'll need HTTP Request nodes with manual authentication. POST to https://your-strapi-instance.com/graphql with query and variables in the body.
Enable "Continue on Fail" on HTTP Request nodes. Add IF nodes checking HTTP status codes with separate branches for success and failure paths. Configure Webhook nodes to respond "Immediately" for long-running workflows. Log error details using Set nodes, then send to notification channels. Check execution logs in n8n's UI for detailed request/response data.